How to Create Personalized Cart Abandonment with Event Triggered Journeys + SendGrid

Track user shopping carts in real time and instantly respond to changes with highly personalized messages that re-engage customers and reduce friction. Ensure a seamless shopping experience by automatically sending timely, relevant cart abandonment emails through Twilio SendGrid—powered by event-driven Journeys in Twilio Segment. Recover lost revenue by delivering tailored content that inspires shoppers to return and complete their purchase. Bring customers back with compelling details that make all the difference!

Segment Made by Segment

What do you need?

  • Twilio Segment Journeys & Twilio SendGrid

  • Segment Sournce & SendGrid Destination

  • Custom “Cart Abandoned” event tracking

  • User profile traits (e.g., email, name)

  • Cart context (item name, image URL, price, cart total, etc.)

  • SendGrid API key & dynamic email template

Easily personalize customer experiences with first-party data

With a huge integration catalog and plenty of no-code features, Segment provides easy-to-maintain capability to your teams with minimal engineering effort. Great data doesn't have to be hard work!

On this page

1. Select Triggering Event for your Cart Abandonment Campaign

What & Why: 

You need to designate an event that kicks off the campaign. It can be any event that the user defines as their conversion event in the abandonment scenario. For this Abandon Cart scenario, that conversion event would typically be a placed order event. Capture the full details of the shopper’s cart (like product names, images, and prices) when they leave items behind. Granular context creates a more relevant and persuasive abandonment email, making shoppers more likely to return and convert. 

How:

Implement a Product Added event on your product pages using Segment. Be sure to include the cart contents, user information, and any other relevant details in your event payload.

JavaScript code example to track added product details in an analytics tool

Include every property you want to show in the email—such as item images, quantities, and the shopper's name.

2. Create an Event Triggered Journey for your Cart Abandonment campaign in Twilio Engage

What & Why: 

Journeys enable timely, automated communication directly tied to real user actions. By using event triggers, you ensure that each email responds to an actual cart abandonment—a much more powerful nudge than generic batch sends.

How:

  • Go to Engage > Journeys and click Create Journey.

  • Set the Entry Trigger: Choose “Event Trigger” and select the Product Added event.

  • (Optional) Add Audience Filters: For example, you might only target carts above $50 or registered users.

  • Add the SendGrid Action: Drag in a Send Email action and pick SendGrid as the provider.

Filters let you get more targeted—sending different messages to VIPs, high cart values, or repeat abandoners.

Flowchart showing steps from viewing a cart to completing an order, including hold duration and sending email.
Interface for selecting a destination for an activation, with options like Braze, Twilio, SendGrid, and Webhook.
SendGrid activation setup for sending cart abandonment emails in a destination step
Screenshot of Segment platform's activation step to select destination action, highlighting SendGrid integration.

What & Why: 

Setting up SendGrid as a destination in Segment ensures your user and cart data can be sent in real time, powering automated, event-based email campaigns.

How:

Screenshot of an interface for configuring an activation event in a software application

Note: I'm selecting the SendGrid Dynamic template (Dependency)  then applying mapping.

Double-check that every cart abandonment event includes an email—no email means no message delivered!

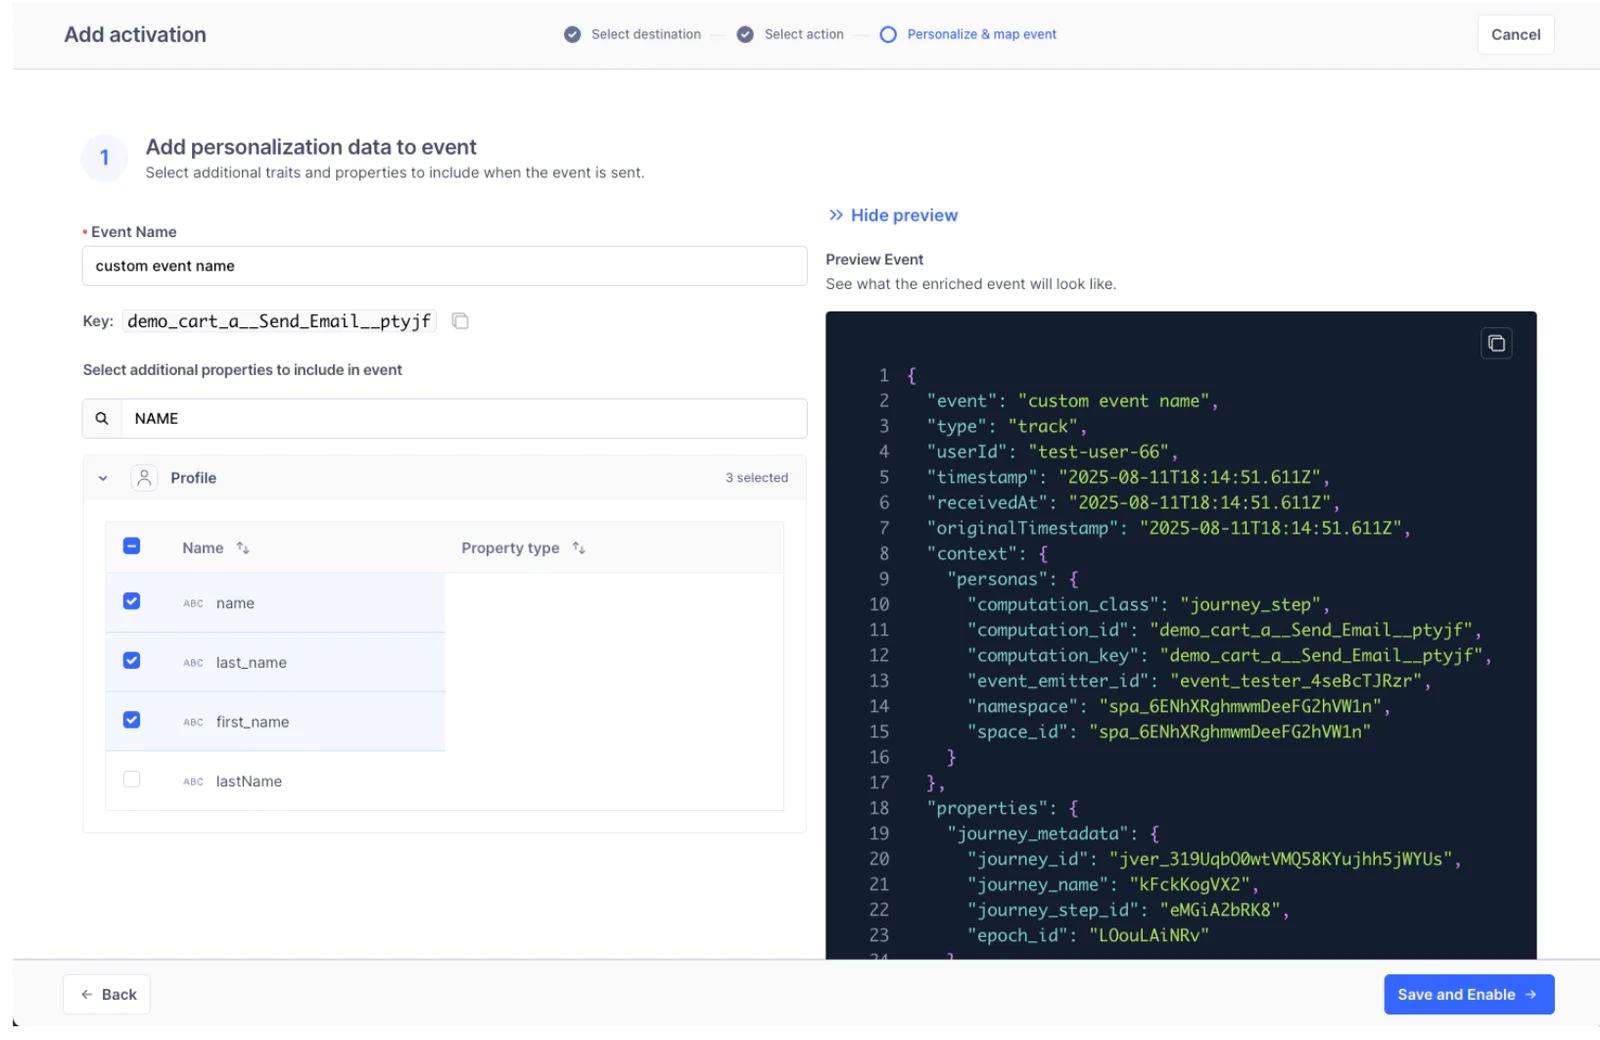
4. Pass Contextual Event Data to SendGrid for Personalization

What & Why: 

Sending full event and profile data allows for dynamic, hyper-personalized emails. Display exactly what the user left behind, including product names, images, and prices—making the message both actionable and relevant.

How: 

  • Personalize your payload within the Activation screen—goal is to enrich payload and map contextual data downstream (to SendGrid).

  • Customize the event name (note the Key that is unique to the Destination step

  • Enrich payload (currently only with profile traits).

  • Mapping (determine which payload parameters will populate which destination fields.

  • Send Test events.

User interface for adding personalization data with code view on the right side and options to add fields on the left.

5. Design Your SendGrid Dynamic Template

What & Why:

Dynamic templates let you use a single email design for every recipient while customizing it with each shopper’s details. This keeps your workflow efficient while maximizing personalization.

How:

  • In your SendGrid account, go to Dynamic Templates (Docs).

  • Build your template and insert variables for all the event data you want to use (e.g., {{name}}, {{cart_total}}, {{image_url}} etc.).

  • Reference your template ID in the Segment SendGrid action, ensuring fields in your event payload match those in the template.

Segment automatically includes event and profile properties when sending data to SendGrid. Reference these with Handlebars syntax in your dynamic template:

HTML code for sending an email reminder about items left in a shopper's cart with a link to return to the cart.

Test your template with different numbers of cart items, images, and cart totals to ensure a robust experience.

You can also create urgency (“Still interested?”) or target incentives to big cart values using event data.

6. Test the Experience

What & Why: 

Testing ensures your emails are sending at the right time, reaching the right users, and displaying all dynamic content as intended—before customers ever see them.

How:

  • Use the Segment Event Tester or simulate a cart abandonment on your site.

  • Preview the email in SendGrid to verify all dynamic fields, including product images, prices, and links.

  • Send a test to your own or a colleague’s email to check for formatting, broken links, or missing content.

Validate with various scenarios—multiple items, missing data, large vs. small carts—to cover all edge cases.

7. Monitor, Analyze, and Improve

What & Why: 

Ongoing analysis helps you boost cart recovery rates, refine content, and identify technical issues—turning valuable insights into higher conversion and more revenue.

How:

  • Track journey stats in Segment: entry rates, delivery successes, and flow drop-offs.

  • Review open rates and clicks in SendGrid reporting.

  • Experiment with A/B tests on email subject lines, timing after abandonment, or personalized discounts.

Use A/B testing to identify what messaging or timing yields the highest recovered sales.

Result

Your shoppers get a personalized, visually engaging nudge showing them exactly what’s waiting in their cart, making it easy—and enticing—to return and complete the purchase. Enjoy increased conversion and fewer lost carts!

References

Ready to win back shoppers? Start using event-triggered cart abandonment journeys with Segment and SendGrid today!

Getting started is easy

Start connecting your data with Segment.