Enhancing your customer profiles with Shopify or Amazon order data using Alloy

Until now, there were no no-code tools to bring customer e-commerce data into one place. In this recipe, we will leverage the new Alloy Flow source to send e-commerce events from popular selling platforms to Segment, then on to Segment destinations, all without code.

Greg Yeutter Made by Greg Yeutter
Alloy Made by Alloy

What do you need?

  • Alloy

Easily personalize customer experiences with first-party data

With a huge integration catalog and plenty of no-code features, Segment provides easy-to-maintain capability to your teams with minimal engineering effort. Great data doesn't have to be hard work!

On this page

The Problem: Siloed E-Commerce Data

E-commerce sellers are constantly searching for ways to improve customer engagement. Typically, they wish to better understand user activity across channels than target specific customer segments through paid and owned channels.

This is a hard problem to solve, because customer profile data is generally scattered across different e-commerce apps or CRMs. These customer information silos make it difficult to identify the ideal audiences for effective engagement. 

Hiring a developer to bring this data together was time-consuming and expensive, and it could not always meet the intended needs. But by pairing Alloy Flow with Segment, sellers can finally pipe data to hundreds of Destinations, all without involving a developer.

The Solution: Alloy Automation + Segment CDP

With Segment Connections and the new Alloy Flow source, eCommerce brands can unify data across tools without extensive development effort. 

Alloy Flow allows e-commerce merchants to quickly set up an automation process to send order events to Segment from multiple sales channels. eCommerce sellers can then syndicate data from Alloy to hundreds of destinations in the Segment catalog.

gy1

In this guide, we’ll walk you through getting data flowing between Alloy and Segment, configuring an eCommerce data source, such as Amazon Seller Central or BigCommerce, and sending data to destinations for analytics, customer service, and more.

Configuring a Segment Source

If you haven’t already, create a Segment account and workspace, or log in to your existing workspace.

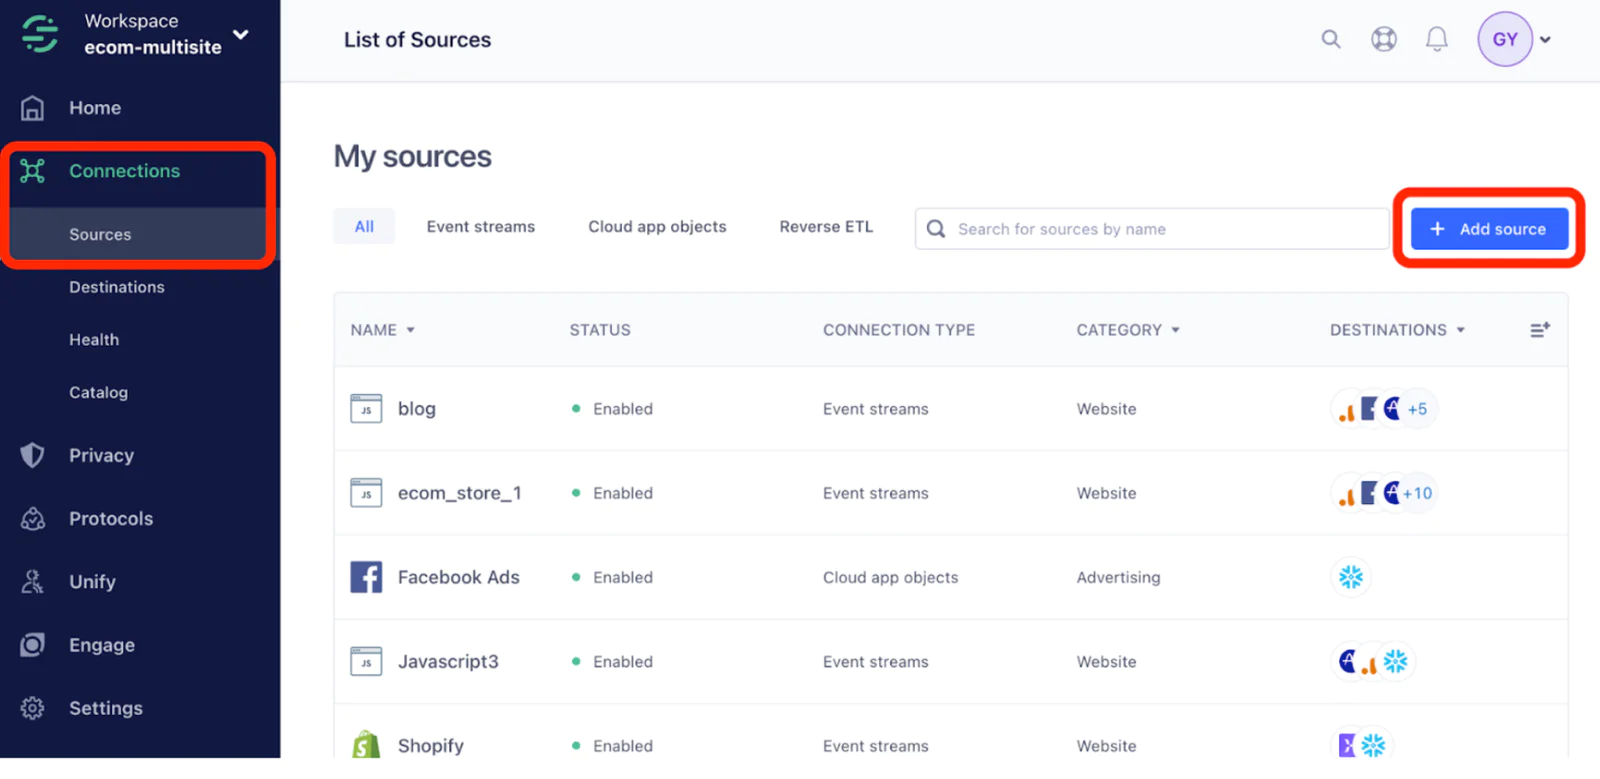
On the left sidebar, click Connections then Sources. Click Add source on the top right.

gy2

Use the Filter box to search for “HTTP,” then click the HTTP API result.

gy3

Click Add Source at the top right.

gy4

Give the source a name, such as Alloy Automation or Alloy Automation Amazon. Then click Add Source.

gy5

You’ve successfully set up your Segment HTTP API Source. Before moving on, copy the write key, as Alloy Automation will require it for configuration.

gy6

Configuring Alloy

Create a workflow for Amazon orders / Shopify orders

To create a workflow tailored for Amazon or Shopify orders, you'll begin by establishing a new workflow within Alloy. This will allow you to synchronize order events directly to Segment seamlessly.

Start the process by selecting the source trigger from available options, which could be either Amazon Seller Central or Shopify, depending on your platform. Once you've picked the appropriate trigger, the next step is to integrate with Segment. 

To do this, choose the Segment block within the workflow and specifically select the "Identify a User" action. You will be required to populate the various fields. Fortunately, Alloy provides dynamic variables directly from the source trigger and any other previous block, making this process intuitive and efficient.

gy7

After setting up user identification, it's beneficial to also track specific events related to orders. Add another Segment block into your workflow and this time choose the "Track Events" action. As before, you'll need to populate the fields.

gy8

Once all steps are completed and you've verified the data flow, it's crucial to give your workflow a descriptive title for easy identification in the future. After doing so, save the workflow to make it active and ready to process order events.

Testing the Data Flow

Back in Segment, click Connections, then Sources on the left sidebar, then find the HTTP API source you created previously. Click the Debugger Tab.

gy9

Within the debugger tab, you will start to see orders as they come in from your Alloy Automation source. We configured the Alloy source to emit both a track event (to record user activity) and an identify event (to enrich user profiles).

gy10

If you click on a track event, then click the Raw tab, you will see all the details of the order in the properties object. 

gy11

Similarly, clicking an identify call will reveal the traits object, which contains data that would be appended to a Segment Unify user profile.

gy12

If anything relevant is missing from the properties or traits objects, you can make edits to the workflows within Alloy Automation.

Once you have verified that orders are flowing in Segment, the next step is to forward events to some of the hundreds of destinations in the Segment catalog. 

Connecting Segment Destinations

With Segment, you can route data from your Alloy Automation source to more than 400 pre-built destinations. Popular examples for e-commerce companies include analytics tools, CRMs, marketing automation tools, and data warehouses.

In this guide, we’ll demonstrate setting up Mixpanel analytics as a destination, but other destinations require a similar level of effort.

In Segment, select Connections then Destinations in the left sidebar. Click Add destination at the top right.

gy13

Search for Mixpanel in the search bar at the top right, then select Mixpanel under Destinations.

gy14

Click Add destination at the top right.

gy15

Select the Alloy Automation source you created earlier, then click Next.

gy16

Give your Destination a name, and keep Actions selected. Click Create destination.

gy17

Now, log into your existing Mixpanel account, or create a new one. Click the gear icon in the top bar, then click Project Settings.

gy18

Scroll down to Access Keys, then copy your Project Token and API Secret.

gy19

In Segment, paste these parameters, then toggle Enable Destination. Click Save Changes.

gy20

Wait for a new order to come in, then check Mixpanel to ensure the order is reflected in analytics.

The Result: Unified E-Commerce Data

In this recipe, we set up Alloy Automation as a source to bring in e-commerce events from popular selling platforms, such as BigCommerce and Amazon Seller Central. By sending the data into Segment, you can leverage the same e-commerce data across hundreds of Segment destinations, including analytics, CRM, marketing, advertising, and data warehouses.

Getting started is easy

Start connecting your data with Segment.