Export and analyze chatbot data for in-depth customer insights

In this recipe, you'll learn how to add a Landbot chatbot to your website and send the collected data directly from the conversation to any of Segment’s hundreds of Destination integrations in real-time.

Landbot Made by Landbot

What do you need?

  • A Segment account with set up event tracking

  • A website already set as a Segment source

  • A Landbot account (you can create one for free)

  • Any Segment Destination (Mixpanel in this recipe)

Export and analyze chatbot data for in-depth customer insights

With a huge integration catalog and plenty of no-code features, Segment provides easy-to-maintain capability to your teams with minimal engineering effort. Great data doesn't have to be hard work!

On this page

Fresh data you can act upon instantly is becoming indispensable to keep up with the challenges and pressures companies face across every stage of the digital customer journey. These “challenges and pressures” all center around the user’s demand for real-time personalization.

Website chatbots have been playing a crucial role in bringing instantaneous interactions (and personalization) to life. 

Since they mimic the widely-embraced messaging experience, bots have the uncanny ability to provide as well as collect information while keeping users at ease. 

However, besides their conversational prowess, chatbots are at their most powerful when integrated with your databases. Any information or behavioral data collected throughout instantaneous conversations can be exported and leveraged for further analysis and personalized interactions. 

This recipe will present a use case of a fictitious travel agency that uses a website chatbot created with Landbot’s no-code chatbot builder to collect user feedback. This travel store is already using Segment to collect data from users and track some critical actions. The data is being sent to Mixpanel in order to analyze how users interact with the website.

All the new data collected by the chatbot will reach Mixpanel as well. It will also provide an opportunity to see which users complete the survey and which do not.

Step 1. Chatbot creation

First of all, we need to access Landbot to create our chatbot. 

Landbot is a no-code tool created for any business seeking to engage with web visitors in real-time through highly interactive chatbots attending to visitors, customers, and leads effectively without necessarily using AI.

You can create an account for free and leverage a 5-day trial period to test all the features. However, if you already have an account in Landbot, you must have a Professional plan in order to use the Segment integration.

There are three ways to go about building a chatbot with Landbot:

  • Do it all from scratch (but still without coding)

  • Use a few pre-made elements (bricks) and do the rest from scratch

  • Pick and customize a pre-designed template

In our case, we are going to use a pre-designed template called "Travel Feedback":

image6

You can preview the flow and try out the end-user experience here: Travel Feedback | Landbot

When you load your chosen template, you’ll see the conversational flow all set up for you. All you have to do is customize the content inside the flow that’s already there.

Let’s do a quick review of what is this template trying to achieve:

  1. It asks about the element to be reviewed (Hotel, Flight, or Destination).

  2. If the user selects “Hotel” or “Flight”, the chatbot asks for the reservation number.

  3. If the user selects “Destination”, the chatbot asks for a destination name.

  4. Then, after several rating questions, the chatbot will ask the user for their email to keep them up to date with promotions and special offers.

Step 2. Adding the chatbot to the website

Once we have the chatbot created in our Landbot account, we have to add it to the website using an HTML snippet for that purpose. All we have to do is navigate to the “Share” section in the chatbot builder and copy the code snippet:

Untitled (6)

There you can see that Landbot offers four ways to embed the web chatbot:

Untitled (1)

We will use the Popup mode to display a modal covering most of the visible screen with the chatbot. 

By default, this option launches the bot automatically from the widget bubble.

You can try the HTML snippet as it is. However, we needed to make some changes to integrate Segment in the chatbot successfully.

First of all, the Landbot instance receives a User Identifier from the Segment JavaScript library. To do that, the Landbot instance must be created right after the Segment library is initialized. Plus, we are also going to track the event when the Landbot popup is opened.

Here is the Landbot snippet updated with code to accommodate the actions mentioned above. (Keep in mind that we must place the Landbot snippet after the Segment snippet):

<!-- Landbot snippet -->
<script>
(function () {
  function loadLandbot() {
    analytics.ready(function() {
      window.myLandbotPopup = new window.Landbot.Popup({
        "configUrl": "<https://chats.landbot.io/v3/**YOUR-LANDBOT-KEY**/index.json>",
        "customData": {
          "analytics_user_id": analytics.user().id() || analytics.user().anonymousId(),
          // Here, you can send more variables to the chatbot
        }
      });
      // Track event when the popup is open
      window.myLandbotPopup.core.events.on('init', () => {
        analytics.track('Open Landbot Popup');
      });
    });
  }
  if (window.Landbot && typeof window.Landbot.Popup === "function") {
    loadLandbot();
  } else {
    function loadScript() {
      var script = document.createElement("script");
      script.type = "text/javascript";
      script.async = true;
      script.src = "<https://static.landbot.io/landbot-3/landbot-3.0.0.js>";
      script.onload = loadLandbot;
      var reference = document.getElementsByTagName("script")[0];
      reference.parentNode.insertBefore(script, reference);
    }
    if (window.attachEvent) {
      window.attachEvent("onload", loadScript);
    } else {
      window.addEventListener("load", loadScript, false);
    }
  }
})();
</script>

So let's add the HTML snippet to our testing website and then see how it works. 

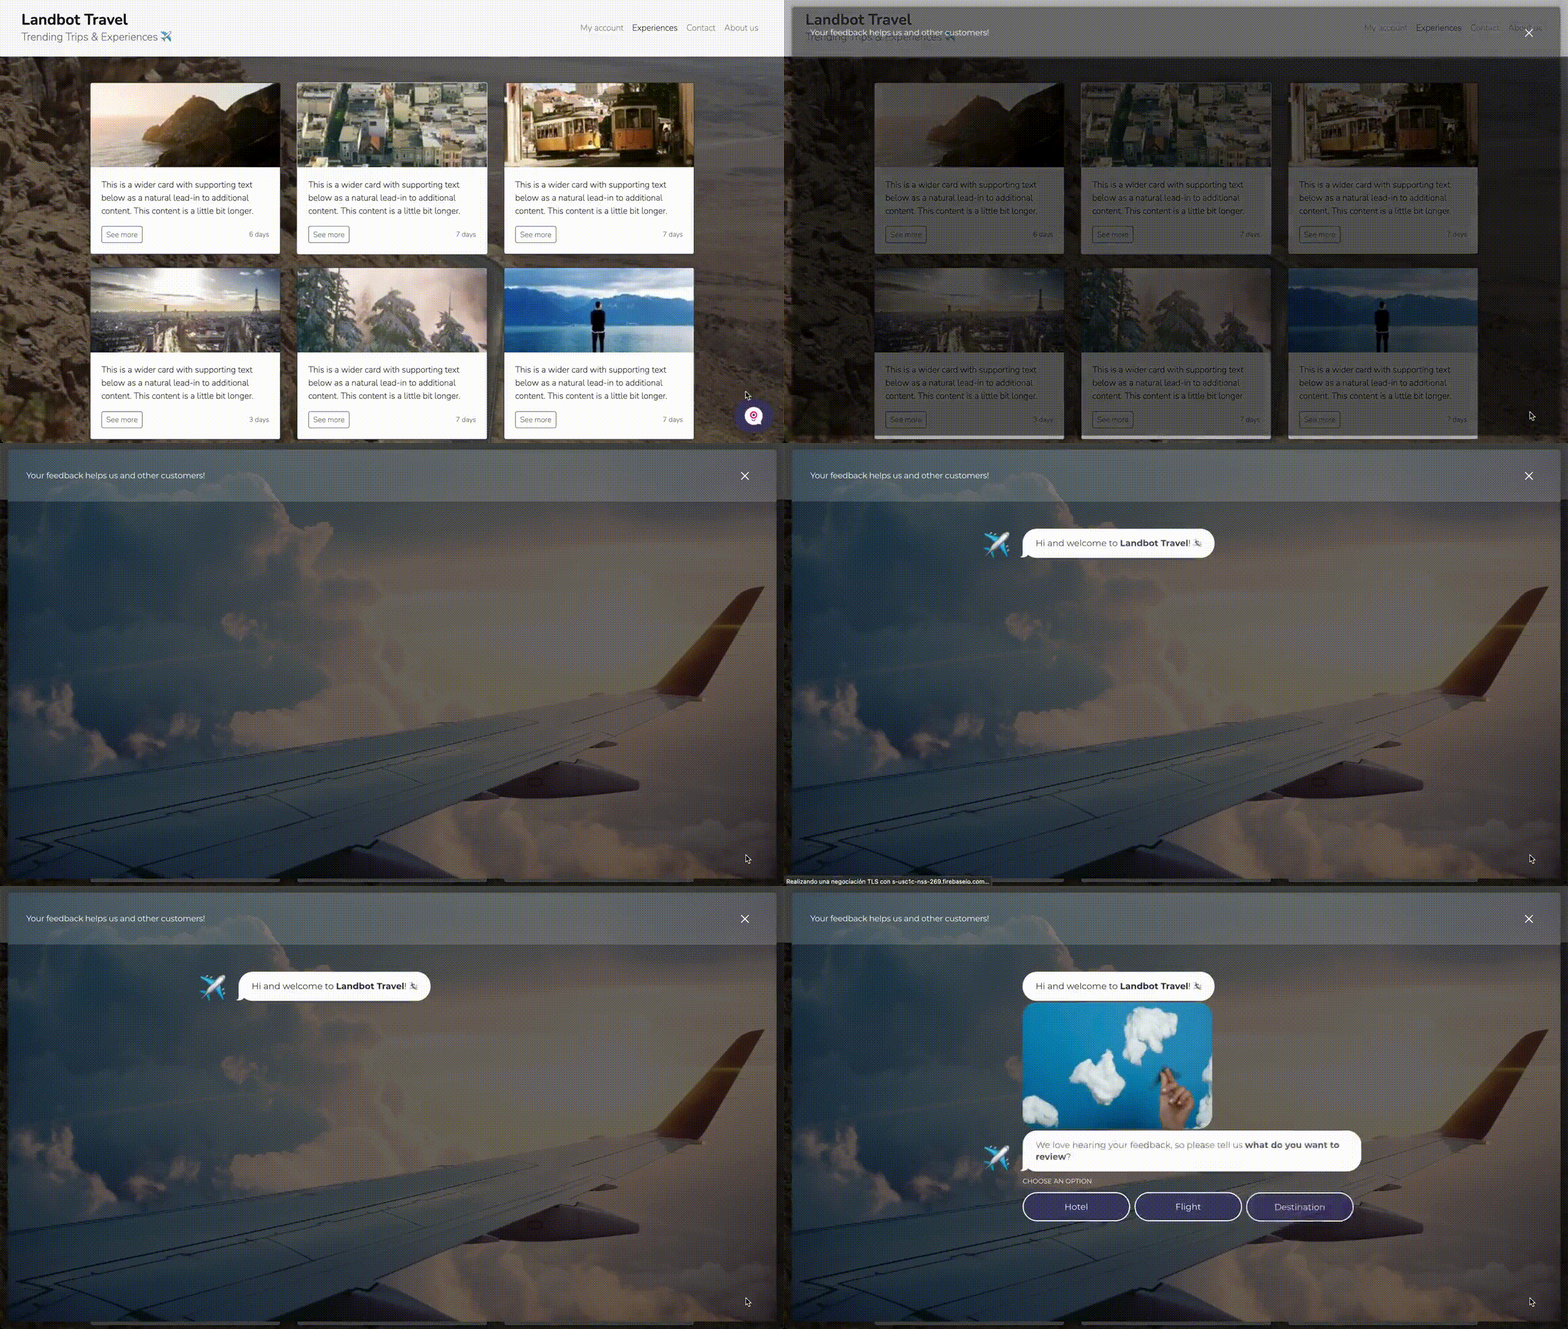
Once the widget is loaded, we can see that clicking on it makes the chatbot pop up, covering most of the page.

01.Bot Popup Embed (1)

Step 3. Create a new Segment Source

Landbot offers an integration that allows us to send data to Segment as an HTTP API Source.

Create the source by clicking on the HTTP API source type in Segment. 

image3

Name your source.

image7

And lastly, copy the generated  Write Key to use it later in Landbot. 

image9

Be sure to connect the new source with the destinations!

Step 4. Connecting the chatbot with Segment

Now let's connect the chatbot we just created with our Segment account. 

Landbot offers a Segment integration (Beta) that allows us to use both the “Identify” and “Track” calls.

As recommended by Segment documentation, we will use the Identify call when the user updates their info - in our case, when they give us their email.

In addition, we'll use the Track call to record some actions the users perform within the conversation. For instance, we want to track when the user finishes giving the feedback.

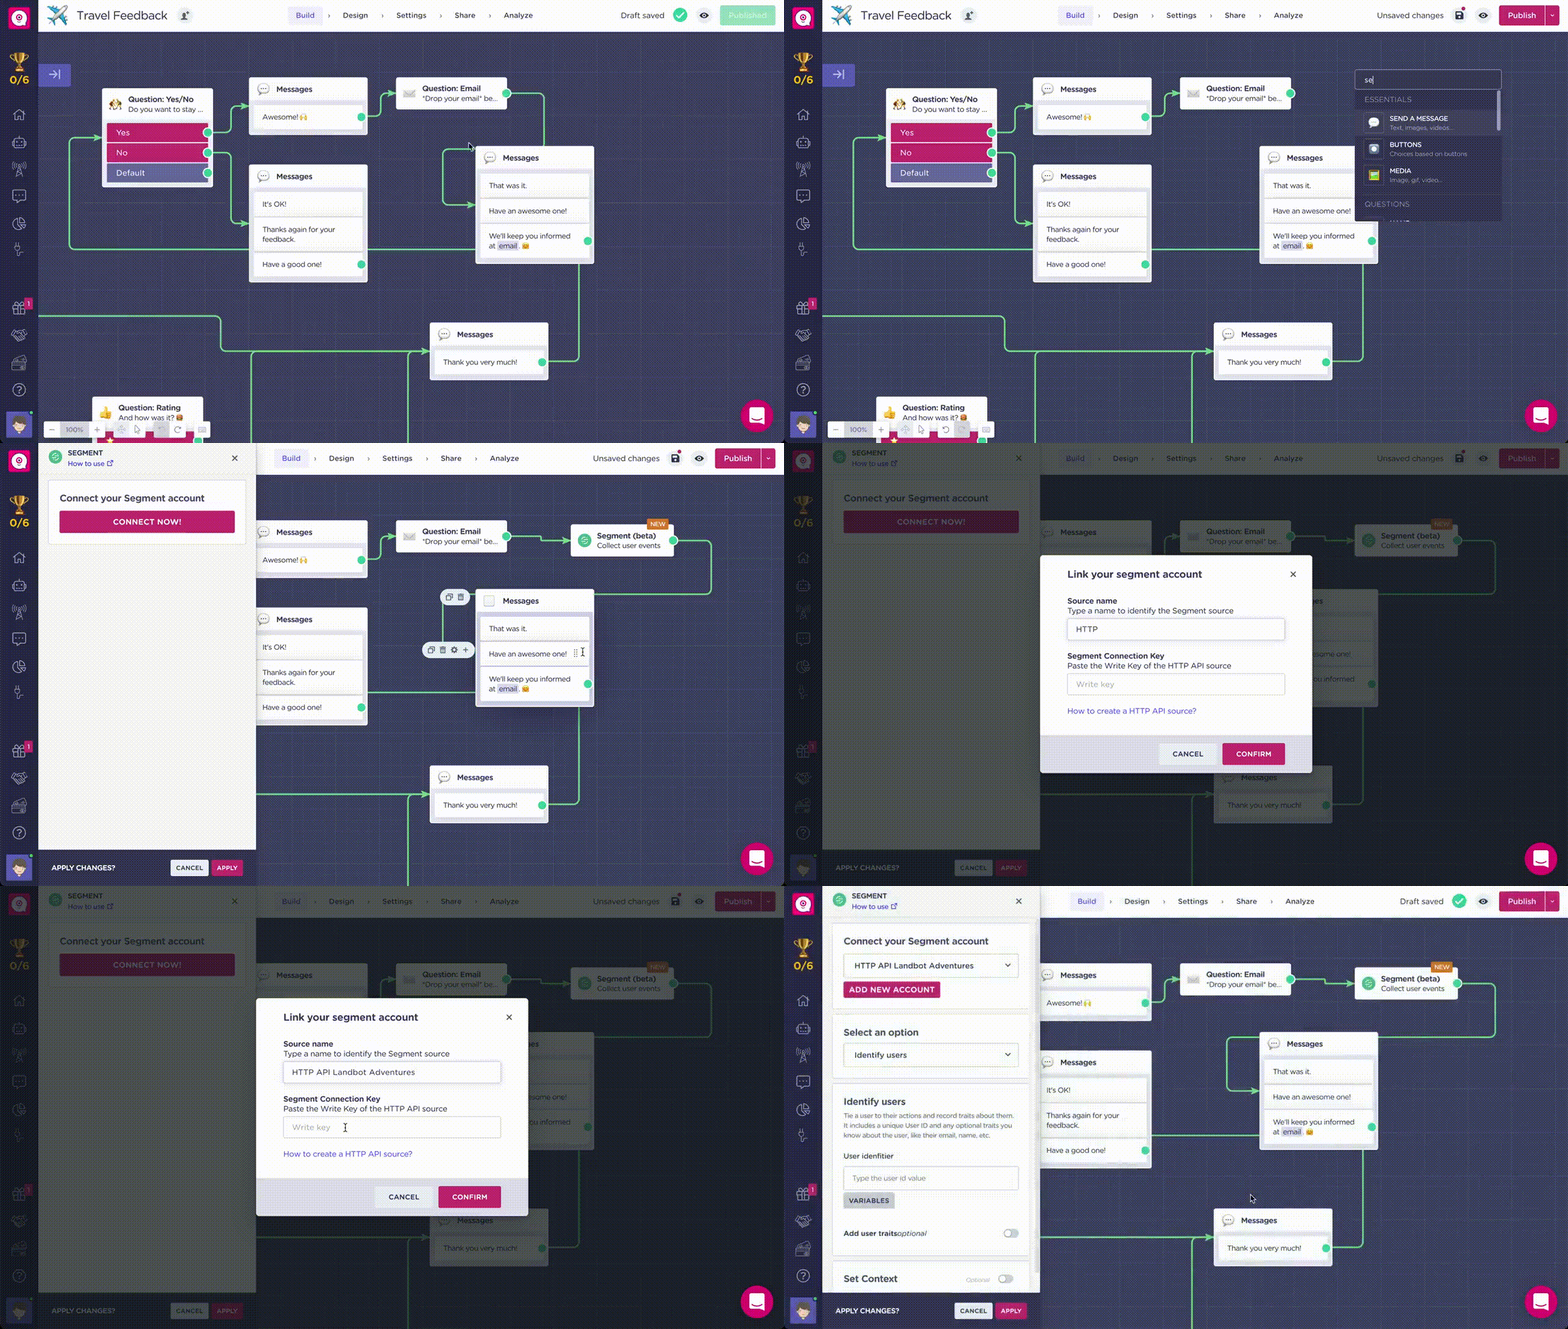
Start by adding the Identify call right after the user provides their email address. If it's the first time you're using Segment in your Landbot account, you must first link your Segment account to activate the integration. All you have to do is paste the Write Key copied in the previous step

02. Integrate Segment in Landbot

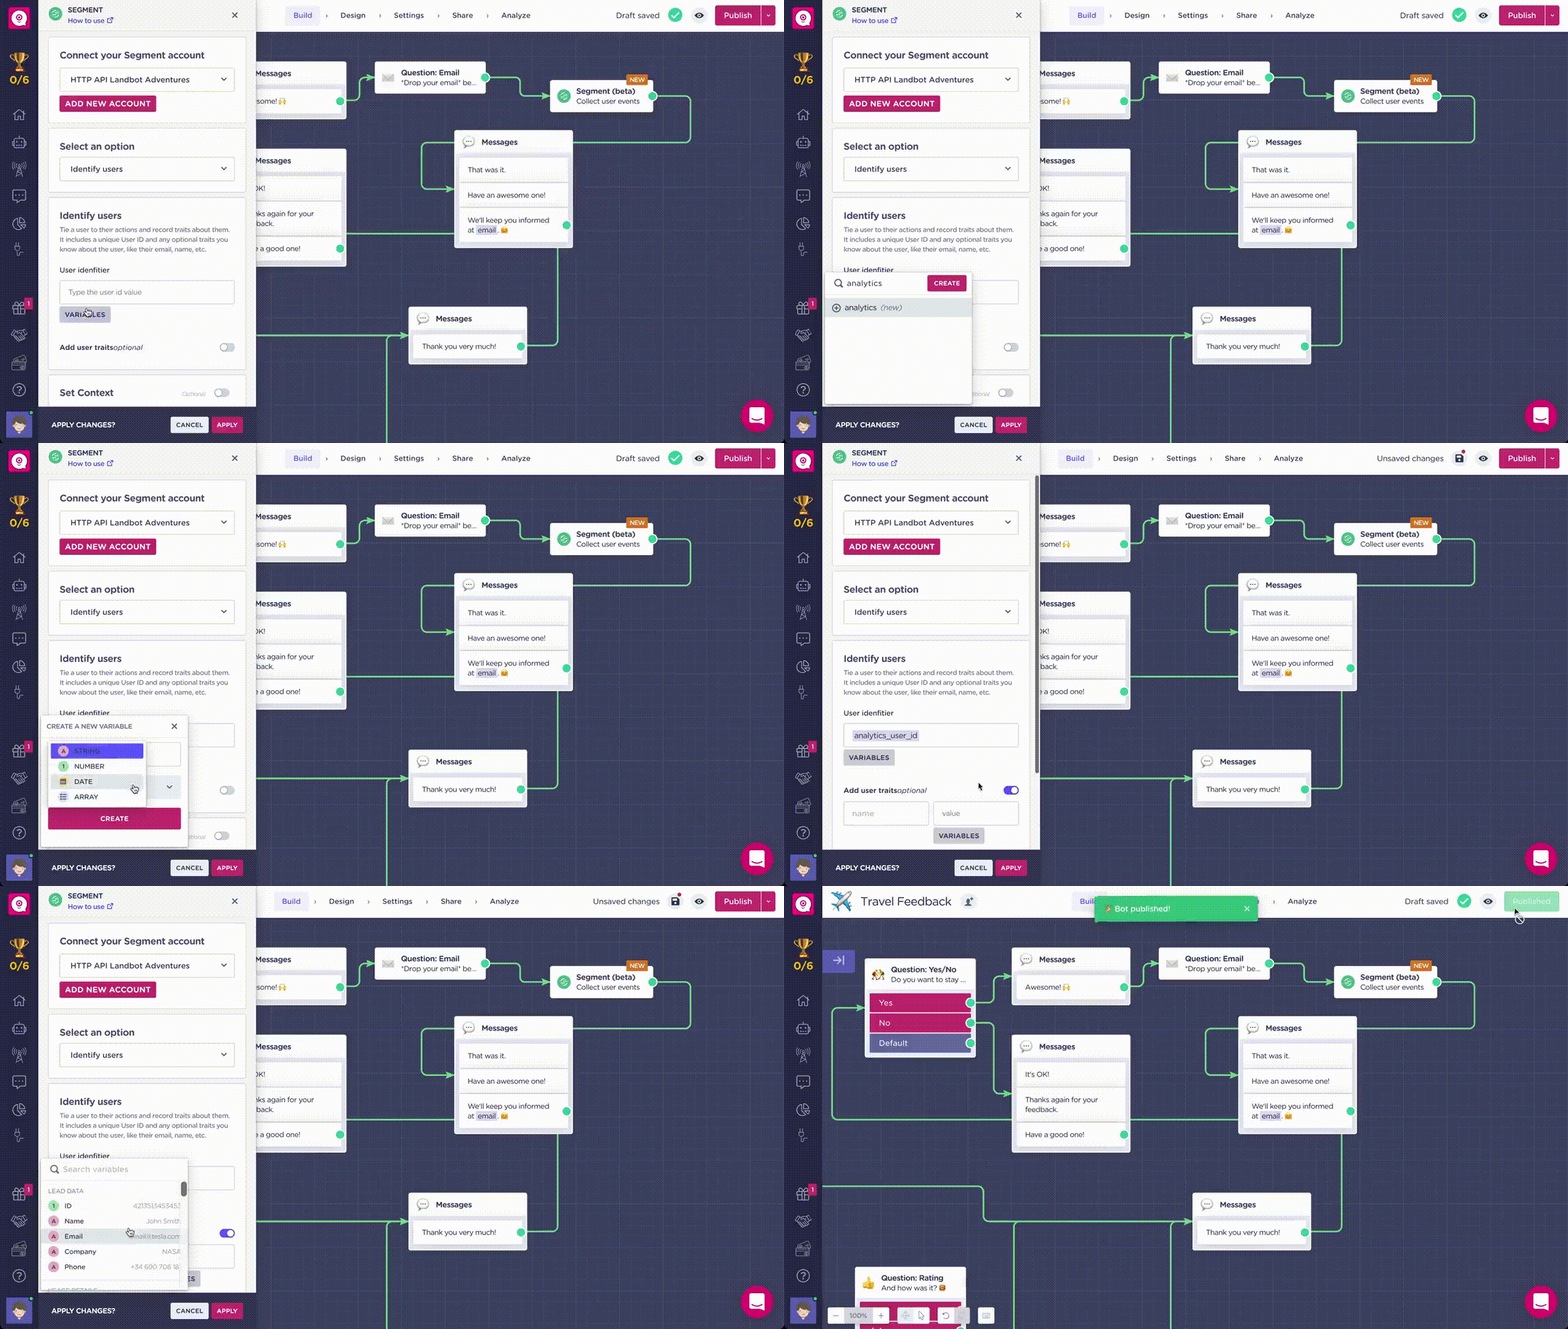
Right after your Segment key is linked, you can set up the Identify call. 

The Identify call requires a User Identifier to keep the user profile linked between different sources.

To get this User Identifier, we used a Landbot feature that allows us to receive the value from the website. 

Create the variable @analytics_user_id and set up the Traits in order to send the user email to Segment:

03. Indentify

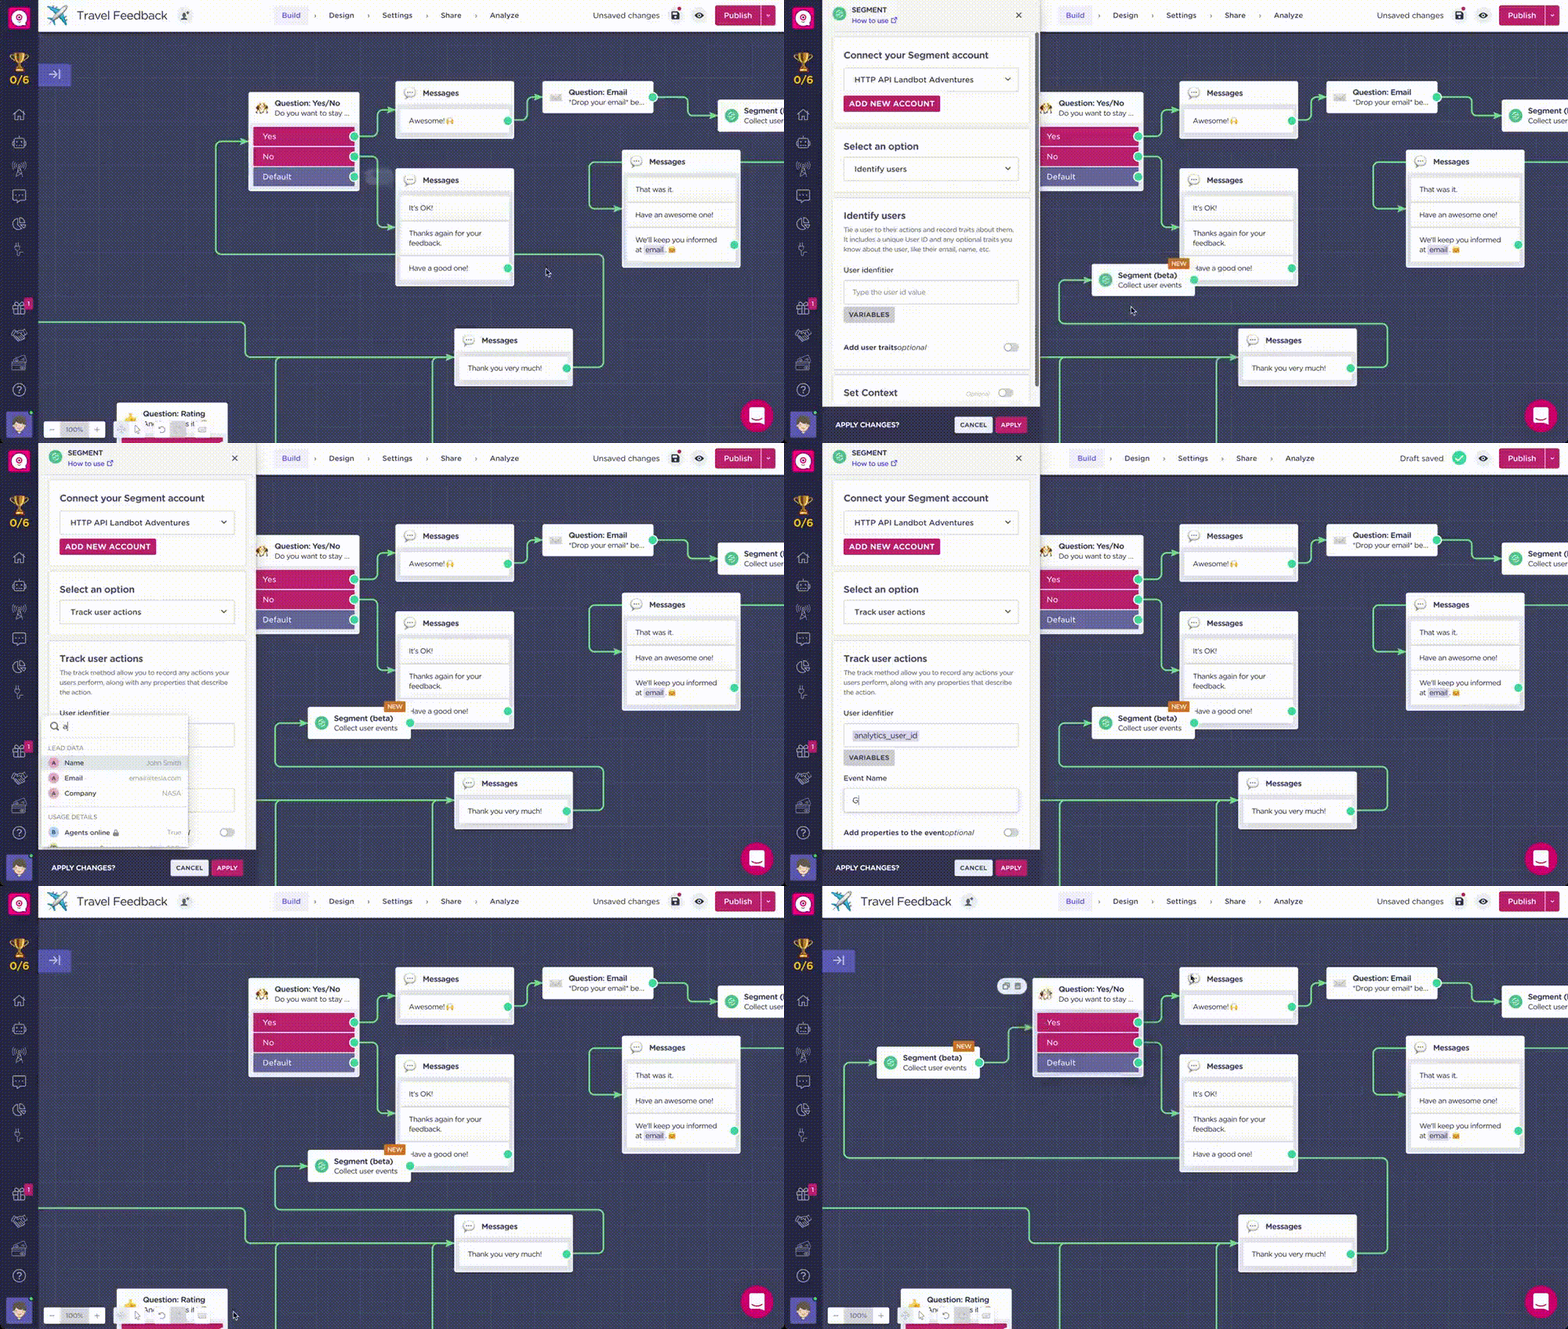
Finally, add the Track call to the chatbot flow right after the feedback has been given:

04. Add Tracking Segment Integration

Step 5. Analyze the results in Mixpanel

Now is the time to test! 

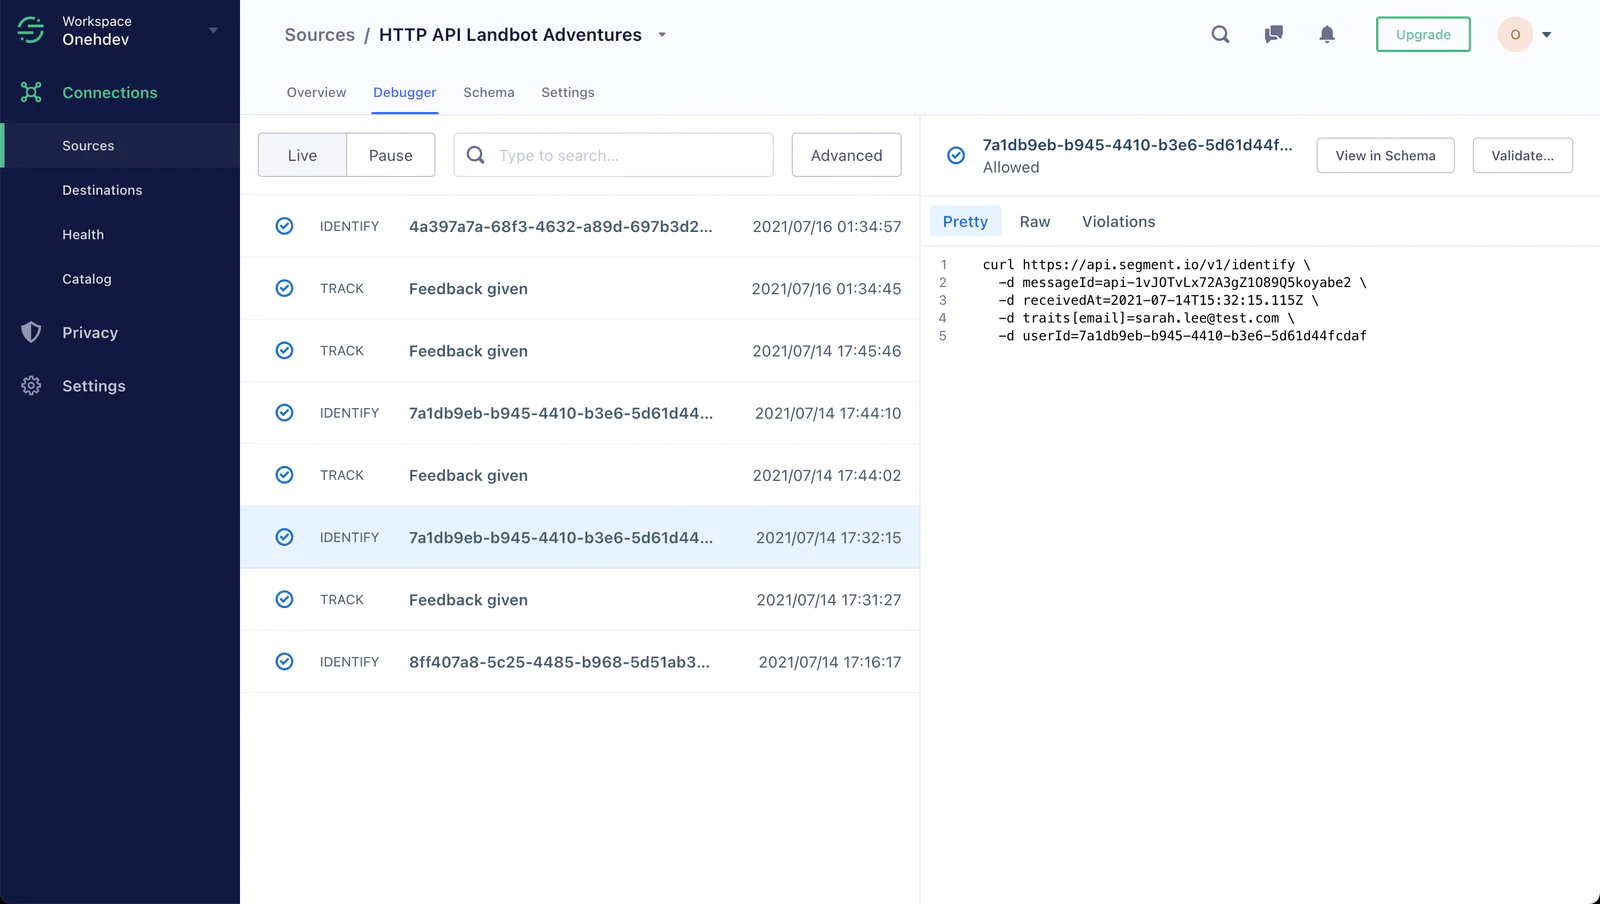
Open the website in several private browser windows to generate some testing profiles. If everything is working well, you should be viewing the Segment calls in the Source debugger:

Untitled (2)

Checking Mixpanel, you can see the events from both sources (webpage & Landbot) are merged in the same user profile. Also, note that the profile’s email is set because it was updated from Landbot using the Identify call.

Untitled (3)

You can also create a funnel and see how many people started the conversation and how many of them finished and gave feedback:

Untitled (4)

Wrapping up…

In this recipe, we learned how to:

  • Create and embed a no-code chatbot on your website

  • Set up Segment integration inside Landbot for both Identify and Track calls

  • Export and analyze data in Mixpanel

Exporting data directly from chatbot will help you gain greater insight into customer behavior on your website, opening doors to new levels of personalization. 

The best part? It can be applied to any use case, extracting and analyzing data from lead generation/scoring bots to FAQ bots. 

Getting started is easy

Start connecting your data with Segment.