Channel Optimization with Predictions

This recipe teaches users how to use Predictions to determine each user's preferred communication channel (email or SMS.) When you use Predictions for channel optimization, you can ensure you reach customers on the best channel for them.

Troy Bolus Made by Troy Bolus

On this page

Today’s customers don’t want to be bombarded by the same message across every channel they interact with your business. Everyone has different preferences in how they would like to be reached. Some like to be reached by emails, others by text, and some have no clear cut preference.

Channel optimization helps you personalize your communication to customers on the channel they’re most likely to engage with, so you can avoid marketing fatigue and boost engagement while providing a better customer experience. 

In this recipe, we will teach you how to use Predictions to determine each user’s preferred communication channel. By using Predictions for channel optimization, you can always reach customers on the best channel for them—keeping subscriber lists healthy, reducing overall spend, and increasing clicks and conversions.

After reading this doc, you should have 3 Audiences:

  • Most likely to convert on Email

  • Most likely to convert on SMS

  • No preference between Email & SMS

Building Channel Optimization

Data Requirements

As with anything machine learning, better data = better results. There are a few key events that you should track in order to do this correctly.

Email

  • Email Sent

  • Email Opened

  • Email Link Clicked

  • Email Unsubscribed

  • Email Marked as Spam

SMS

  • SMS Sent

  • SMS Link Clicked

Ads

  • Ad Viewed

  • Ad Link Clicked

You don’t necessarily need all of these events, but your performance will increase if you track events around customers engaging with your marketing content.

Creating a Prediction

Once your data is tracked and has been ingesting for around 30-45 days (but consider using rETL to backfill more data for more accurate predictions), enter the predictive traits builder. Select a Custom Prediction.

You’ll want to build these 2 traits with your events. Predict over a longer time horizon like 120 days to measure general propensity. However, please note that predicting over 120 days will require more data, so if you just started tracking these events, predict over a shorter time horizon.


image6
image5


Creating Your Audiences

Initial Audience

Once your predictions are computed, the next step is to build an audience for each. To do this, you will need to actually create 2 audiences based on each Predictive Trait. 

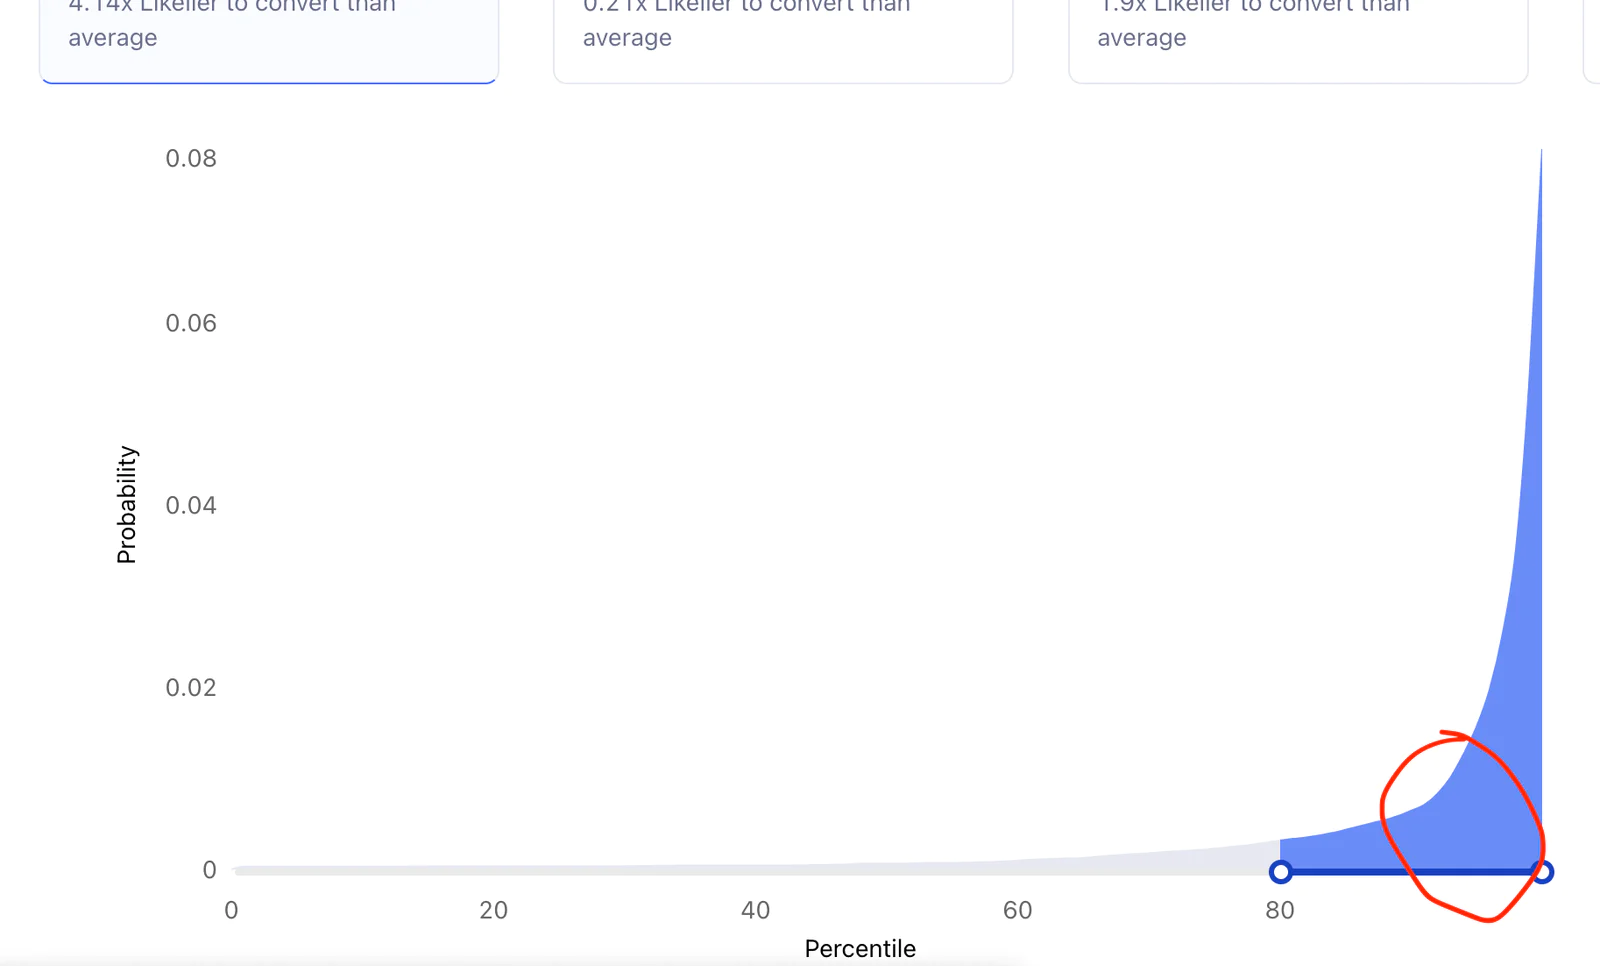
Click into the Predictive Trait, and then into the Prediction Page. Next, look at your histogram. Choose a point where there appears to be a sharp increase in the propensity. This is most likely somewhere in the top 20%.


image2


Do these for both of your Predictive Traits, and give your audience a chance to compute. Now we can move on to building the final optimized audiences.

Name these audiences something like Top 20% prefer Email and Top 20% prefer SMS.

Final Audiences

We will create 3 audiences that will be used in your campaigns. 1 Audience for customers that strictly prefer email, 1 that strictly prefer SMS, and 1 that do not have a strong likelihood to convert in either direction.

To set up these 3 Audiences, let’s first build the Optimal Email Audience. We will select customers in that first top 20% audience that we saved earlier, and exclude all users who are part of the Top 20% SMS audience. This will remove any customers who are duplicated across both audiences and save you money.

The  Audience recipe should look like this. Name this audience something like “Channel Optimization - Email’.


image4


The next Audience recipe should look like this. Name this audience something like “Channel Optimization - SMS. In this example, we are doing the opposite as we did above. We include customers in the top 20% that prefer SMS and excluding customers in the top 20% audience that prefer Email.


image4


The final Audience recipe should look like this. Name this audience something like “Channel Optimization - No Preference. In this example, we only take the overlap of the other audiences we just created. This will ensure that all customers that are most likely to engage will be receive a message on their preferred channel.


image3


Conclusion

And there you have it! You can now set up the method to reach customers in their preferred way.

Getting started is easy

Start connecting your data with Segment.