Engage customers on their preferred communication channels using Segment and Twilio

Today’s consumers want the freedom to communicate with businesses on their preferred communication channels. Here’s how to do it with Segment and Twilio.

Segment Made by Segment

What do you need?

  • Node

  • Npm

  • Segment

  • Twilio

  • Sendgrid

Engage customers on their preferred communication channels using Segment and Twilio

With a huge integration catalog and plenty of no-code features, Segment provides easy-to-maintain capability to your teams with minimal engineering effort. Great data doesn't have to be hard work!

On this page

A version of this recipe first appeared on the Twilio blog.

What if you could automatically discover the channels that customers preferred, and engage with them accordingly? 

It’s actually not a far-fetched possibility. 

With Segment, Sendgrid, and Twilio (Programmable SMSProgrammable Voice), you can measure, and personalize, your users’ preferred channels.

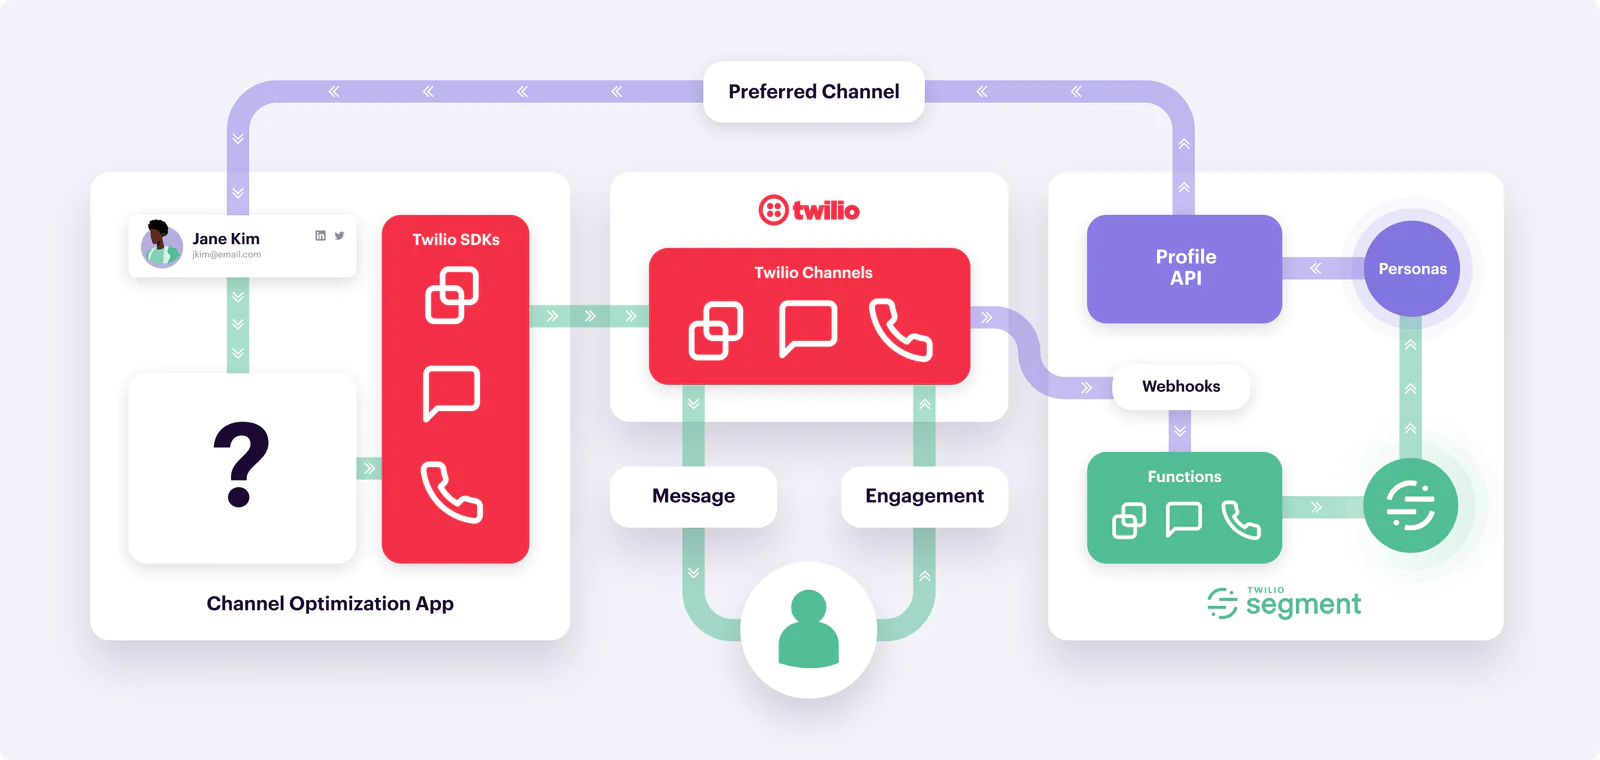
This is how it works: Let’s say your an e-commerce brand that works across channels – email for marketing, phone for support, etc. Each of these channels will have a goldmine of data, but it’s often siloed and inaccessible to teams across the businesses.

 The good news is that you can send data from an email tool like SendGrid and/or a voice and SMS tool like Twilio to Segment (e.g. tracking when a user opens a SendGrid email, answers a phone call from Twilio, etc.). 

With this data centralized in Segment, teams can then use the Computed Traits feature to calculate which channel a user engaged with the most – and then set that as their preferred channel. 

That means when sending out future notifications, the user will get their communication to their preferred channel, whether that be text, email, or phone call. 

What follows is a detailed description of how to do it. Good luck!

What you’ll need

Before you get started, you’ll need the following:

  • Node

  • Npm

  • A Sendgrid account – sign up here if you don’t already have one

  • A Twilio account – sign up here if you don’t already have one

  • A Segment account – sign up here if you don’t already have one.

    • You will also need access to Twilio Engage. You’ll need to talk to a sales rep to enables these if you haven’t got them already.


Optimize Comms Blog Image (2)

Set up your Node server

 First, let’s set up the Node server. 

 Create a new directory using the terminal by navigating to where you want your project and using the command mkdir channel-optimization. Then navigate to the root directory and create two files using the command touch index.js .env. Initiate your Node app with the command npm init. Lastly, install the following libraries using this command: npm install --save express twilio @sendgrid/mail analytics-node dotenv.

Open your channel-optimization folder in your preferred code editor. Open index.js and copy and paste the following code

The code above checks whether there is a “Preferred Channel” set for a user using the Segment Profile API. If there is a channel set, then the notification will be sent on that channel. If not, it will randomly select the channel where a user should receive their notification between SMS, voice call, or email. Additionally, the code will send that notification as an email, SMS, or call using Twilio’s and Sendgrid’s APIs.

Next, open your .env file and copy and paste the following:

PORT=3000
TWILIO_ACCOUNT_SID=
TWILIO_AUTH_TOKEN=
SENDGRID_API_KEY=
SEGMENT_KEY=
PHONE_NUMBER=
EMAIL=
SGEMAIL=
SEGMENT_CALL_SOURCE_FUNCTION_URL=
SEGMENT_PERSONAS_SPACE_ID=
SEGMENT_PROFILE_API_TOKEN=


Retrieve your Twilio Account SID and Auth Token from your Twilio console, and add them as the value to the TWILIO_ACCOUNT_SID and TWILIO_AUTH_TOKEN variables. Do the same for Sendgrid and Segment by adding your Sendgrid API key to the SENDGRID_API_KEY variable and your Segment key to the SEGMENT_KEY variable. To retrieve your Segment write key, create a “Node.js” source in Segment, give it a name such as “Channel Optimization”, and once the channel is created Segment will show you the write key. See Segment’s documentation for more details. For the PHONE_NUMBER and EMAIL variables, put the phone number and email address where you would like to receive the Twilio notifications from this demo.

Note: We recommend using your personal email address and phone number to see it in action. 

Next, add the Sendgrid sender email address to the SGEMAIL variable; this could be your personal email or if you have domain authentication, it could be any of your domain addresses. 

Next, navigate to your Segment dashboard, go to "Profiles", click into “Profile Settings”, and finally into “API Access”. Click “Generate Token” and give it a name such as “Channel Optimization App”.  

Copy the token and paste it into your .env file for the SEGMENT_PROFILE_API_TOKEN variable.

Back in your Segment dashboard under “API Access” for “Profiles”, copy the space ID and paste in your .env file for the SEGMENT_PERSONAS_SPACE_ID variable. See the screenshot below of where to find your Segment space ID.


image2


Leave the SEGMENT_CALL_SOURCE_FUNCTION_URL variable blank, we will come back to it after we set up our Segment workspace.

Set up your Segment workspace

For this next section, you will set up your Segment workspace. First, we will set up three Segment Functions to handle incoming engagement events from Twilio such as responded to SMS and opened email

Navigate to Connections > Sources’and click "Create New Source". Then click ‘Functions’ at the top of the page, and then click ‘+ New Function’ and make sure ‘Source’ is the Function type selected. Next, delete the boilerplate code in the function and add the following code for handling SMS events. Click through to ‘Configure’ and give your source the name ‘Twilio SMS’.  

Once your Function is saved, click on it in the catalog and select + Connect Source. After your Function is connected, you will receive a webhook URL that starts with “https://fn.segmentapis.com/?b=”. Save the full URL in a notepad and remember that this is for your SMS event handler; we will use this later to set up our Webhooks in the Twilio console.

Repeat the same Source Function set up two more times, once for handling Email events and once for handling Voice events. For your Email Source Function use this code and for your Voice Source Function use this code.

Note: For this demonstration, the Email Source Function is simplified to handle only Sendgrid email opens. However, if you would like to amend your setup to accommodate any or all of the Sendgrid webhook events such as clicks and unsubscribes use the Segment Sendgrid Source Function.

Remember to name these functions “Twilio Email” and “Twilio Voice” so you can distinguish them in the catalog – and don’t forget to save the URL you receive after setup.  

For more information and additional screenshots on how Segment Source Functions work, refer to this documentation. The code we’re adding for each Source Function will ensure that once Twilio or Sendgrid receives a webhook event, it will be pushed to Segment which will track a “Notification Engaged” event which will then record what channel a user engaged with. 

Navigate to the Twilio console, and navigate to your Numbers. Either select one of your current numbers or purchase a new number that is SMS and Voice compatible. Then paste your Segment SMS Source Function URL in the incoming message webhook; this will ensure that when someone responds to your SMS notification, Twilio will send that webhook event to Segment to be tracked as a Segment event.


image4


To set up the Voice Call answered event, go back to your Node application, navigate to your .env file, and paste the Voice Segment Source Function URL as the value for the variable SEGMENT_SOURCE_FUNCTION_URL. Here we are using the Programmable Voice API’s status callback events to send an event called ‘Notification Engaged’ to Segment when a user answers a call sent from your Node app.

Open up your Sendgrid dashboard, navigate to “Settings > Mail Settings”, and then click on “Event Webhook”. Paste your Segment Email Source Function URL under the HTTP Post URL and only select Opened under Engagement data. This will ensure that when a user opens an email, an event called ‘Notification Engaged’ will be sent to Segment.


image1


Create Computed Traits

Once your engagement metrics can be sent from Twilio and Sendgrid to Segment by setting up the webhooks described above, these events can be used to create Computed Traits in Segment. Computed Traits are how you will be able to set a “preferred channel” for a user once the user has engaged with that channel most frequently. 

Before we can create a Computed Trait in Segment, you will need to send some events to Segment. Get started by running your Node application with the terminal command node index.js in the root directory of your application. 

You should see a text, email, or call come into the number or email address you set in your .env file. Answer the call, open the email, or send a confirmation text back to see events come into your Segment account in the debugger. While all the events have the name “Notification Engaged”, they are separated by their Source Function which will inform the Computed Trait of the user’s engagement channel.

 Restart your server a few times to send more events to Segment – do this at least five times. Once you’ve done that, navigate to your Segment dashboard, then navigate to "Engage", then “Computed Traits”, and finally click “New Computed Trait”. Select “Most Frequent”, and then for the “Event Name” select “Notification Engaged” with the “Minimum Frequency” set to 3

You can change the number, but for this demonstration let’s use 3 “Notification Engaged” events at minimum before calculating which channel—email, SMS, or call—is a user’s most frequent. 

Once a user has a Preferred Channel Computed Trait assigned to them, they will receive notifications on that channel exclusively in the future. For example, if the user’s preferred channel is “email”, then your Node application will check Segment using the Profile API and set the channel to “email” rather than allowing the channel to be picked randomly. Additionally, you can see what a user’s Computed Trait is on the Engage dashboard within your Segment account.

Testing & troubleshooting your preferred customer notification channel computations 

Nice work – you’ve hopefully now got a working app which computes your users’ preferred notification channels. Let’s look at a few more things you can try, and cover some of the problems you might hit.

For more interesting results:

Restart your Node app server a few times until you get a Computed Trait, then try changing the user’s name and user id in your Node app to create additional users.

Troubleshooting not seeing events in Segment:

Make sure your Source Functions are set up correctly, and that the Call Source Function URL is added to you .env file. Make sure the Email Source Function URL is added to your Sendgrid dashboard as the event webhook and the SMS Source Function URL is added to your number as the incoming message webhook in your Twilio dashboard. 

You can double-check whether these events are coming in by checking the Source Function debugger in your Segment dashboard.

Troubleshooting not getting an SMS, email, or call:

  • Make sure your Twilio number and Sendgrid sender email are added to your .env

    file.

  • Make sure your number and email are in your .env file.

Take it to the next level:

  • Create a Twilio Flex instance and create a plugin to read a user’s preferred channel so agents can send notifications on that channel.

Set up an analytics Destination in Segment to send conversion events to your analytics tool and measure what channel performs best across all of your users.

Delivering notifications on a users’ computed preferred channel

Congratulations on connecting Segment, Twilio, and Sendgrid! With this demo app, you can automatically select a user’s preferred channel by tracking what they engage with and assigning a Segment Computed Trait. This is a powerful way to personalize your communications with your users and customers on a one-to-one level. 

Once you have this under your belt, explore what other Segment Computed Traits you can use to power a Twilio and Sendgrid communication. We can’t wait to see what you build!

Getting started is easy

Start connecting your data with Segment.