Gathering data from your Webflow site using Segment

Webflow is a low-code website builder that helps web designers and developers build sites fast and at scale. It’s different from more traditional web Content Management Systems (CMS), in that it is SaaS based and takes care of all hosting, code assembly, code deployment, domain management, content delivery networks (CDN), and other processes behind the scenes.

Mark Urquhart Made by Mark Urquhart

What do you need?

  • Segment

  • Webflow Paid Plan

Easily personalize customer experiences with first-party data

With a huge integration catalog and plenty of no-code features, Segment provides easy-to-maintain capability to your teams with minimal engineering effort. Great data doesn't have to be hard work!

On this page

Getting ready to use this recipe

If you want to try this at home, please make sure you complete the following before starting:

  1. Sign up for Webflow

    • You need to have a paid Webflow account tier, as we will be using custom code 

    for a Segment workspace

  2. choose a free template for your project, and make sure it has CMS objects 

Installing and validating Page Calls

  1. Once you have access to Webflow, create your Webflow project.


w1


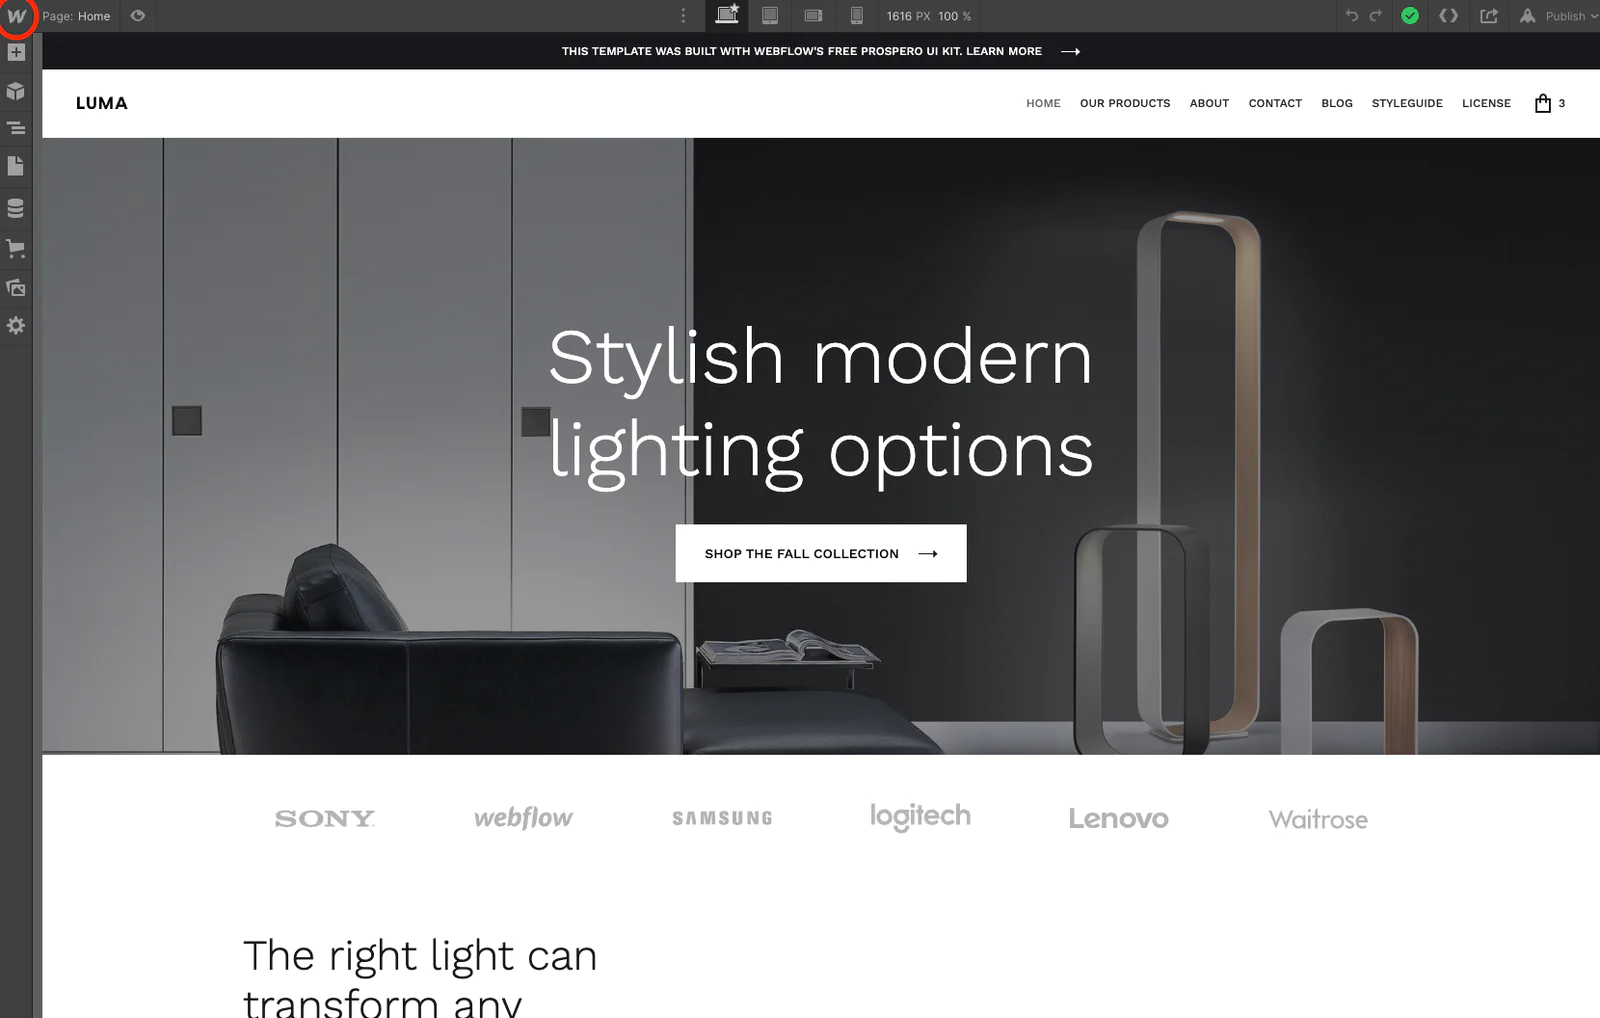
2. Click on the “W” on the top left of the screen and select “Project Settings”.


w2
w3


3. Click on “Custom Code” in the settings navigation. 


w4


Reminder:  This is a feature of paid accounts, and will not be available in a free trial account.  If you don’t see Custom Code, please upgrade your Webflow account to get access.

4. When you click on Custom Code, you’ll see a place where you can input code into either the websites header or the footer.  This is where we will insert our Segment Analytics.js code.  The reason we are putting this in the header is to initialize it as high up in DOM load as we can.  Note that when you insert code here within the overall project settings, this code will be present on all pages.  


w5


5. Leave this Webflow tab open in your browser, and open an additional tab.  Login to your Segment Workspace.  Click on Connections, and then click on Sources.  Click on “Add Source” button, and then select “Javascript” which you’ll find under the “Website” category.


w6
w7


6. Copy the Javascript snippet that is provided to you.


w8


7. Go back to your Webflow browser tab and paste the code snippet into the header custom code box.  Click the green button, “Save Changes.”  Then click the blue button in the top right “Publish” and this will publish your site and give you a URL you can preview the site with.  Note - when you “Save” in Webflow, you also have to “Publish” in order to see the changes at the website/DOM level.  Saving it just stores your progress of edits it in your project, you have to commit to Publish to see it live.


w9
w10


8. Open the site you just published and click around.  After a few clicks, go back into Segment and validate that Page calls are being seen in the debugger of your new Segment source.   


w11


Additional tip:  If you want to pass a “Friendly” name in your Page call to Segment, I’d suggest using this approach below where you leverage the document title and trim it to the first string before the dash.  This may not work for every website, but the approach can be modified depending on how you structure you doc title.  For the Luna template we are using - the Title tag is the same for all pages, so if you modify that under Page Settings you’ll see the appropriate Page name coming through.


<script>
// Get the Page Title
const pageNameFull = document.title.split('-')[0];
// Trim the page title so you only return the first string before a dash
const pageNameTrimmed = pageNameFull.trim();
// Start Segment Analytics.js 2.0 code
!function(){var analytics=window.analytics=window.analytics||[];if(!analytics.initialize)if(analytics.invoked)window.console&&console.error&&console.error("Segment snippet included twice.");else{analytics.invoked=!0;analytics.methods=["trackSubmit","trackClick","trackLink","trackForm","pageview","identify","reset","group","track","ready","alias","debug","page","once","off","on","addSourceMiddleware","addIntegrationMiddleware","setAnonymousId","addDestinationMiddleware"];analytics.factory=function(e){return function(){var t=Array.prototype.slice.call(arguments);t.unshift(e);analytics.push(t);return analytics}};for(var e=0;e<analytics.methods.length;e++){var key=analytics.methods[e];analytics[key]=analytics.factory(key)}analytics.load=function(key,e){var t=document.createElement("script");t.type="text/javascript";t.async=!0;t.src="https://cdn.segment.com/analytics.js/v1/" + key + "/analytics.min.js";var n=document.getElementsByTagName("script")[0];n.parentNode.insertBefore(t,n);analytics._loadOptions=e};analytics._writeKey="your write key here";;analytics.SNIPPET_VERSION="4.15.3";
  analytics.load('<your write key here>');
  // use the variable we created above to pass in a friendly page name
  analytics.page(`${pageNameTrimmed}`);
}}();
</script>


If you make that code change from the original snippet Segment provided and modify the Page Title Tag in Webflow,  your page calls will now have a more friendly title/name in debugger. 


w12
w13


9. We now have Page calls rolling through.  Now we can focus on making some Segment track calls which will track custom events and activities in Webflow.  

Before we move on, here’s additional info on a few features of Webflow that are important context to understand. 

Pages in Webflow:  Each page in Webflow can be accessed from the left rail of Webflow’s Designer interface.  Each page has additional settings you can access/configure, that are specific to that page only.  To access these settings, hover over to the right of the page name and click the settings gear. Once you access, you will see a lot of options around SEO, thumbnails, etc.  Down toward the bottom, you will see another section where you can add additional custom code in, either to the header or before the body closes(</body>).  Any code added in these settings will be added only to this page, and will load in addition to any of the code you’ve added at the website parent level settings(like our Analytics.js code).  


w14
w15
w16


CMS Collections in Webflow:  Webflow has a feature called CMS Collections.  With these, you can build objects like Blog Posts, or other custom entity types.  When you build a CMS Collection, any fields you use in that collection are variables you can call/utilize when writing track or other Segment calls, via the custom code dialog box in the Page settings.   Think of Collections as the data structure of what a content object should have behind the scenes: eg - Headline, Category, Author, Body Text, Hero Image, etc….


w17
w18
w19


CMS Templates:  These go hand-in-hand with CMS Collections, but CMS Templates are how the data behind the scenes should visually show on the site when the template loads.  CMS Templates are similar to pages, but instead of building a one-off page you are building the structure of how one of your CMS collection objects should show to an end-user.  You may build Template designs to show how a blog post should be displayed, or a category of blog posts should group together, etc.  

To access these CMS Templates, go to your left rail in the Designer interface, and CMS templates are marked by any links you see in purple.  

For the next section we will use the “Blog Posts Template”.

Create a track call to capture blog post visits

  1. Go to your Blog Posts Template in Webflow. 


w20


2. Click on the gear for Blog Posts Template to open up the options for that template.


w21


3. Scroll to the bottom of the options to get to the entry window labeled “Before </body> tag.” Here we are telling the website to wait until everything is done loading before writing our track call to Analytics.js. 


w22


4. Start to write your track call.  You’ll notice that you can start to use those variables I described earlier where it says, “+ Add Field.”  Make sure you add single or double quotes around your name value pairs.  Here is the basic structure of the snippet you will need to substitute the variable placeholders with the CMS variables/fields in Webflow.  To access those variables in your code snippet, use the “+ Add field” link, which will give you access to your variables/fields.


<script>
analytics.track("Blog post - Viewed", {
  'title': '<title variable goes here>',
  'slug': '<slug variable goes here>',
  'category': '<category variable goes here>'
});
</script>


And here is how it should/could look in Webflow:


w23
w24


5. Save your code via the “Save” blue button on the options window near the top.  Then publish your site.  Don’t forget to publish - the “Save” doesn’t auto-publish.  So if you don’t see any events in your debugger, you probably forgot to Publish.  

6. Go check the debugger again for your javascript source in Segment.  You should see our “Blog Post - Viewed” event firing!  Congrats! Now Webflow is sending Segment a custom event every time a Blog Post is viewed on our site! 


w25


Conclusion 

This is a great exercise to start working with Segment’s Analytics.js and Webflow together.  Using this same pattern you can start to add additional events and actions and start to build out granular event tracking for things like button clicks, element hovers, and all sorts of other metrics that will help understand how well your website is being navigated and consumed by your customers! 

Getting started is easy

Start connecting your data with Segment.