Guide to SQL Traits using RETL

As SQL Traits have been moved into End-Of-Sale (EOS), migration to/using Reverse ETL + Twilio Segment Profiles is Segment’s recommended way for syncing Profile Traits.

Made by Prayansh Srivastava
Made by Jason Sooter

What do you need?

  • Access to warehouse
  • Twilio Segment workspace
  • Twilio Segment Space ID

Easily personalize customer experiences with first-party data

With a huge integration catalog and plenty of no-code features, Segment provides easy-to-maintain capability to your teams with minimal engineering effort. Great data doesn't have to be hard work!

On this page

Overview

Migrating from SQL Traits to Reverse ETL changes how user profiles and attributes are managed. The primary difference centers around two jobs to be done:

  1. Extract rows from the warehouse

  2. Sync rows into Engage / Unify as Profiles with traits

SQL Traits is a bundled solution that handles both of these jobs from end-to-end.

Reverse ETL + Segment Profiles is a decoupled solution that handles the same jobs.

  • Reverse ETL is a general purpose tool for extracting rows from a warehouse

  • Segment Profiles is a destination tasked with syncing rows into Engage / Unify as Profiles with traits

As SQL Traits have been moved into End-Of-Sale (EOS), migration to Reverse ETL + Segment Profiles is the Segment’s recommended way for syncing Profiles

Prerequisites

Step 1: Understand the Key Differences

Warehouse Permissions

Change Detection

  • SQL Traits detects changes at each trait level

  • Reverse ETL detects changes at the profile level

    • If one trait is added, updated, or deleted the whole profile is extracted as updated

    • When the user_id (or equivalent) is deleted from the warehouse, the profile is extracted as deleted

Traits

  • SQL Traits implicitly lowercases any extracted traits

  • Reverse ETL extracts fields as-is from the warehouse as per your query. You can lowercase them explicitly in the query if desired.
    • Note: ❄ Snowflake always returns column names in UPPERCASE unless aliased.

Step 2: Prepare Your Data

  • What identifier is being used
  • Is the SQL Traits query `select *` or specific columns

Step 3: Configure Reverse ETL in Segment

  • Connect Segment to your Data warehouse by creating a Reverse ETL source

  • Setup a new model with your SQL query to extract the SQL traits for profiles in your warehouse. 

    • The Query must select the user_id (or equivalent) of the profile and 1 or more traits.

  • Select your  $user_id column as the “Unique Identifier Column”

Screenshot of Query Builder displaying SQL query to select user data from the shoe_users table.

Step 4: Sync Data to Segment Profiles

  • Add a new Mapping to Connect the above model to a new Send Identify / Send Group Action via Segment profiles destination.

    • Choose the Added, updated or deleted trigger to sync all changes to traits to Segment

    • From the dropdown, choose the space you want to send the traits data into.

    • Setup the user_id mapping to correctly associate the user

    • Setup your traits mappings to sync the extracted traits for the user

  • Choose an interval / schedule for how often you want Segment to extract and update your SQL traits

  • Enable the new mapping

We understand that warehouse data is not always “clean”, and in certain scenarios null values can seep in and can have unintended consequences in your space’s profiles data. To provide you with finer tuned control of how Segment will sync your warehouse data containing null values to your space, we have added a new control switch for individual fields. More info on that is available in our Null Value Management Docs.

Screenshot of a CRM event properties interface showing fields like segment ID, event name, received date

Customize your mapping

Screen showing settings for defining sync behavior and mapping fields in a data integration tool.

Select a schedule

Settings page showing mapping name and options to set sync schedule, with Interval sync every 15 minutes selected.

Enabling your mapping

Screenshot of a sync dashboard displaying sync status, schedule, and sync history with success indicators.

With this configured, you have now set up an RETL model to deliver data from your warehouse to your Segment space.

Step 5: Monitor and Validate

Syncs should start automatically once enabled and you should be able to see how many profiles have changed with each sync and also a historic view of the syncs. Clicking on each individual sync will show you the detailed counts and also any delivery errors that may have occurred.

You can now jump to Unify > Profile Explorer to view the new profiles / traits that have been synced.

Troubleshooting & FAQs

I have a lot of traits that I need to individually map

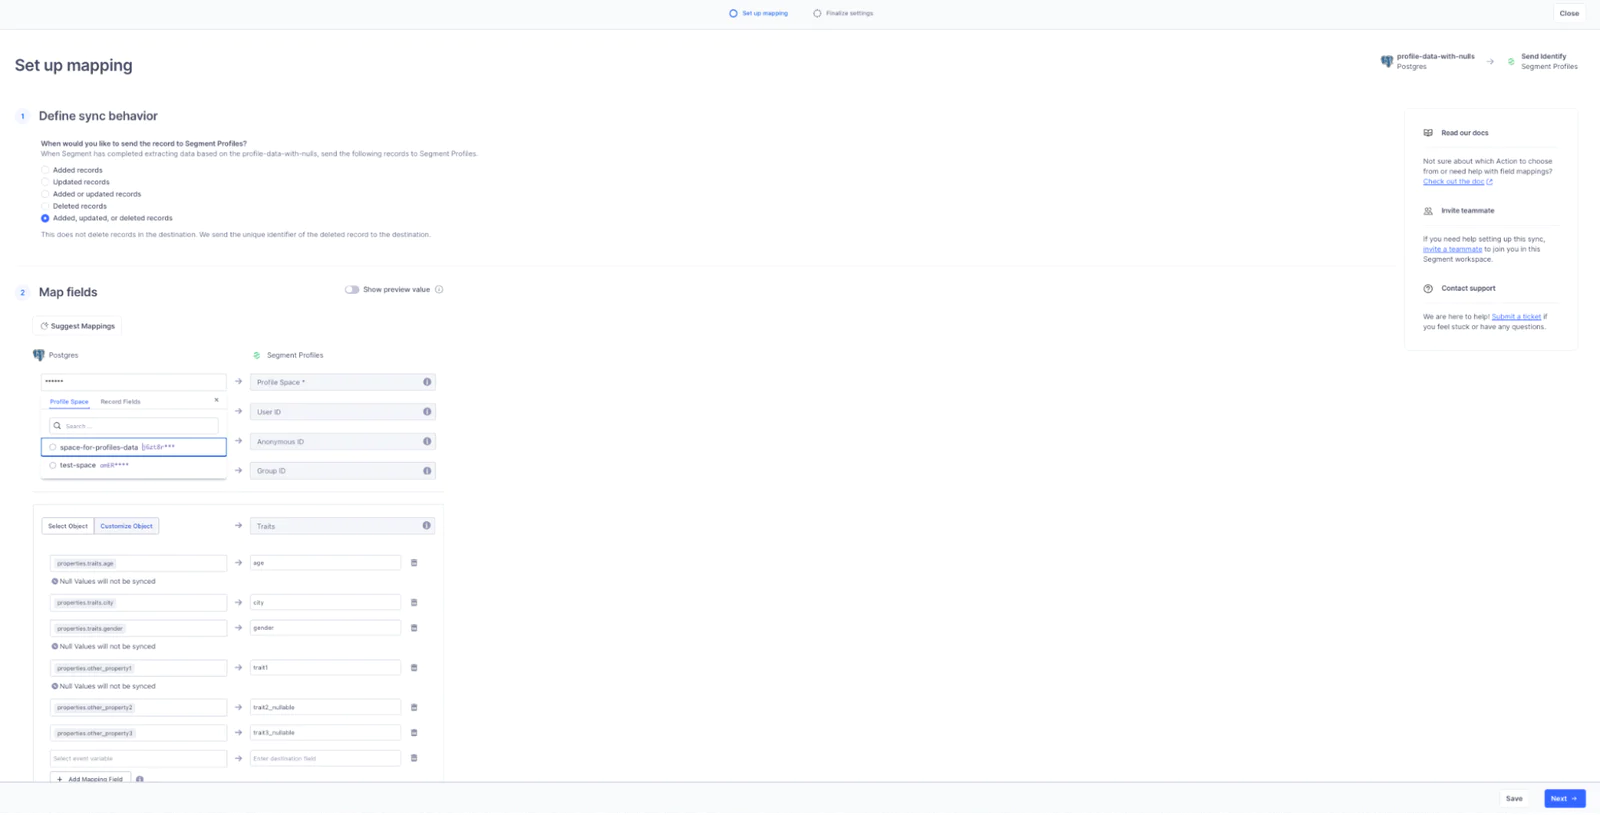
You can leverage object level mappings to select all of the incoming columns as traits.

Interface showing field mapping between Postgres and Segment Profiles in a data integration platform

I have lower case and mixed case traits appearing in my profiles

Use aliases in your query to explicitly choose your casing for traits.

I want to delete a certain trait from all my profiles

Update your model query to include that trait as a null value, and ensure that the mapping is set up to correctly allow null values for that trait. The next sync will send that trait as null and delete it from the profiles.

Resources

Getting started is easy

Start connecting your data with Segment.