Recipes
StartupMobileMarketplaceMediaB2BRetailAny Industry

Improve conversion rates with cross-channel A/B testing

In this recipe, you’ll learn how to use Segment, an A/B testing tool like Split, and an email marketing tool like Vero to execute cross-channel A/B testing experiments. It’ll also teach you how to craft, and deliver personalized, consistent messaging to your subscribers - all based on the variation of the test they’re in.

Segment

Made by Segment

Vero

Made by Vero

Split

Made by Split

What do you need?

  • Javascript or Mobile source to track and collect events

  • A/B testing tool - we're using Split in this recipe

  • Email marketing tool - we're using Vero in this recipe

Improve conversion rates with cross-channel A/B testing

With a huge integration catalog and plenty of no-code features, Segment provides easy-to-maintain capability to your teams with minimal engineering effort. Great data doesn't have to be hard work!

Get started for free

Savvy marketers will know that A/B testing helps you make data-driven decisions instead of relying on assumptions. In fact, 77% of companies perform A/B tests on their websites, 60% of which use the methodology on landing pages. And if we examine A/B testing examples, we’ll notice that even some of the smallest tests can have the most significant impact.

For example, US-based software company WorkZone realized via A/B testing that the colorful customer logos on its testimonial page were distracting from its demo request form. After making the change, they saw their leads grow by 34%.

Google also tested out 50 different shades of blue for its ad links to see which visitors preferred, and the experiment brought in a whopping $200 million in ad revenue.

To add, it’s very important to keep messaging consistent across all channels when you test in order to maintain a seamless user experience. For example, if you are testing out new pricing structures, all content and pages that mention price points should reflect the changes to minimize confusion for users.

In this recipe, you’ll learn how to use Segment, an A/B testing tool like Split, and an email marketing tool like Vero to execute cross-channel A/B testing experiments. It’ll also teach you how to craft, and deliver personalized, consistent messaging to your subscribers - all based on the variation of the test they’re in.

Step 1: Send your Split Feature Flag impression data to Segment

This recipe assumes you have Segment installed, and that you’re tracking events. If not, check out our documentation here.

The first step is to send events and impressions data from Split into Segment Source. Here are the steps to enable your Split Source on Segment:

  1. In Segment, navigate to Source and select Add Source. Segment docs can be found here.

  2. Search “HTTP API” and select HTTP API > Add Source

  3. Type in a name then copy the write key provided for this new source

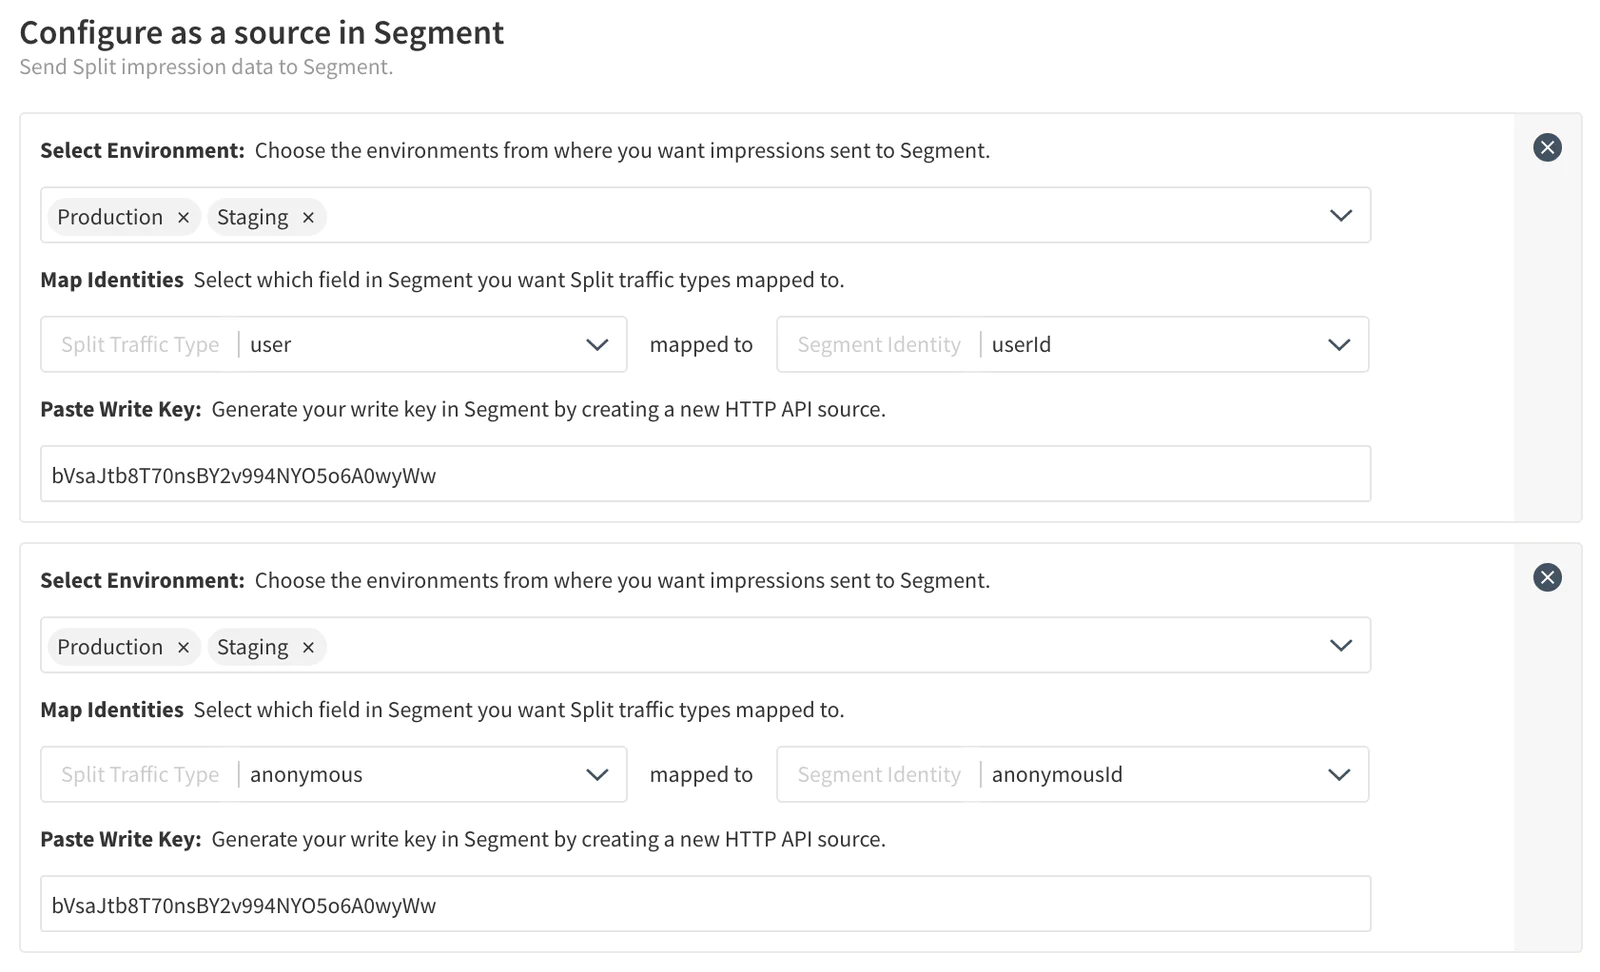
  4. Go to “Admin settings” inside the Split dashboard, click “Integrations”, select your workspace, and navigate to the Marketplace. Click “Add” next to Segment

  5. Select the environment(s) that will send data to Segment

  6. Select how you would like to map Split traffic types to Segment identities

  7. Paste the write key you copied in step three above and click “Save”

  8. When configured properly, data will begin flowing into Segment as an event — using the “track” type — with the event name “get_treatment”. An example is shown below

split source configuration
segment-debugger-split-events

Step 2: Connect Vero Destination with your Split Source

The next step is to ensure the impression data from Split is flowing to Vero as a Destination. We do this by enabling Vero Destination on Segment. Below are the steps:

  1. Navigate to Destinations and select Add Destination

  2. Search “Vero”

  3. Select Vero > Configure Vero

  4. Add your Vero API Key and Auth Token

  5. You can find your unique API key and Auth token by logging in to your Vero account and navigating to Settings > Project Details

Check out these docs if you need help or have any questions.

vero-catalog-search
vero-destination-setup

Once you enable the Destination, your customer data starts flowing into Vero. To verify the data is making it to Vero navigate to Logs page inside your Vero dashboard — here you'll be able to view the activity data streaming into the platform.

vero-logs-page

You can view the metadata attached to each event by selecting the specific log.

vero-logs-meta-data

Step 3: Build your Workflow campaign inside Vero

Workflows provide you with the visibility and tools to design and manage your customer messaging experience. With a clear view of all the logic, action steps and message content, you and your team can feel confident in designing your customer journey and ensuring the right message is delivered at the right time.

Each new workflow starts with an Entry Trigger, and you can choose from different logic and actions to build your customer messaging journey. You can send both email messages and mobile push notifications within one workflow.

To create a new workflow:

  1. Select an Entry Trigger. In order for a customer to enter a workflow, they must trigger an event. Vero defines events as all the actions a customer takes on your site. It could be everything from signing up for an account, purchasing an item or viewing a page.

  2. Add logic and action steps. All workflow steps can be easily added and moved around using drag and drop, giving you full control over the order of filters, branches, delays, emails and push notifications. This allows you and your team to quickly create and update your customer journeys.

  3. Add a branch node to split your workflow so you can send a different email for each version of the test.

  4. Add your email content. You can add four types of email content in Vero including Drag and Drop, HTML, Rich Text and Plain Text. You can leverage the pre-built drag-and-drop email template for Welcome email in this case.

  5. Add a conversion goal. You can measure the overall success of a workflow by adding a conversion goal. A conversion goal is reached when a customer triggers the specified event. By default, the goal is tracked for up to 30 days after the contact exits the workflow.

  6. Save and publish your workflow. Once you’ve reviewed the configuration steps, simply save and publish your workflow to start your customers on their journey!

vero-email-branch-node
vero-email-builder

Check out these docs to learn more about creating a workflow in Vero or watch this video.

Wrapping up

Here’s what we’ve done in this recipe:

  • To start off, we create a Split Source on Segment. When configured properly, the impressions data from feature flags and A/B experiments will flow into Segment as track events - with the event name get treatment.

  • Next, we’ve enabled Vero Destination on the Split Source to send the impressions data into Vero.

  • Finally, we built a workflow campaign inside Vero where we selected an entry trigger, added logic and action steps, added branch nodes to split the workflow for testing, adding email content, and conversion goals.

Getting started is easy

Start connecting your data with Segment.