E-commerce and Analytics-Swift

Analytics-Swift makes it easier than ever to customize your tracking implmentation to meet the unique requirements of your app. With the groundwork of the analytics implementation laid out, adjusting it as you evolve or expand is typically as straightforward as adding a few dependencies and refining your tracking plan.

By Alan Charles

Hi I’m Alan, a software engineer at Twilio Segment. I’ll be walking you through a complete implementation of Analytics-Swift using this app

Segment Shop

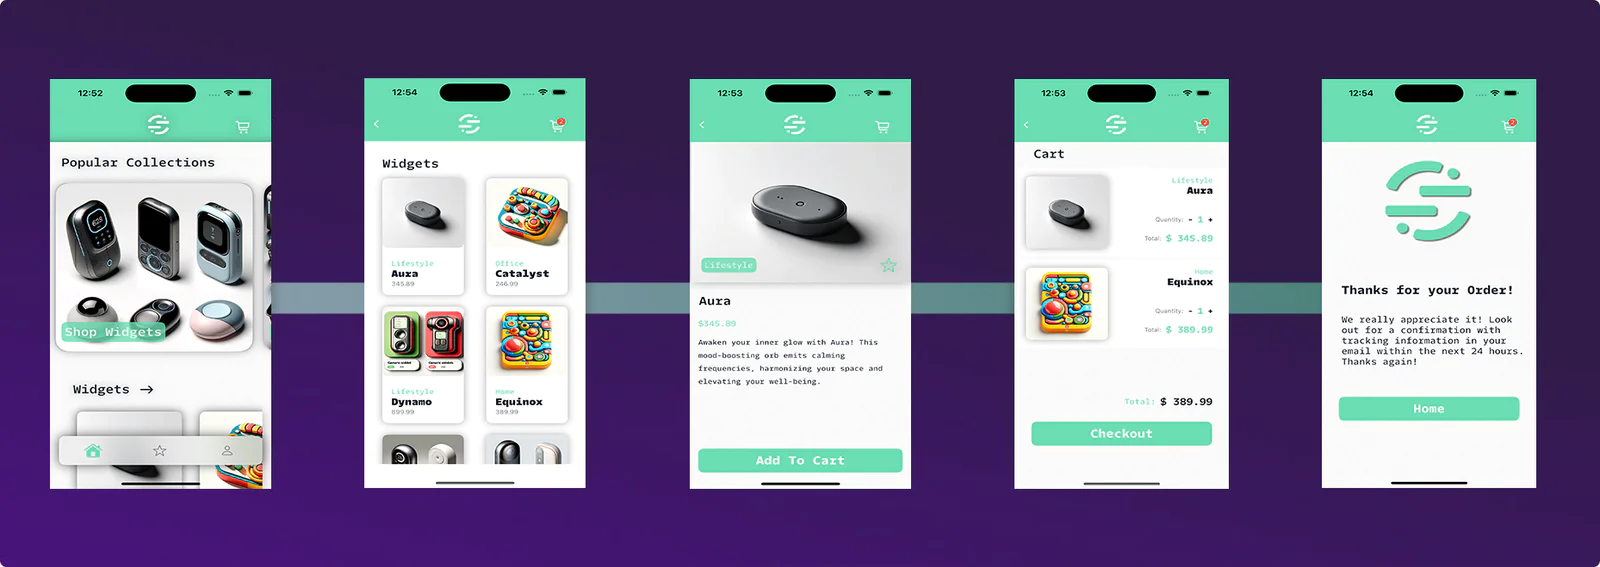
This is an example of a real-world E-commerce application that sells Widgets, Gadgets, and Trinkets. This blog and its companion app will walk you through a complete implementation of the Core-Ordering section of Segment’s E-commerce Spec. 

If you would like to implement the steps outlined in this blog as you go, you can use the starter app found here. Alternatively, you can follow along with the finished app found here

Overview

We will start with a functional E-commerce app built with SwiftUI that does not have tracking implemented. From there,  we will walk through a complete tracking implementation with Analytics-Swift. The architecture implemented in Analytics-Swift will make it possible for us to add IDFA consent and collection without incorporating another third-party dependency. Finally, with the help of the Firebase Destination Plugin, we will send the events tracked to Firebase.

Segment’s Mobile Architecture

A few years ago, we completely rebuilt our mobile libraries from the ground up with an entirely new architecture. There were a number of reasons for this but the biggest one was customizability. Every customer has their own bespoke needs and we strongly believe that our analytics libraries should reflect and support this reality. 

With this in mind, we decided to take a flywheel approach to the new libraries. The idea is that by keeping the core library small and lightweight, customers can “plugin” to it when and where they need. To accomplish this we decided to break down the lifecycle of an analytics event into simple components. You can think of this as a timeline of when an analytics event is created until the time it leaves a device. We came up with the following: 

  • Before: What happens before the event is created. For instance, has consent been given by the user? 
  • Enrichment: Data that needs to be added to the event after it has been invoked. An example of this would be adding contextual data if certain criteria have been met. 
  • Destination: The destination of the event, either Segment or a third party SDK (Device Mode integrations). 
  • After: What happens after the event lifecycle. This includes clean up operations and things of that nature.

Approaching an analytics event this way makes it much easier to conceptualize your entire implementation and gives you more control over what and when you track. This has become increasingly important as Apple and Google continue to restrict tracking anything useful without a user’s consent. This architecture has been stable for almost two years and is used by customers in every industry from healthcare to media, and of course, retail. 

Getting Started

  1. create a new Apple source in your Segment workspace
  2. clone the sample app repository<link>
  3. open starter app in XCode
  4. add Analytics-Swift via SPM

https://github.com/segmentio/analytics-swift

Once you’ve added Analytics-Swift to the starter app you can start implementing the SDK.

1.  Add an Analytics Extension in SegmentShopApp.Swift with your write-key
1-code-analytics-swift

init() {
        _ = Analytics.main
      //..
    }

extension Analytics {
    static var main = Analytics(configuration:
                                    Configuration(writeKey: "ABCD")
                                    .flushAt(3)
                                    .trackApplicationLifecycleEvents(true))
}

2. Build  and run the app

IDFA Collection

In order to tie the data we collect back to a particular user within Apple’s ecosystem, we need to ask the user for permission to collect their IDFA. Chances are, if you’re familiar enough with Apple’s ecosystem to follow along with this blog, you’re already quite familiar with IDFA collection. (And if not, here’s a quick catch up.)

With the help of Analytics-Swift, we can ask for the user’s consent to collect the IDFA, and if granted, add it to the context.device object of every event collected. To do this, we’ll create an enrichment plugin. Refer to the definition above for more information regarding enrichment plugins. 

This plugin is not supported by Segment, but is instead intended to show how easy it is to add your own plugins to Analytics-Swift in order to meet your business’s bespoke data needs. 

  1. create new Swift file: IDFACollection.swift 
  2. add the following code or adjust it to meet your needs:

2-code-analytics-swift

import Foundation
import UIKit
import Segment
import AdSupport
import AppTrackingTransparency

/**
 Plugin to collect IDFA values.  Users will be prompted if authorization status is undetermined.
 Upon completion of user entry a track event is issued showing the choice user made.
 
 Don't forget to add "NSUserTrackingUsageDescription" with a description to your Info.plist.
 */
class IDFACollection: Plugin {
    let type = PluginType.enrichment
    weak var analytics: Analytics? = nil
    @Atomic private var alreadyAsked = false
    
    func execute<T: RawEvent>(event: T?) -> T? {
        let status = ATTrackingManager.trackingAuthorizationStatus

        let trackingStatus = statusToString(status)
        var idfa = fallbackValue
        var adTrackingEnabled = false
        
        if status == .authorized {
            adTrackingEnabled = true
            idfa = ASIdentifierManager.shared().advertisingIdentifier.uuidString
        }
                
        var workingEvent = event
        if var context = event?.context?.dictionaryValue {
            context[keyPath: "device.adTrackingEnabled"] = adTrackingEnabled
            context[keyPath: "device.advertisingId"] = idfa
            context[keyPath: "device.trackingStatus"] = trackingStatus
            
            workingEvent?.context = try? JSON(context)
        }

        return workingEvent
    }
}

extension IDFACollection: iOSLifecycle {
    func applicationDidBecomeActive(application: UIApplication?) {
        let status = ATTrackingManager.trackingAuthorizationStatus
        if status == .notDetermined && !alreadyAsked {
            // we don't know, so should ask the user.
            alreadyAsked = true
            askForPermission()
        }
    }
}

extension IDFACollection {
    var fallbackValue: String? {
        get {
            // fallback to the IDFV value.
            // this is also sent in event.context.device.id,
            // feel free to use a value that is more useful to you.
            return UIDevice.current.identifierForVendor?.uuidString
        }
    }
    
    func statusToString(_ status: ATTrackingManager.AuthorizationStatus) -> String {
        var result = "unknown"
        switch status {
        case .notDetermined:
            result = "notDetermined"
        case .restricted:
            result = "restricted"
        case .denied:
            result = "denied"
        case .authorized:
            result = "authorized"
        @unknown default:
            break
        }
        return result
    }
    
    func askForPermission() {
        ATTrackingManager.requestTrackingAuthorization { status in
            // send a track event that shows the results of asking the user for permission.
            self.analytics?.track(name: "IDFAQuery", properties: ["result": self.statusToString(status)])
        }
    }
}

3. Add a NSUserTrackingUsageDescription to the info.plist

4. Add the IDFACollection plugin to your Analytics instance

3-code-analytics-swift

//in SegmentShopApp.swift

    init() {
        Analytics.main.add(plugin: IDFACollection())
        let serverQueue = DispatchQueue(label: "com.example.SegmentShopServerQueue", qos: .utility)
        startServer()
    }

5. Build and run the app

Implementing  E-commerce events

Now that we have IDFA collection set up, we can begin to implement core tracking events from the Analytics-Swift SDK. We will begin by identifying a user and from there, move in to the Core Ordering section of the E-commerce spec. 

  1. Check for userId and add identify event to login function in MockServer/MockCalls

4-code-analytics-swift

func login() {
  if let data = data {
      do { 
          let userInfo = try JSONDecoder().decode(LoginResponse.self, from: data)
          let traits = [ "userName": userInfo.userName]
          
          if let userId = userInfo.userId?.toString() {
            Analytics.main.identify(userId: userId, traits: traits)
          } else {
            Analytics.main.identify(traits: traits)
          }
      } catch {
          print("Failed to decode JSON")
    }
}

 2. Add .onAppear to ProductDetailScreen to collect Product Clicked and Product Viewed events

5-code-analytics-swift

.onAppear {
            let properties = [
                "product": product.title,
                "price": product.price,
                "id": product.id,
                "category": product.category
            ] as [String : Any]
            
            Analytics.main.track(name: "Product Clicked", properties: properties)
            Analytics.main.track(name: "Product Viewed", properties: properties)
        }

3. Add the following to the addProduct function in Cart.swift

6-code-analytics-swift

let properties = [
            "product": product.title,
            "price": product.price,
            "id": product.id,
            "category": product.category
        ] as [String : Any]
        
        Analytics.main.track(name: "Product Added", properties: properties)

4. Add onAppear to CheckoutUserInfoScreen to collect Checkout Step Viewed

7-code-analytics-swift

.onAppear {
            Analytics.main.track(name: "Checkout Step Viewed")
        }

5. Add onDisappear to PaymentInfoForm to collect Payment Info Entered

8-code-analytics-swift

.onDisappear {
            let properties = [
                "cardholderName": cardholderName,
                "cardNumber": cardNumber,
                "expMonth": expMonth,
                "expYear": expYear,
                "cvc": cvc,
                "zipcode": zipCode
            ]
            Analytics.main.track(name: "Payment Info Entered", properties: properties)
        }

6. Add onAppear to OrderCompletedScreen to collect Order Completed

9-code-analytics-swift

.onAppear {
            let properties = [
                "products": cart.cartItems,
                "totalPrice": cart.totalPrice
            ] as [String : Any]
            
            Analytics.main.track(name: "Order Completed", properties: properties)
        }

7. Add onTapGesture to quantityButtons in CartItemCard to collect Order Updated

9-code-analytics-swift

private var quantityButtons: some View {
        HStack {
            Text("Quantity:")
                .font(.caption)
                .foregroundColor(.secondary)
            Button(action: {cart.removeProduct(product: product)})  {
                Text("-")
                    .font(.custom("TwilioSansMono-Semibold", size: 16))
                    .foregroundStyle(CustomColor.DarkGreen)
            }.onTapGesture {
                let properties = [
                    "products": cart.cartItems,
                    "price": cart.totalPrice
                ]
                Analytics.main.track(name: "Order Updated", properties: properties)
            }
            Text(String(quantity))
                .font(.custom("TwilioSansMono-Semibold", size: 18))
                .foregroundStyle(CustomColor.Mint)
            Button(action: {cart.addProduct(product: product)})  {
                Text("+")
                    .font(.custom("TwilioSansMono-Semibold", size: 16))
                    .foregroundStyle(CustomColor.DarkGreen)
            }.onTapGesture {
                let properties = [
                    "products": cart.cartItems,
                    "price": cart.totalPrice
                ]
                Analytics.main.track(name: "Order Updated", properties: properties)
            }
        }
    }

8. add onTapGesture to checkoutButton in CartScreen to collect 

9-code-analytics-swift

.onTapGesture {
            Analytics.main.track(name: "Checkout Started")
        }

9. add onAppear to CartScreen to collect Cart Viewed

9-code-analytics-swift

.onAppear {
            Analytics.main.track(name: "Cart Viewed")
        }

10. add onAppear to CollectionDetailScreen to collect ProductListViewed

9-code-analytics-swift

.onAppear {
            let properties = [
                "collection": collection,
                "title": title,
            ] as [String : Any]
            
            Analytics.main.track(name: "Product List Viewed", properties: properties)
        }

11. add the following to the add method in Favorites.swift to collect Product Added to Wishlist

9-code-analytics-swift

func add(_ product: Product) {
        
        let properties: [String: Any] = [
            "product": product.title,
            "id": product.id,
            "price": product.price,
            "category": product.category
        ]
        
        Analytics.main.track(name: "Product Added to Wishlist", properties: properties)
     ....
    }

12. add the following to the remove function in Favorites.swift  to  collect Product Removed from Wishlist

9-code-analytics-swift

func remove(_ product: Product) {
        
        let properties: [String: Any] = [
            "product": product.title,
            "id": product.id,
            "price": product.price,
            "category": product.category
        ]
        
        Analytics.main.track(name: "Product Removed from Wishlist", properties: properties)

      ...
    }

13. add the following to the saveUserInfo method in CustomerInfoViewModel

9-code-analytics-swift

func saveUserInfo() {
     ...  
        let traits: [String: Any] = [
            "firstName": firstName,
            "lastName": lastName,
            "email": email,
            "phone": phone,
            "street": street,
            "city": city,
            "state": state,
            "country": country
        ]
        let userId = Analytics.main.userId ?? nil
        
        if userId != nil {
            Analytics.main.identify(userId: userId!, traits: traits)
        }
    }

Destination Plugins

The final step of our implementation is to add a Destination Plugin in order to send data to Firebase. Destination Plugins are the equivalent of Device Mode Destinations in the classic Analytics-iOS SDK. Once enabled, events are mapped and sent directly to the destination from the device without being routed through Segment. A more detailed overview of Segment’s Connection Modes, including their advantages and drawbacks, can be found in the public documentation. 

In order to add the Firebase Destination Plugin we have to do the following: 

  1. navigate to the source you created earlier, click Add Destination 
  2. search for Firebase, select it, and complete the setup process
  3. once set up, make sure to enable it in the Destination settings 
    1. disabled by default

4. create a new iOS project in your Firebase console 

5. download the Google-Services-Info.plist from Firebase and add it to your project

6. Add the analytics-swift-firebase package via Swift Package Manager

7. import SegmentFirebase in SegmentShopApp.swift 

8. add plugin to your analytics instance

code-analytics-swift

import SegmentFirebase
...

    init() {
        ...
        Analytics.main.add(plugin: FirebaseDestination())
        ...
    }

*Note: Event Delivery metrics for events sent to Firebase will not be available in your Segment workspace. It can also take up to 24 hours for your initial events to appear in the Firebase dashboard. To verify your implementation you can add Firebase’s debugging functionality outlined here

Conclusion

With that, we have completed the Core Ordering section of the E-commerce spec with Analytics-Swift. The new architecture implemented in Analytics-Swift made it possible to add a custom IDFA collection implementation without incorporating another third-party dependency. Finally, with the help of the Firebase Destination Plugin, we sent events to Firebase.

Analytics-Swift makes it easier than ever to customize your tracking implementation to meet the bespoke requirements of your app. Now that the foundations of the analytics implementation are complete, customizing it over time or as you scale will typically be as straightforward as adding a few dependencies and updating your tracking plan.

The State of Personalization 2023

Our annual look at how attitudes, preferences, and experiences with personalization have evolved over the past year.

Recommended articles

Loading

Want to keep updated on Segment launches, events, and updates?