Implementing Analytics React Native 2.0 and Braze
This blog shares a complete implementation of Analytics for React Native and includes a 'real-world' example.
By Alan Charles
This blog shares a complete implementation of Analytics for React Native and includes a 'real-world' example.
Hi, I’m Alan, a software engineer at Twilio Segment. I’ll be walking you through a complete implementation of Analytics for React Native using this app.
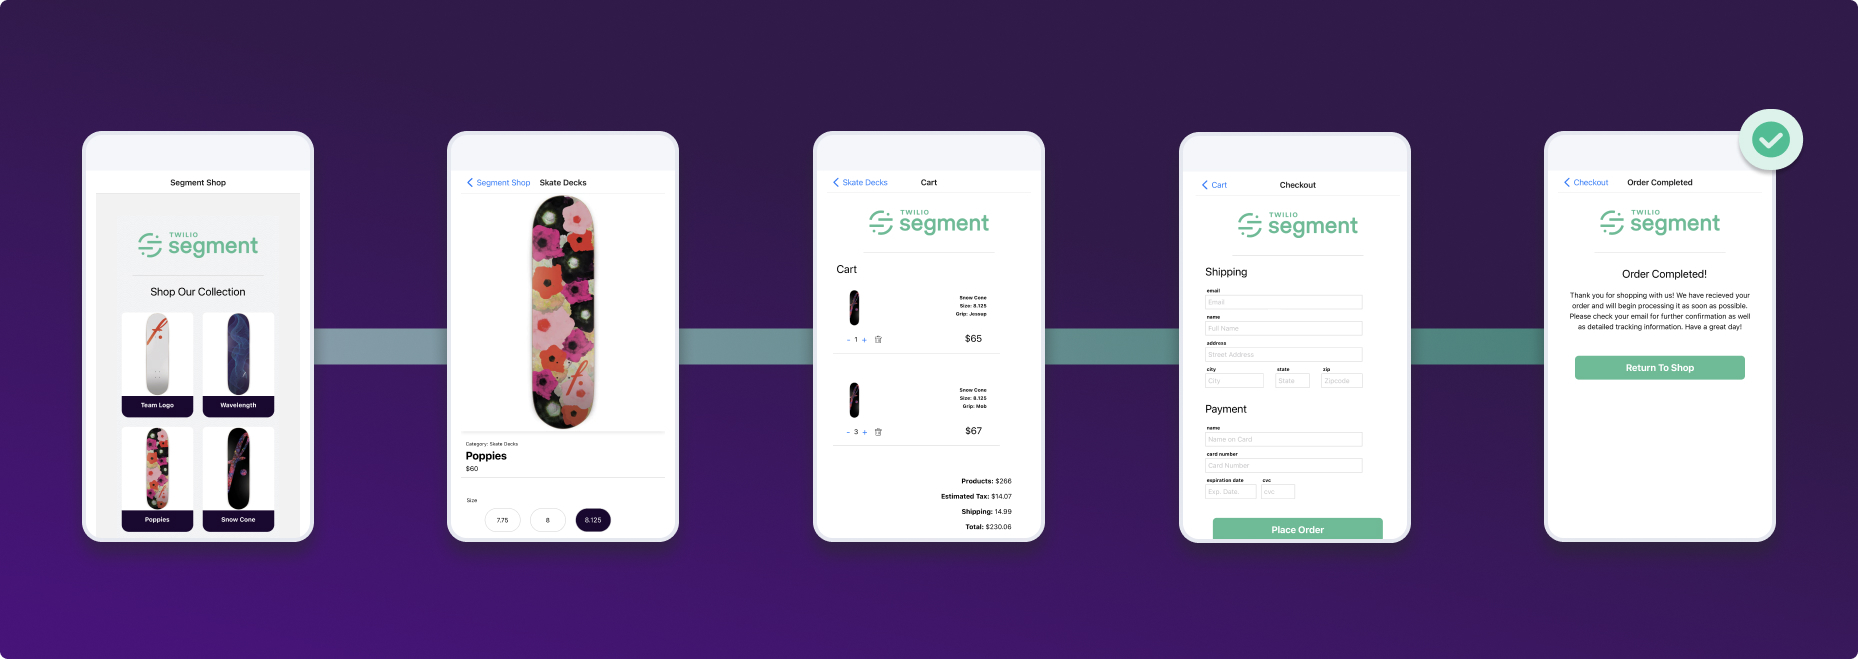
This is an example of a ‘real-world’ E-Commerce application that sells skateboard decks. We decided to use real products designed and produced by our beloved colleague, Brandon Sneed. In this app, you can walk through a typical E-Commerce purchase flow complete with a tracking implementation that follows Segment’s E-Commerce spec.
If you would like to follow along, you can use the starter app found here. Or, if you would instead like to review the code with a completed implementation, check out the finished app.
We will start with a functional E-Commerce app built in React Native that does not have tracking implemented. From there, we will walk through a complete tracking implementation with the help of Analytics React Native 2.0, Protocols, and a Tracking Plan.
The new architecture implemented in Analytics React Native 2.0 will make it possible for us to add IDFA and advertisingId collection consent without incorporating another third-party dependency and incorporate an analytics hook to track events throughout the application. Finally, with the help of the BrazeDestination Plugin, we will see users, attributes, events, and purchases flow into the Braze customer engagement platform.
Over the course of the past year, we have completely reimagined our mobile libraries. There were a number of reasons for this, but the biggest one was customizability. Every customer has their own bespoke needs and we strongly believe that our analytics libraries should reflect and support this reality.
With this in mind, we decided to take a flywheel approach to the new libraries. The idea is that by keeping the core library small and lightweight, customers can “plug in” to it when and where they need. To accomplish this, we decided to break down the lifecycle of an analytics event into simple components. You can think of this as a timeline of when an analytics event is created until the time it leaves a device. We came up with the following:
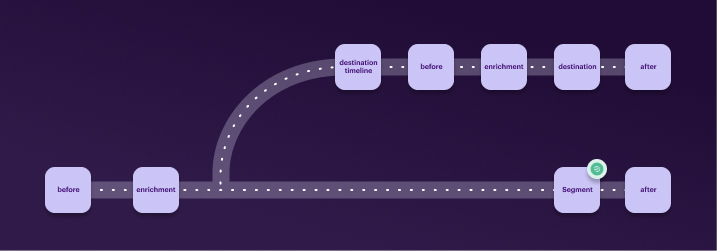
Before: What happens before the event is created. For instance, has consent been given by the user?
Destination: The destination of the event, either Segment or a third-party SDK (Device Mode integrations).
After: What happens after the event lifecycle. This includes clean-up operations and things of that nature.
Approaching an analytics event this way makes it much easier to conceptualize your entire implementation and gives you more control over what and when you track. This has become increasingly important as Apple and Google continue to restrict tracking without a user’s consent.
To get started, clone a copy of the segment/analytics-react-native-ecommerce-samples repository and run the necessary build/startup commands:
Before we do anything else with this app, let’s set up a new React Native Sources in your Segment workspace.
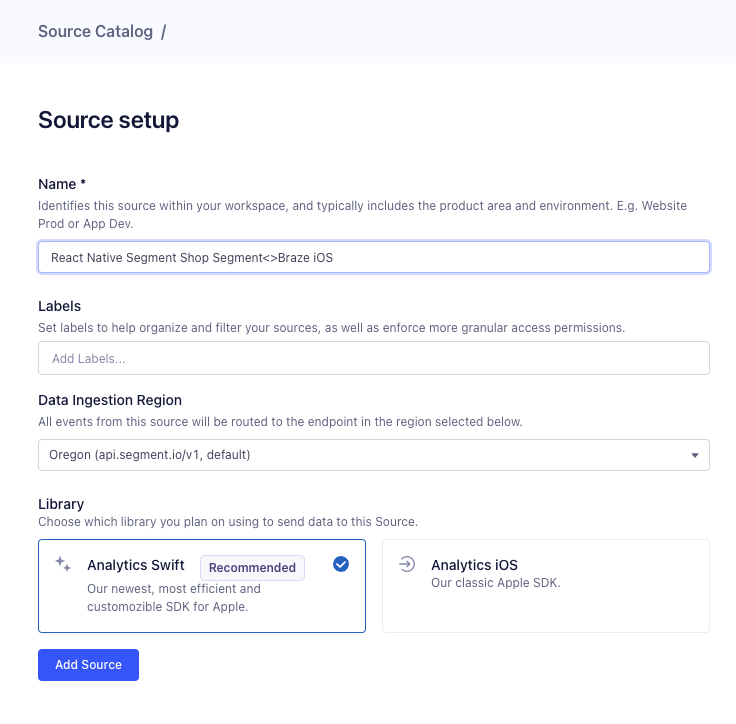
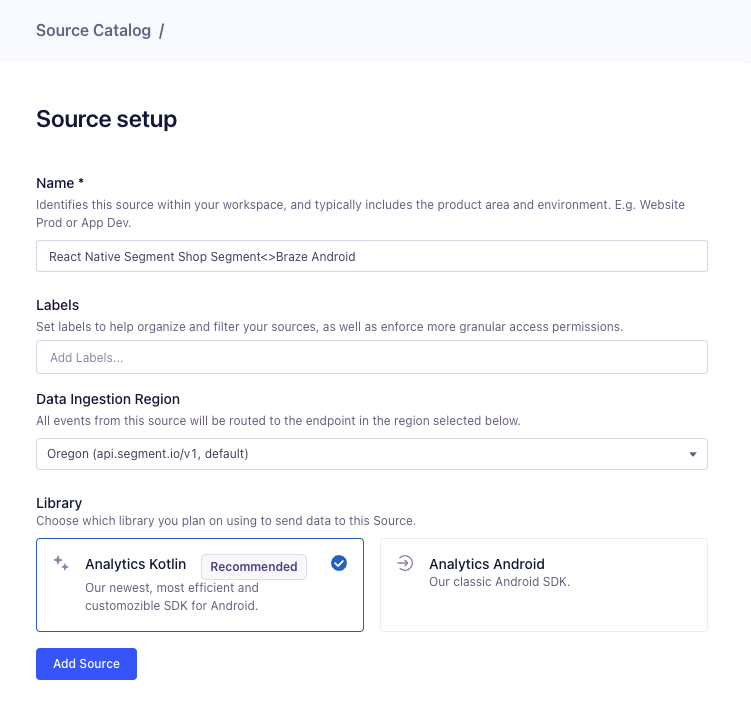
When sending data to Braze from a React Native App, you will need to create a React Native Source per OS. For example, create a source for iOS and another source for Android. This will be used later to map each source to their respective OS-specific Braze destination.
When a push token is registered from a device and sent to Braze, it is associated with the app identifier used when initializing the SDK. The device-type conditional initialization ensures that any push tokens sent to Braze are associated with the relevant app. For that reason, you need to use an OS specific source/destination setup.
Important: If the React Native app initializes Braze with the same Braze app identifier for all devices, then all React Native users will be considered Android or iOS users in Braze, and all push tokens will be associated with that operating system.
1. Go to Connections -> Sources -> Add Source

2. Search for React Native

3. Fill out the necessary fields and Add Source
You should now have a new iOS Source.
4. Repeat this process to create a source for Android
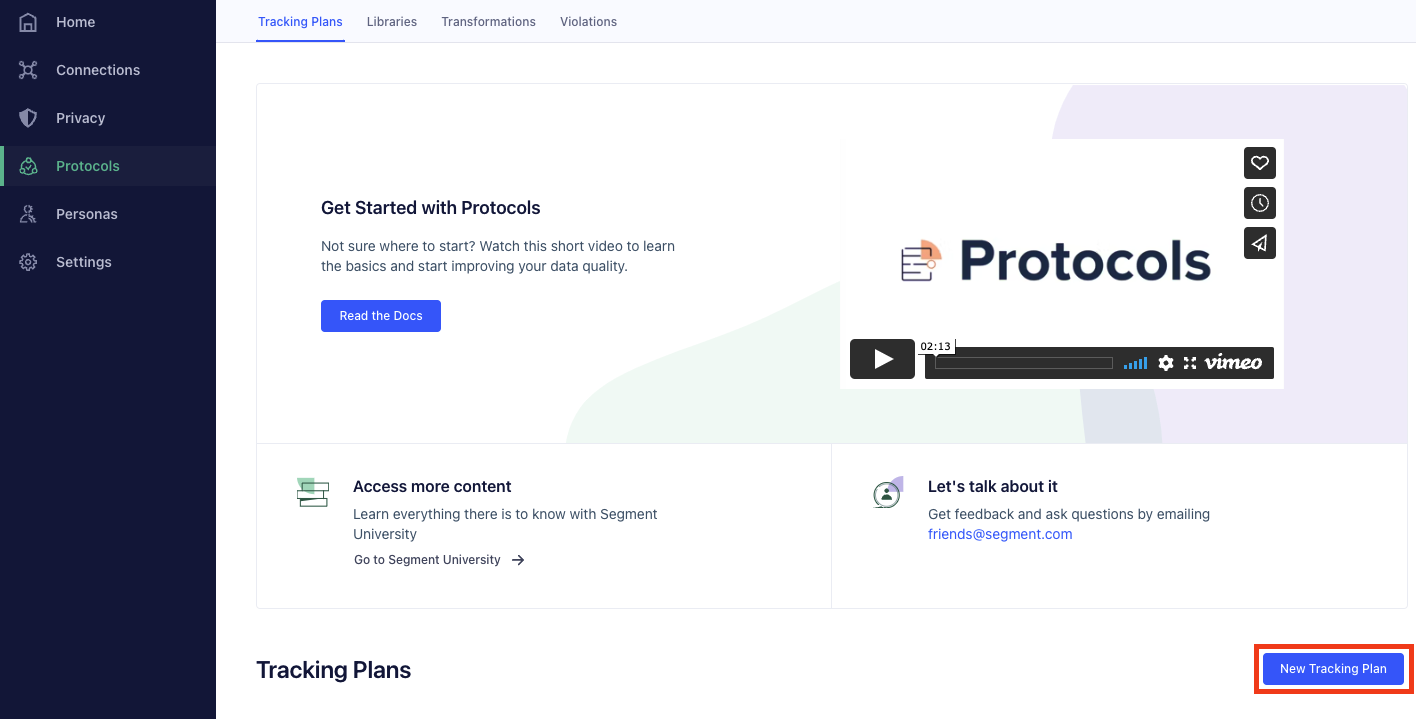
This is technically all you need to get started with your implementation. However, as mentioned earlier, the best analytics implementations are planned. While this may seem like a big lift in the beginning, it will make your life much easier as your analytics needs start to scale. To do this, we’re going to add a Tracking Plan**.
**Protocols and Tracking Plans are a Business Tier add-on. However, the steps above are still a helpful exercise to make a plan with Google Sheets or Excel for your own tracking purposes if you are not currently in the Business Tier.
If you don’t have access to Protocols or already know how to implement a Tracking Plan, feel free to skip this section. The full Segment Shop Tracking Plan can be found here in JSON format, which can be used to create a tracking plan via our API docs.
Start by selecting Schema in your React Native Source
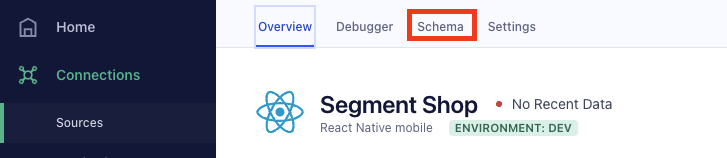
2. Next, select Connect Tracking Plan

3. Finally, select New Tracking Plan
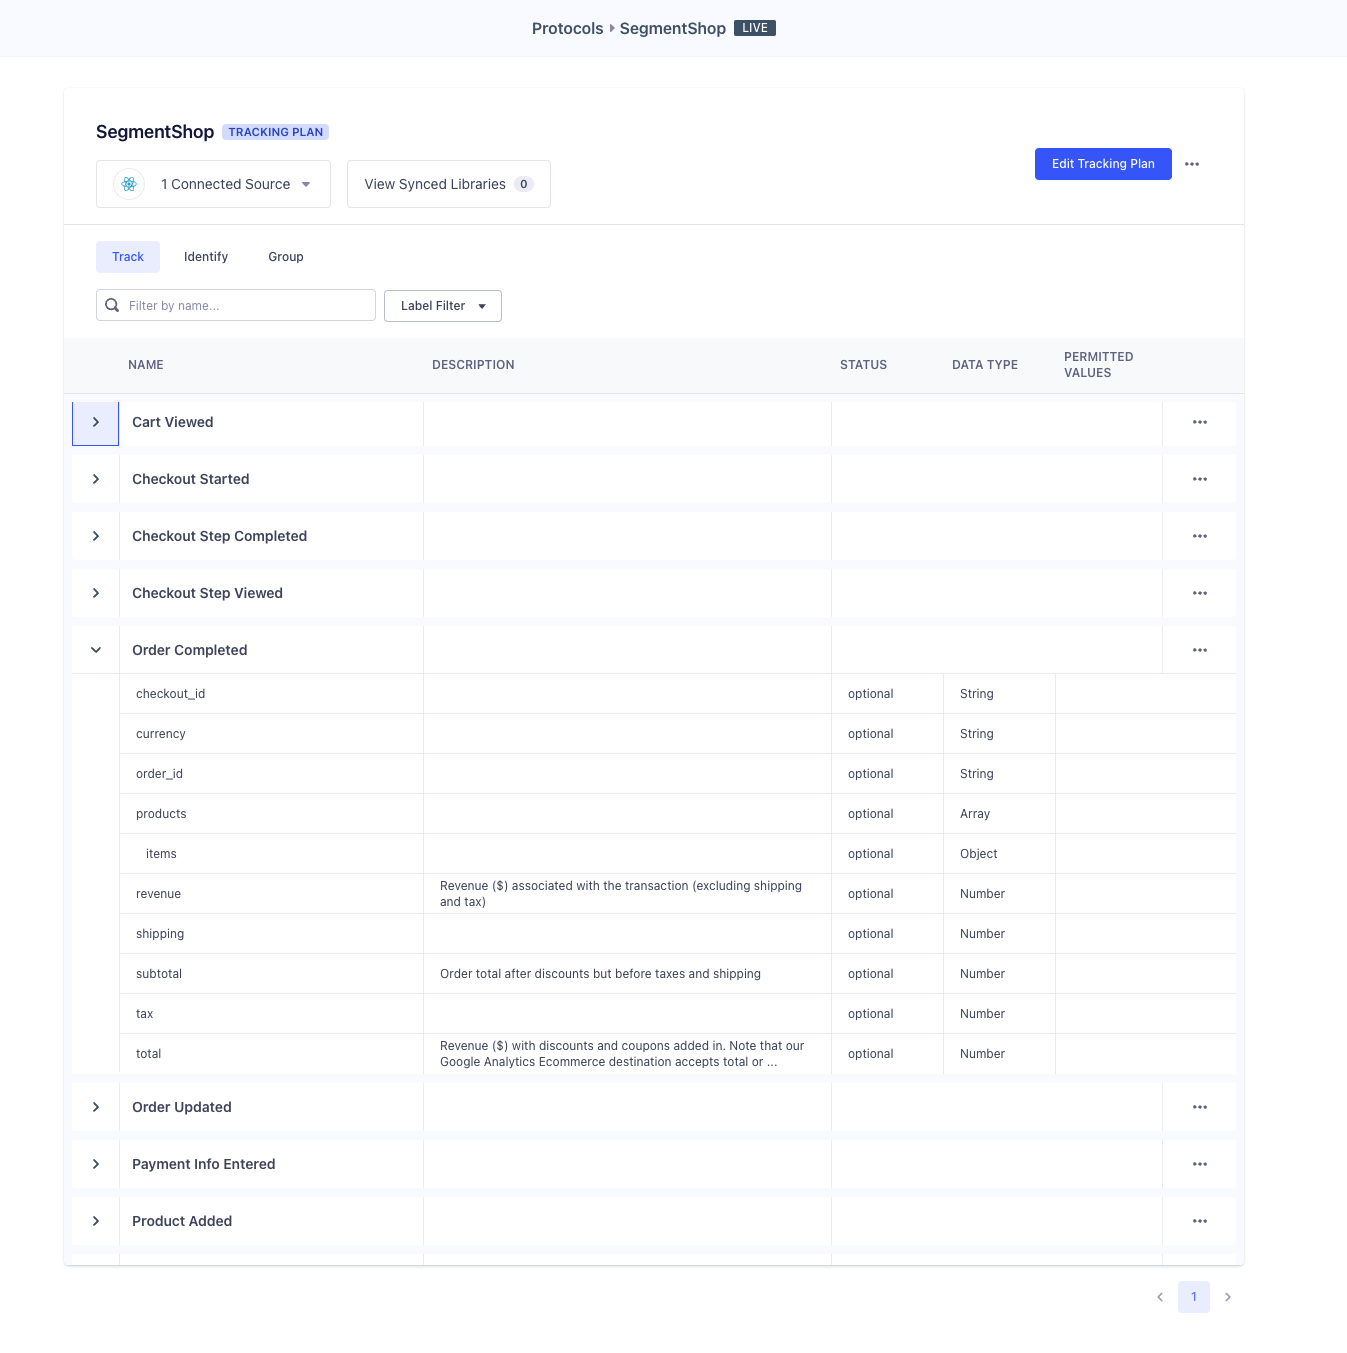
Before we begin adding events to our tracking plan, let’s take a step back and think about what we need. Segment’s E-commerce Spec is a great place to start thinking about the events we’d like to track and the properties we need to associate with a particular event. You should also consider where you need to send event data as different tools have different requirements. For the sake of this demo, we are ultimately going to send data to Braze. We can start by running the app.
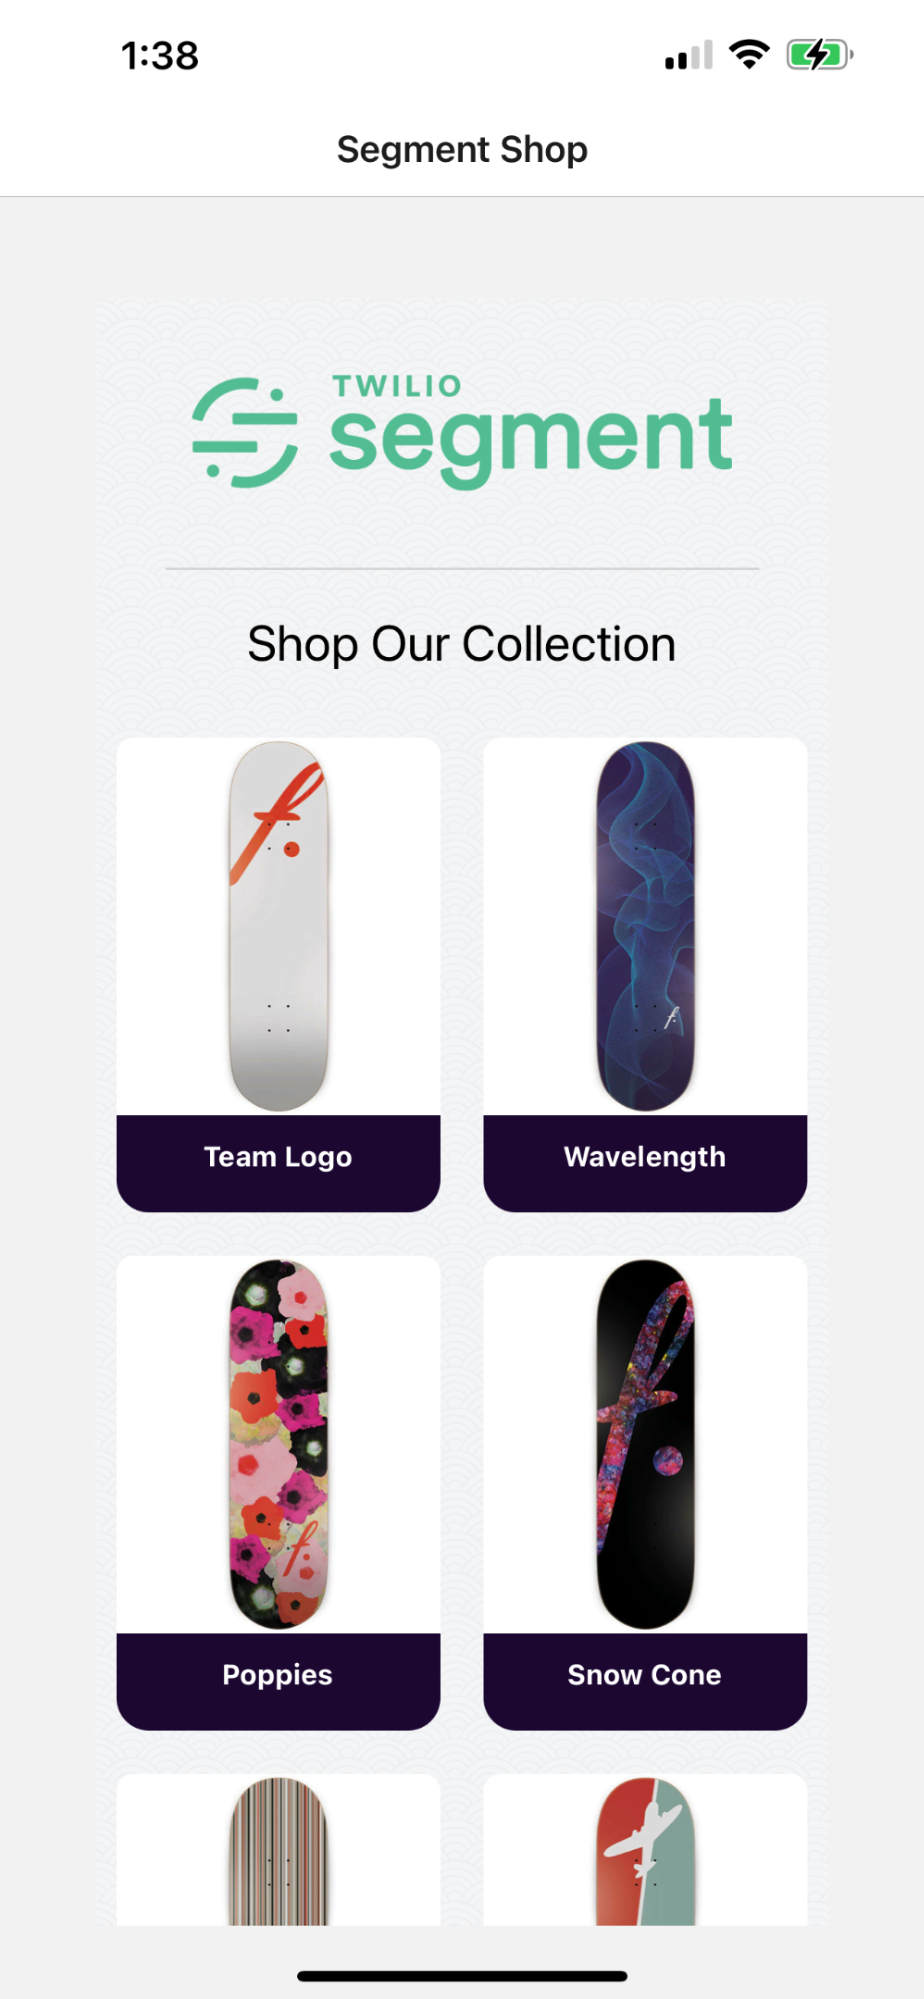
The home page of our Segment Shop is simply a list of skateboards. This fits perfectly with the Product List Viewed event in the E-commerce Spec so let’s add that to our tracking plan.
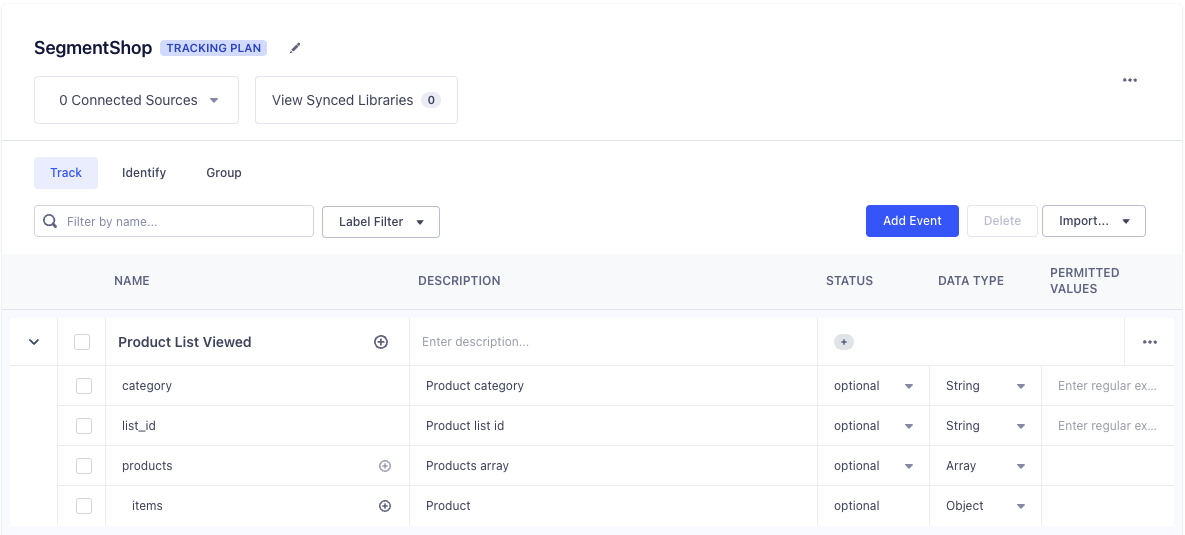
Once you’ve added the event and its associated properties, click Add Event. We are going to do this for the rest of the events we’ll need for our shop.
Now that we have a complete tracking plan for our app, we can start to implement Segment’s Analytics for React Native library. To get started, add the following packages:
You may want to rebuild your app to make sure everything is compiling correctly. Next, in App.tsx you will need to import the library and set up the client configuration. The WRITE_KEY can be found in the Source Overview of the new React Native Sources we just created in the Segment workspace. Take note of the WRITE_KEY for both the iOS and Android sources.
Conditionally initialize with the relevant write key based on the native OS of the device.
The Segment Client has a number of useful configuration options. You can find more about those here. For this project, we’ll use the following:
The last thing we need to do in App.tsx is wrap the app in the analytics provider. This uses the Context API and will allow access to the analytics client anywhere in the application.
Rebuild the app and you will now start seeing Application Lifecycle Events in your Source Debugger! Before we start implementing custom track events, we’re going to add enrichment plugins to request tracking permission from the user on both Android and iOS devices.
iOS
In Info.plist add the following
In App.tsx
Android
In app/build.gradle
In AndroidManifest.xml
All that’s left to do is implement the track events from the tracking plan. An easy one to start with is the Product List Viewed event we covered earlier. In Home.tsx add the {useEffect} hook to your existing React import and import the useAnalytics hook.
Add the useAnalytics hook and set up the track call inside the useEffect method to track the Product List Viewed event when the screen is rendered.
As an exercise, you can go through the rest of the Tracking Plan and implement the remaining tracking events. If you want to see a final version, checkout the final-app-ecommerce in the same repository.
Destination Plugins make it possible to send your events to analytics tools directly from the device. This is handy when you want to integrate an SDK that either does not offer a server-side endpoint or has additional functionality you would like to use (in-app messaging, push notifications, etc.). In this example we are going to add the Braze Destination Plugin.
To get started, add a BrazeDestination for your iOS Source and a second Braze destination for your Android source in your Segment workspace.
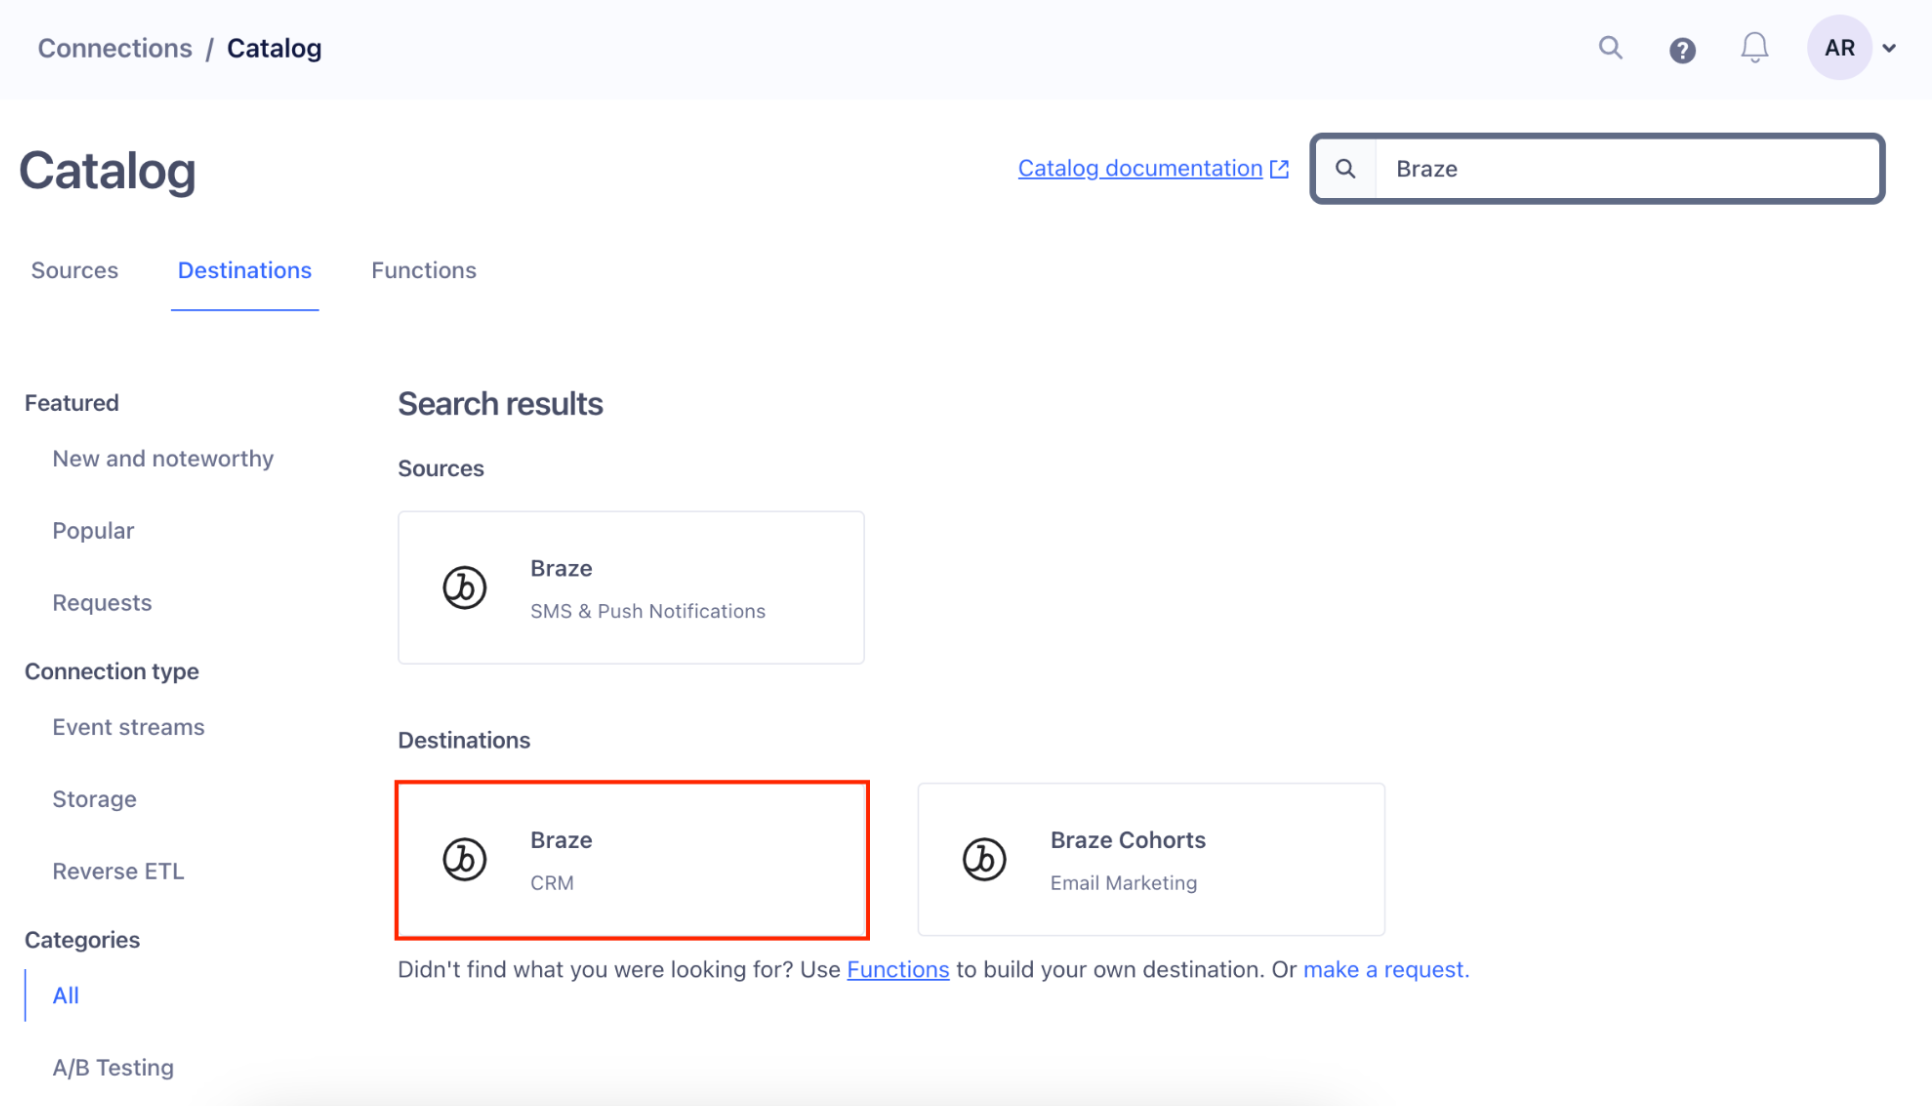
Go to Connections -> Destinations -> Add Destination

2. Search for Braze and choose Braze CRM
3. Select as your source the React Native Source you created for iOS
4. Give your destination a name and choose Classic as the Destination Framework.
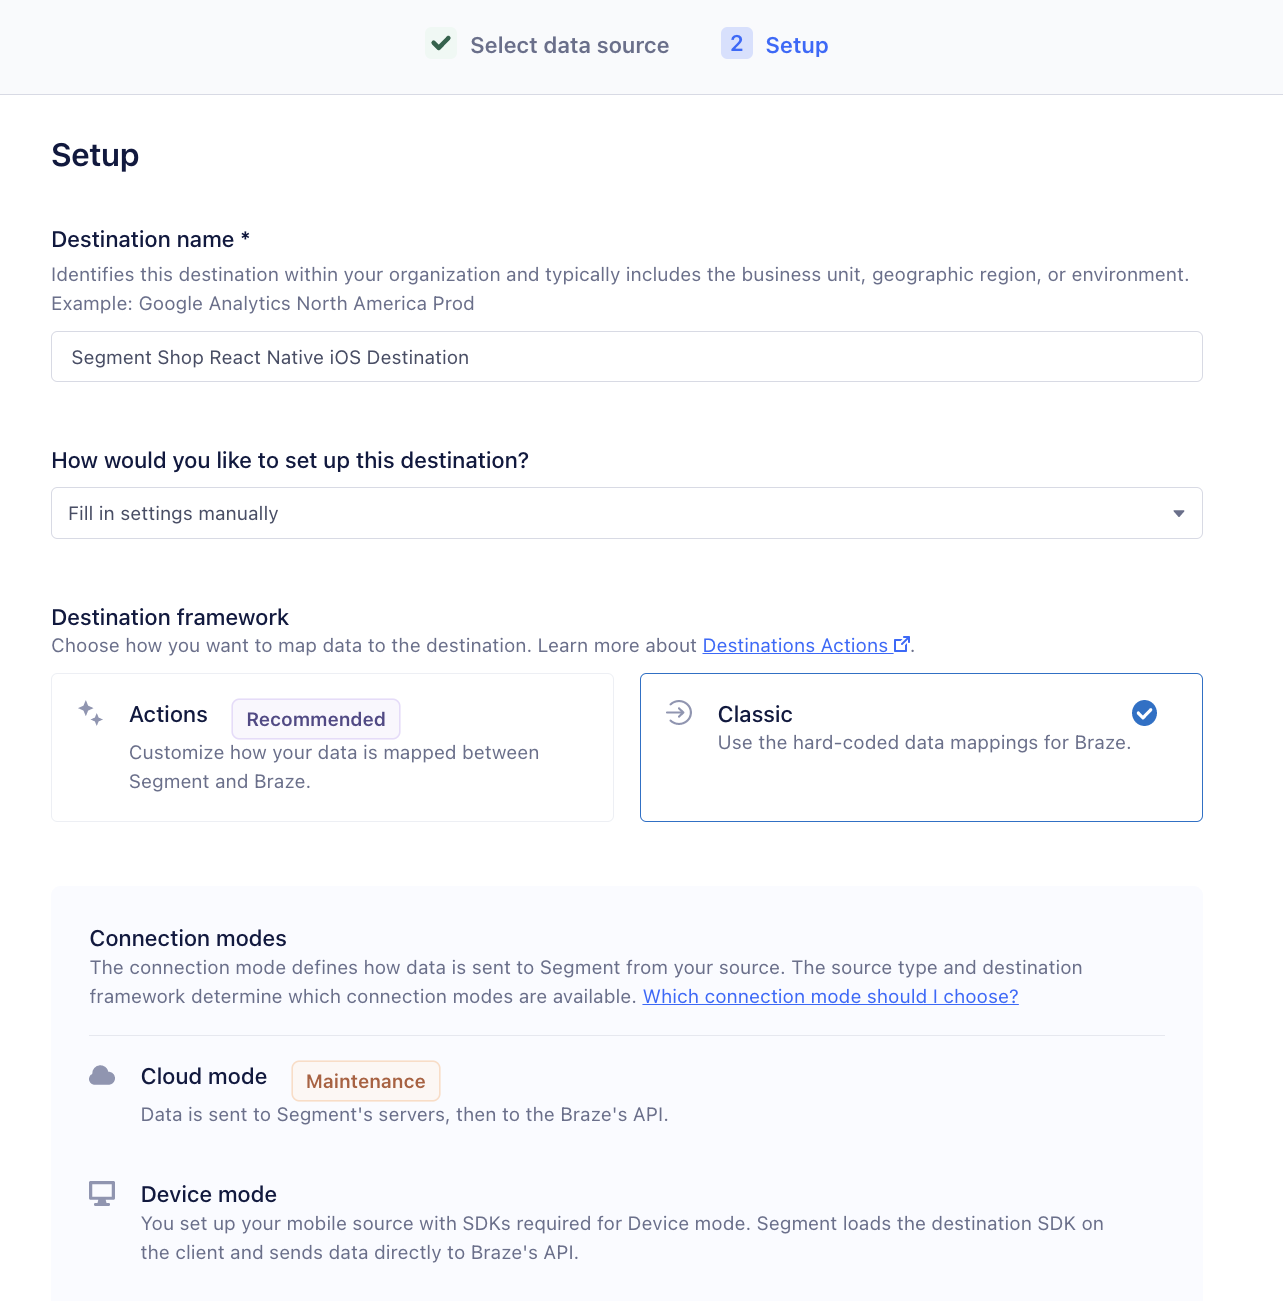
5. Fill out your settings, making sure to complete the following:
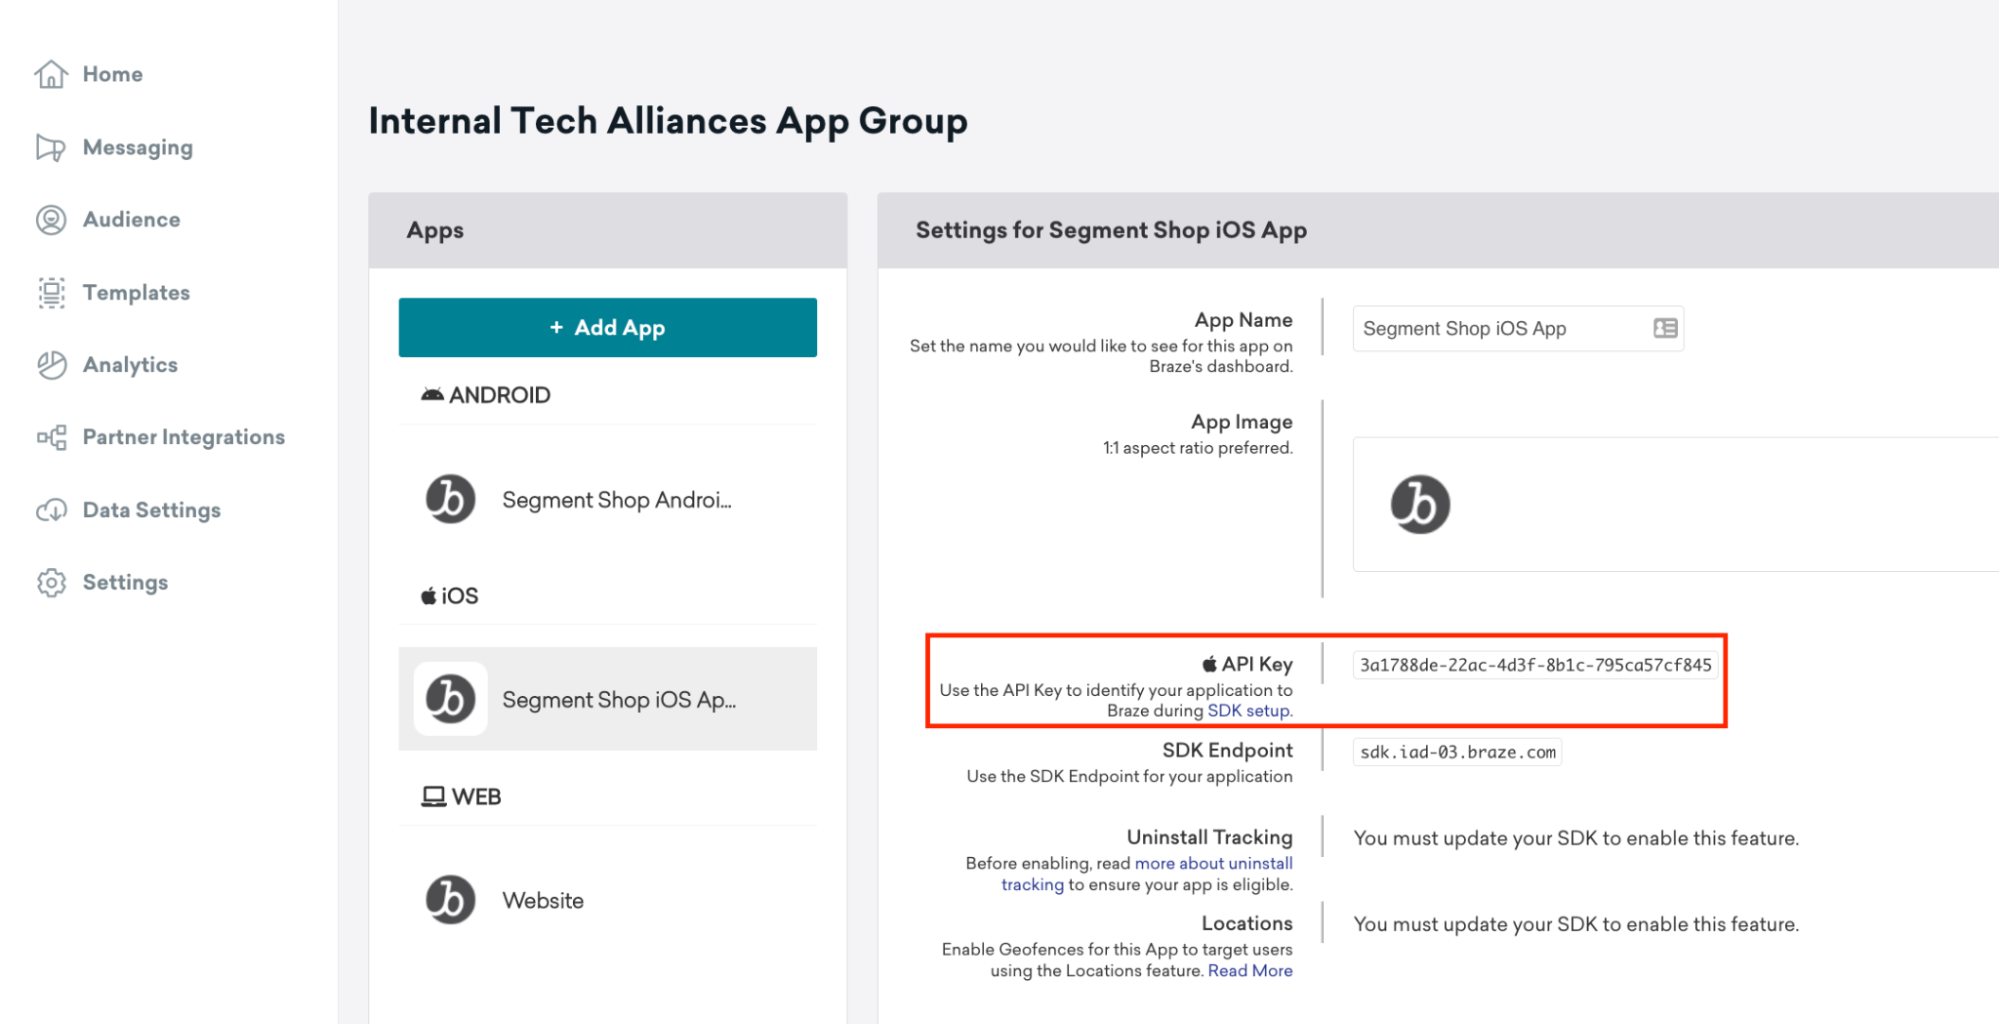
a. App Identifier will correspond with your Braze App Identifier. This can be found by navigating to Settings > App Settings > API Key in your Braze dashboard.
b. REST API Key** will correspond with your Braze REST API key which can be found by navigating to Settings > API Key > Identifier

c. Endpoint Region corresponds to your Braze Instance. This can be determined by your dashboard URL. For example, if your dashboard URL is https://dashboard-03.braze.com your Instance (Endpoint Region) will be 03.
6. Finally, enable your destination.
7. Repeat the steps to create your Android destination.
Add dependencies
Add pods to autolink the Braze SDK
Additional Braze Setup for IOS
In AppDelegate.mm import Braze
4. Add the following at the bottom of Appdelegate.mm
Add Plugin to Segment Client
(Optional) Add an Identify call with a user ID to automatically create a known user when you run your app and allow you to more easily search for your user.
You should now be able to rebuild your app and successfully send your events to Braze. You should begin seeing data in your Braze dashboard within minutes of connecting your app.
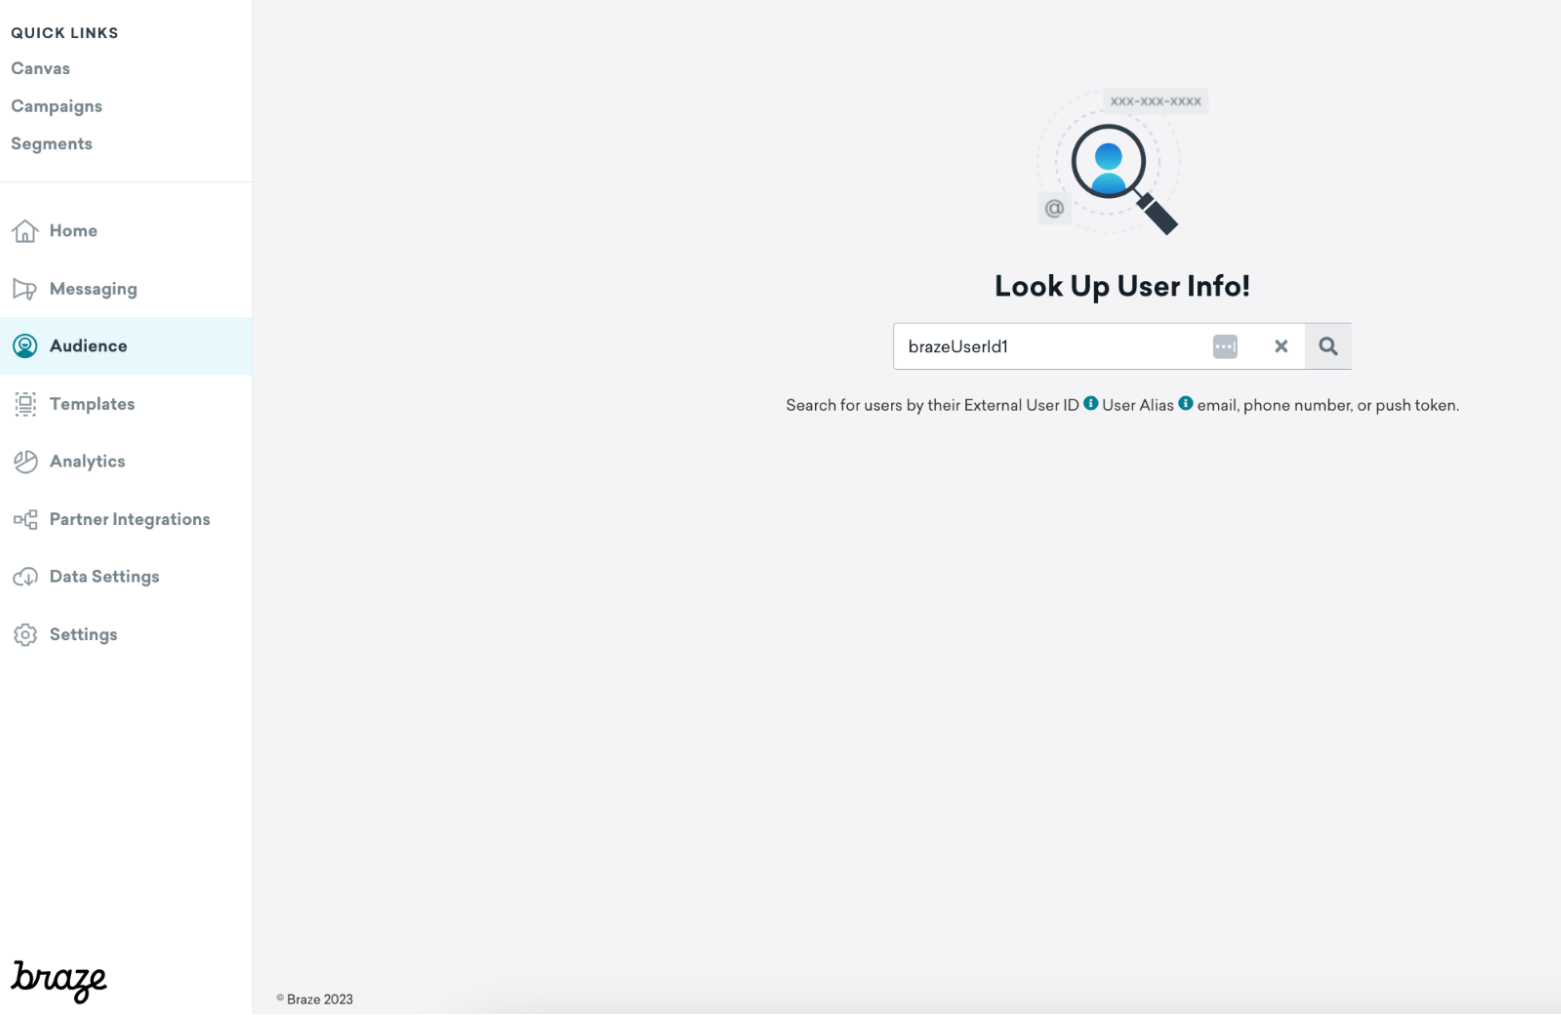
In your Braze dashboard go to Audience -> Search Users and search for the user ID
In-app messages are available to all customers and native in-app messages display automatically on Android and iOS when using React Native without needing any additional effort!
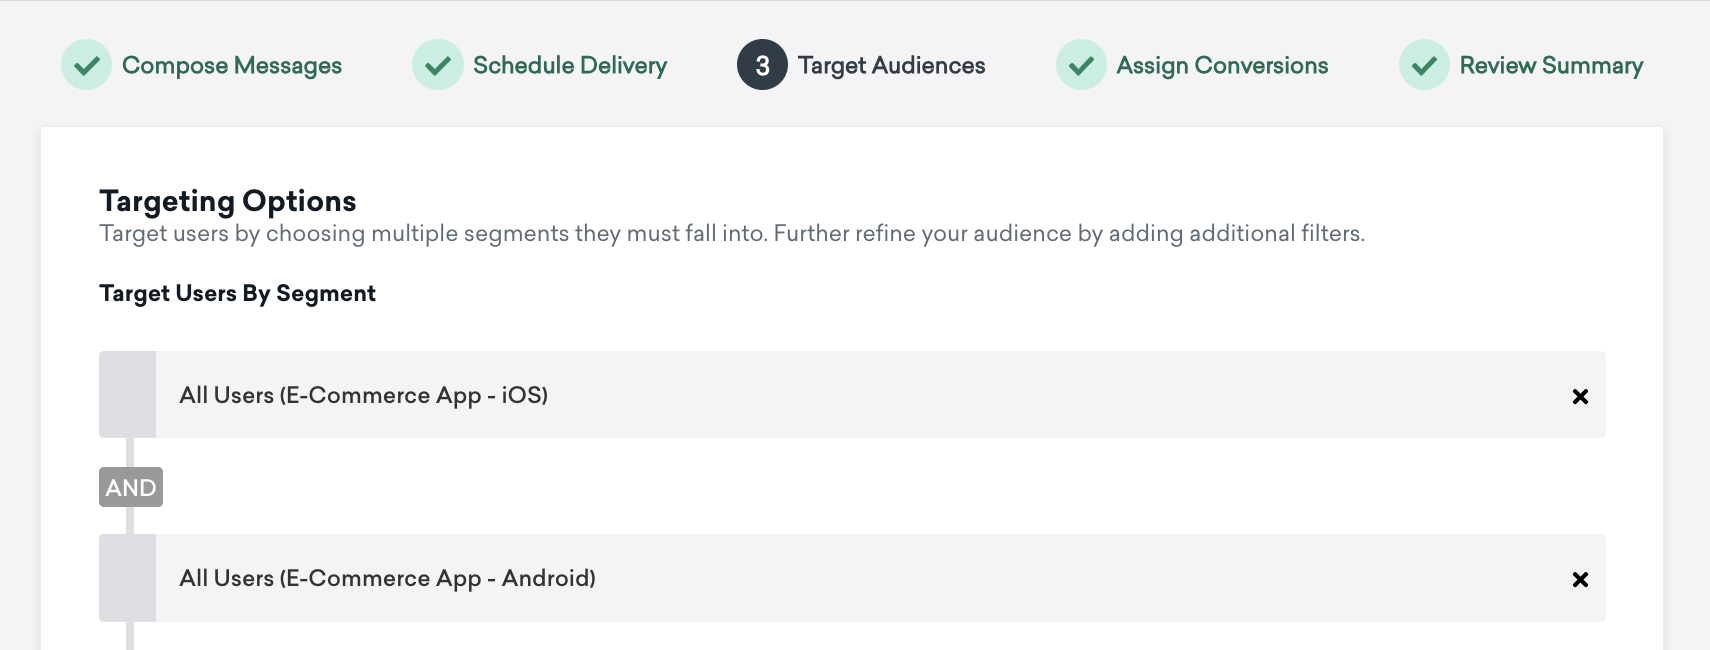
For example, we can set up an in-app message campaign triggered by the “Product Viewed” event:
This in-app message will target all of our e-commerce app users:
After launching the campaign, when a new session is started in the app and a product is viewed, we can see the in-app message:
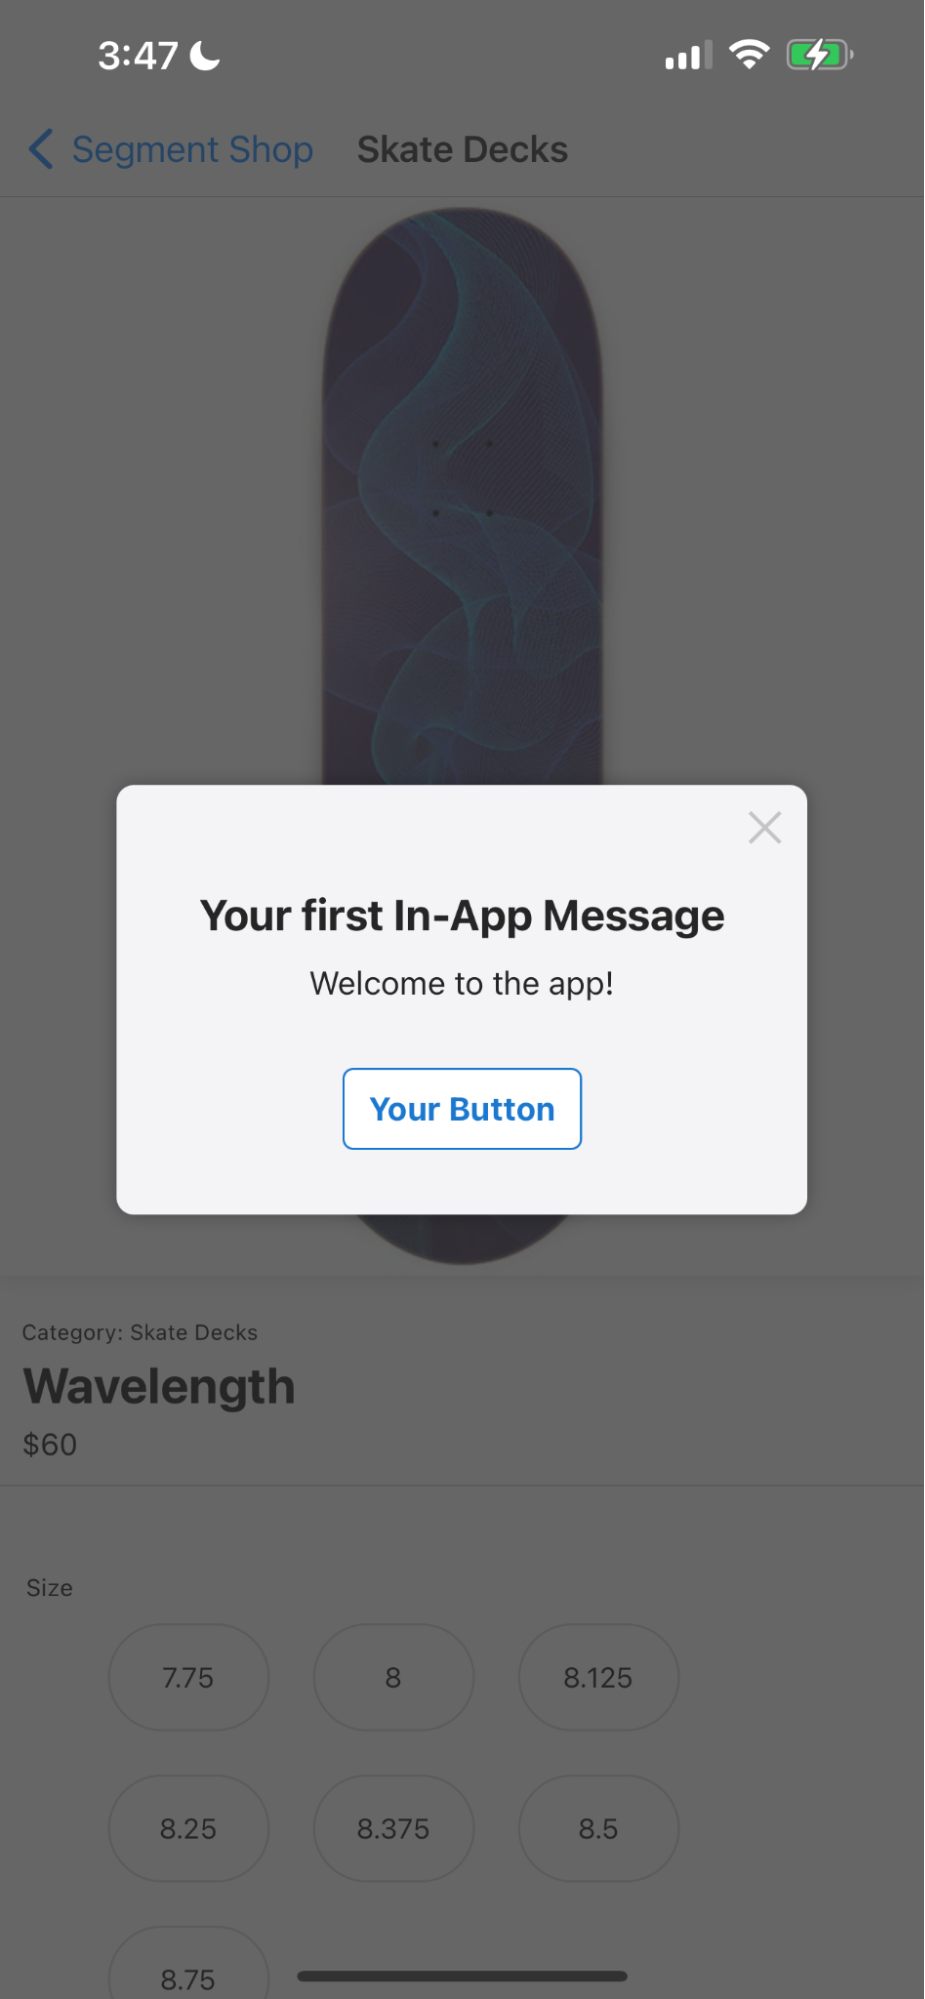
*Note: some simulators can block the delivery of in-app messages. If you are following along but having difficulty getting your message to show, ditch the simulator and try testing on your device!
Content Cards are a channel that is embedded directly into the interface of your app or website so that you can engage users in a way that feels like a native, seamless part of the experience. You can do a lot with Content Cards — the most common implementations are a message inbox, carousel, or banner.
Content Cards are great for extending the reach of other channels, like email or push notifications, and they give you more control over the app or website experience.
Note: Content Cards are an add-on feature and must be purchased. To get started with Content Cards, reach out to your Braze customer success manager or our support team.
We are going to use Content Cards in our app to run a coupon campaign for new users who downloaded the app and persist that coupon in their notification tray for 1 week or until they’ve made a purchase. This is going to be pretty straightforward as the Braze SDK includes a default card feed that will handle UI, rendering, functionality, and tracking out of the box. However, if you’re feeling creative, you can build and customize your UI by following the Braze customization doc.
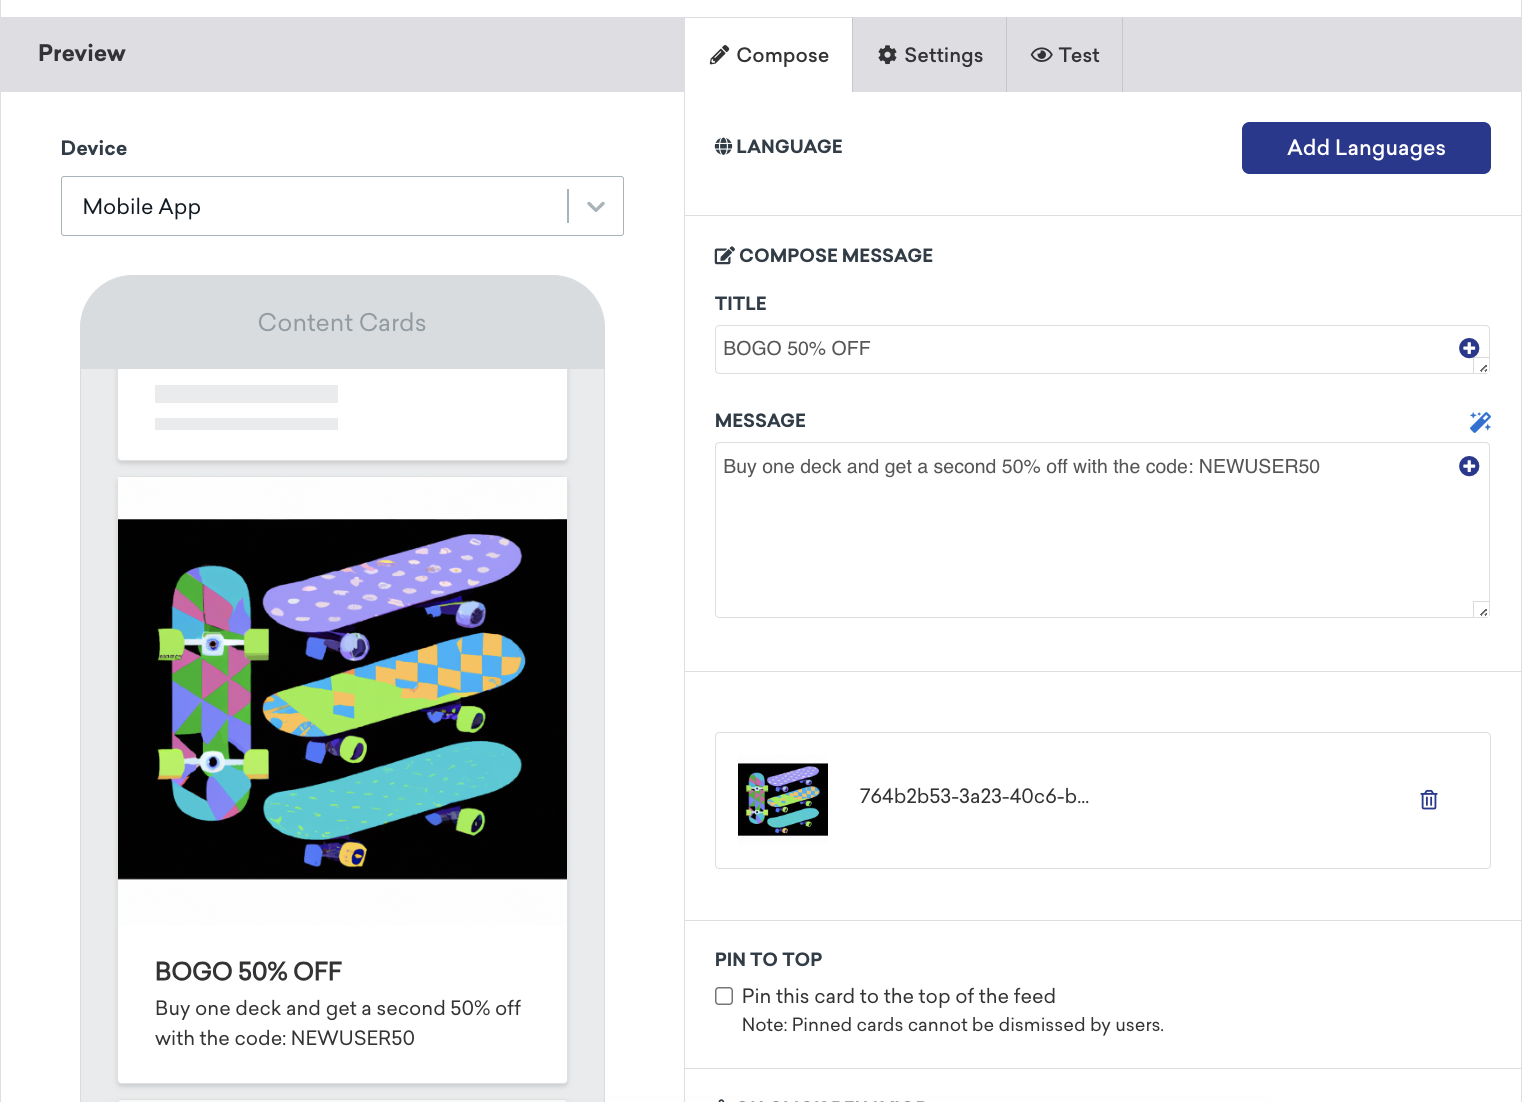
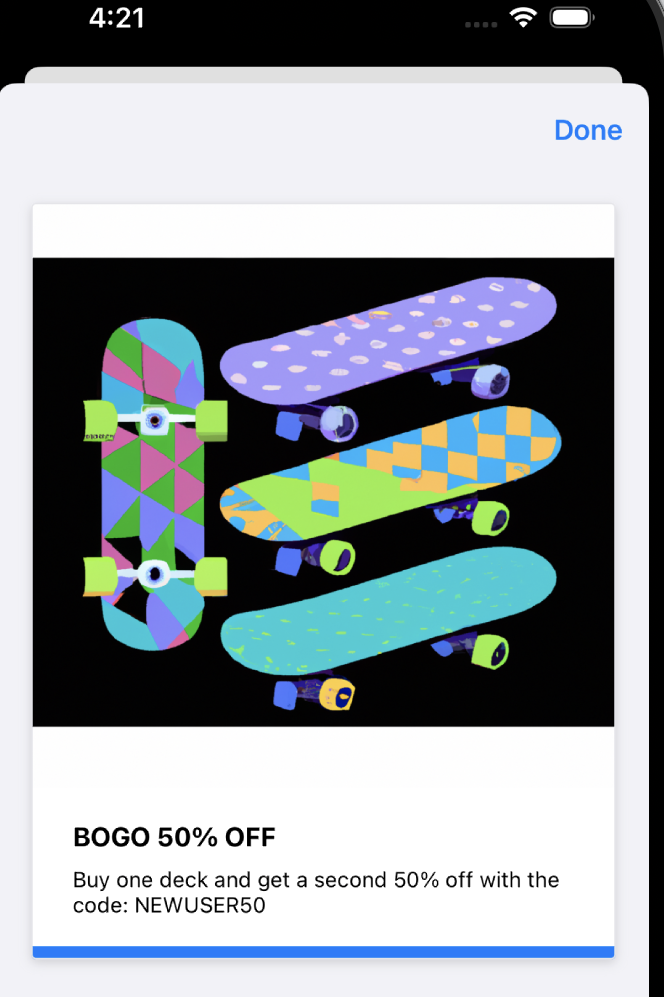
First we will need to create the Content Card campaign in Braze that will deliver coupons to new users. A step-by-step guide on creating a Content Card campaign can be found here. In our example we'll be using a captioned image Content Card type.
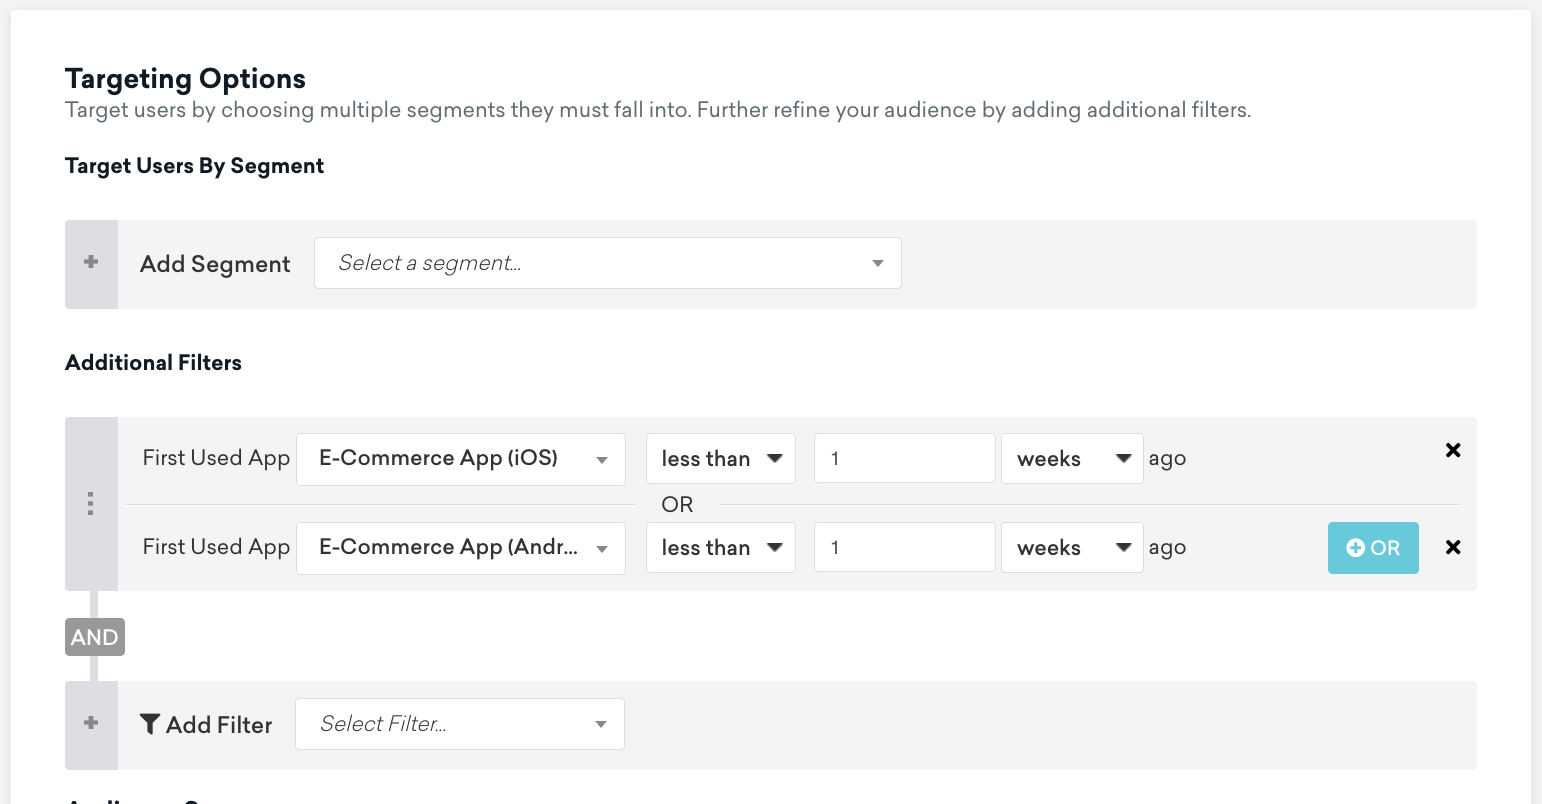
Our campaign will be triggered on session start for all users who first used the app less than 1 week ago.
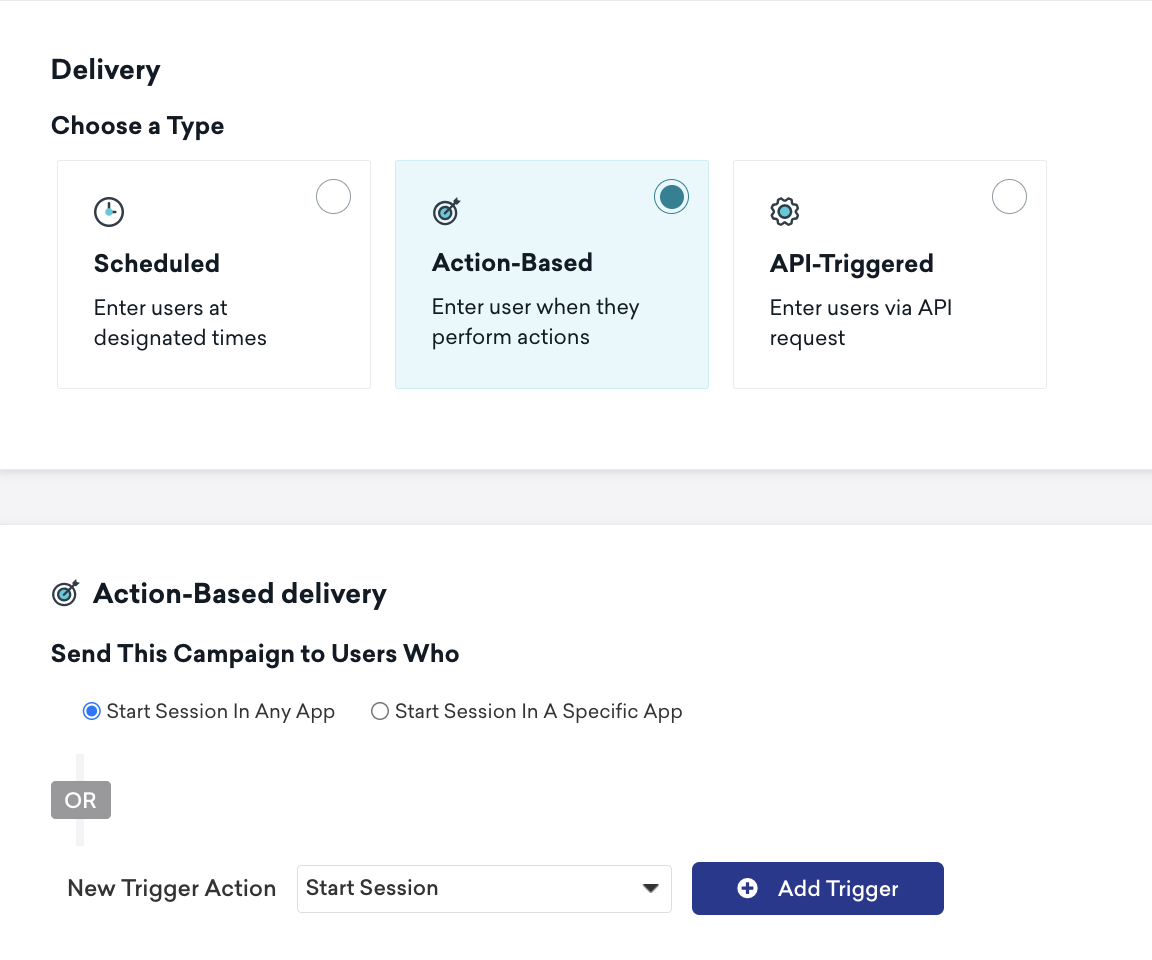
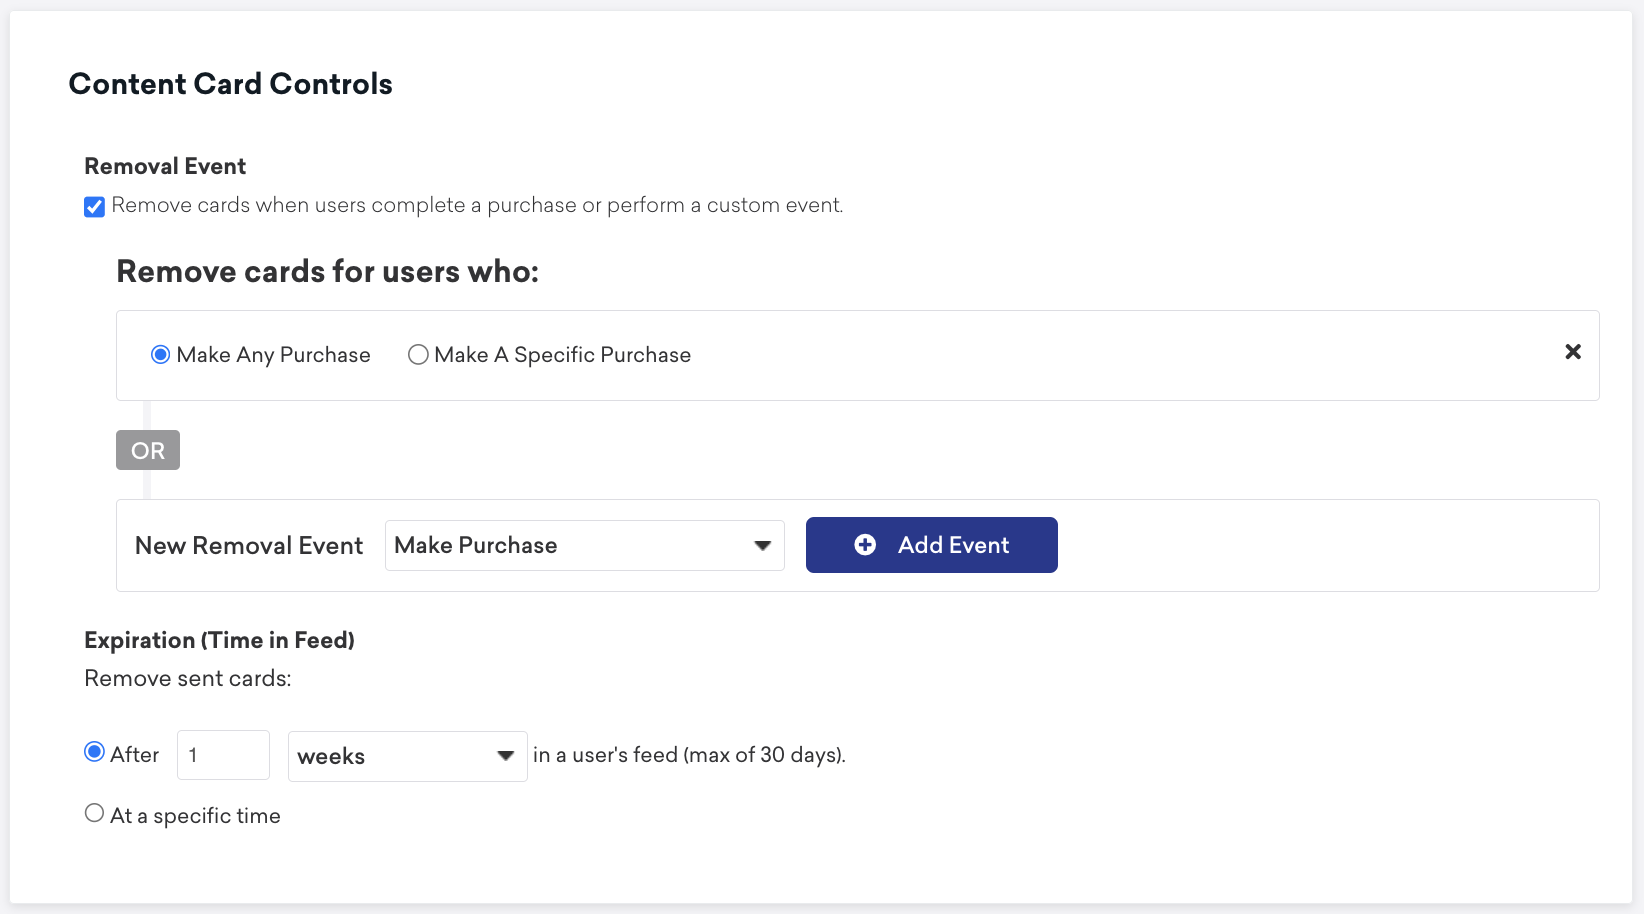
And we will include controls to remove the coupon Content Card after a user has made a purchase, or expire the Content Card after 1 week.
Once ready, we can launch the campaign. Now that we’ve built out the campaign, we will need to add support for Content Cards in our app. To get started, navigate to starter-app-braze/components and create a new component called CouponButton.tsx. This button will be rendered in the navigation bar of the home page and is simply going to handle displaying content cards. Add the following code:
Navigate to starter-app-braze/App.tsx and import your new button:
Add it to the Home Stack.Screen
Rebuild your app and press the button. Your Content Card coupons will now be available. There is a lot more you can do with this from here. For instance, you could have the coupon navigate to a specific section of your app, or to a URL of your choice.
Conclusion
We have now completed a simple yet holistic tracking implementation with Analytics React Native 2.0. With the help of the E-Commerce Spec and Protocols, we have built a tracking plan to standardize the events and data being tracked.
The new architecture implemented in Analytics React Native 2.0 made it possible to add IDFA and advertisingId collection consent without incorporating another third-party dependency and incorporate an analytics hook to track events throughout the application.
Finally, Analytics React Native 2.0 makes it easier than ever to customize your tracking implementation to meet the bespoke requirements of your app. Now that the foundations of the analytics implementation are complete, customizing it over time or as you scale will typically be as straightforward as adding a few dependencies and updating your tracking plan.

Our annual look at how attitudes, preferences, and experiences with personalization have evolved over the past year.