Inside Twilio Segment Data Lakes: Secure Tooling Using AWS API Gateway
By Maggie Yu
At Segment, we rely heavily on custom-built, internal tools for running ad-hoc tasks and debugging problems in our infrastructure. These are run not just by the engineers doing product development but also by our support teams, who use them to efficiently investigate and resolve customer-reported issues.
This internal tooling has been especially critical for maintaining the Segment Data Lakes product, which, as described in our previous blog post, loads data into a customer’s S3 bucket and Glue Catalog via EMR jobs.
Because the latter infrastructure is all in a customer’s AWS account and not a Segment-owned one, configuring, operating, and debugging issues in this product is a bit trickier than it otherwise would be for something running completely in Segment infrastructure.
One of the most common problems customers have when trying to set up Segment Data Lakes is missing permissions in their IAM policies. So, one of our tools tests if Segment’s role is allowed to access the target S3 bucket, Glue Catalog, and EMR cluster in the customer account. Another common tooling task is to submit EMR jobs to replay archived data into Segment Data Lakes, so customers can bootstrap the latter from historical data.
Since the people running these internal tools can access a customer’s resources, security is extremely important. Hence, all the security best practices that apply for sensitive production systems need to apply for our Data Lakes tooling as well. Among other examples, the access to the tools should be limited to a small group of people, and all the operations performed using the tools need to be tracked and auditable.
We evaluated multiple approaches to creating and securing these tools, but ultimately settled on using AWS’s API Gateway product. In this blog post, we’ll explain how we integrated the latter with the Data Lakes backend, and how we used IAM authorization and API Gateway resource policies to tighten up access control. We will also provide some examples of setting up the associated infrastructure in Terraform.
Data Lakes tooling has two components – a CLI client and a RPC service. Each CLI command issues a request to the RPC service, which can then access the associated customer resources.
When Segment Data Lakes was launched, only the Data Lakes engineers could access and use the CLI tool. This was fine for the initial launch, but in order to scale the product, we realized that we needed to allow wider access inside Segment. We thus set out to design some improvements that would allow us to open up this access in a safe, controlled manner.
Our initial design depended on SAML to authenticate users, which is how several other, internal tools at Segment address this problem. Segment uses the Okta-AWS SAML integration to manage and assign access to AWS IAM roles, and then we use aws-okta to authenticate with AWS and run tooling commands with the resulting credentials.
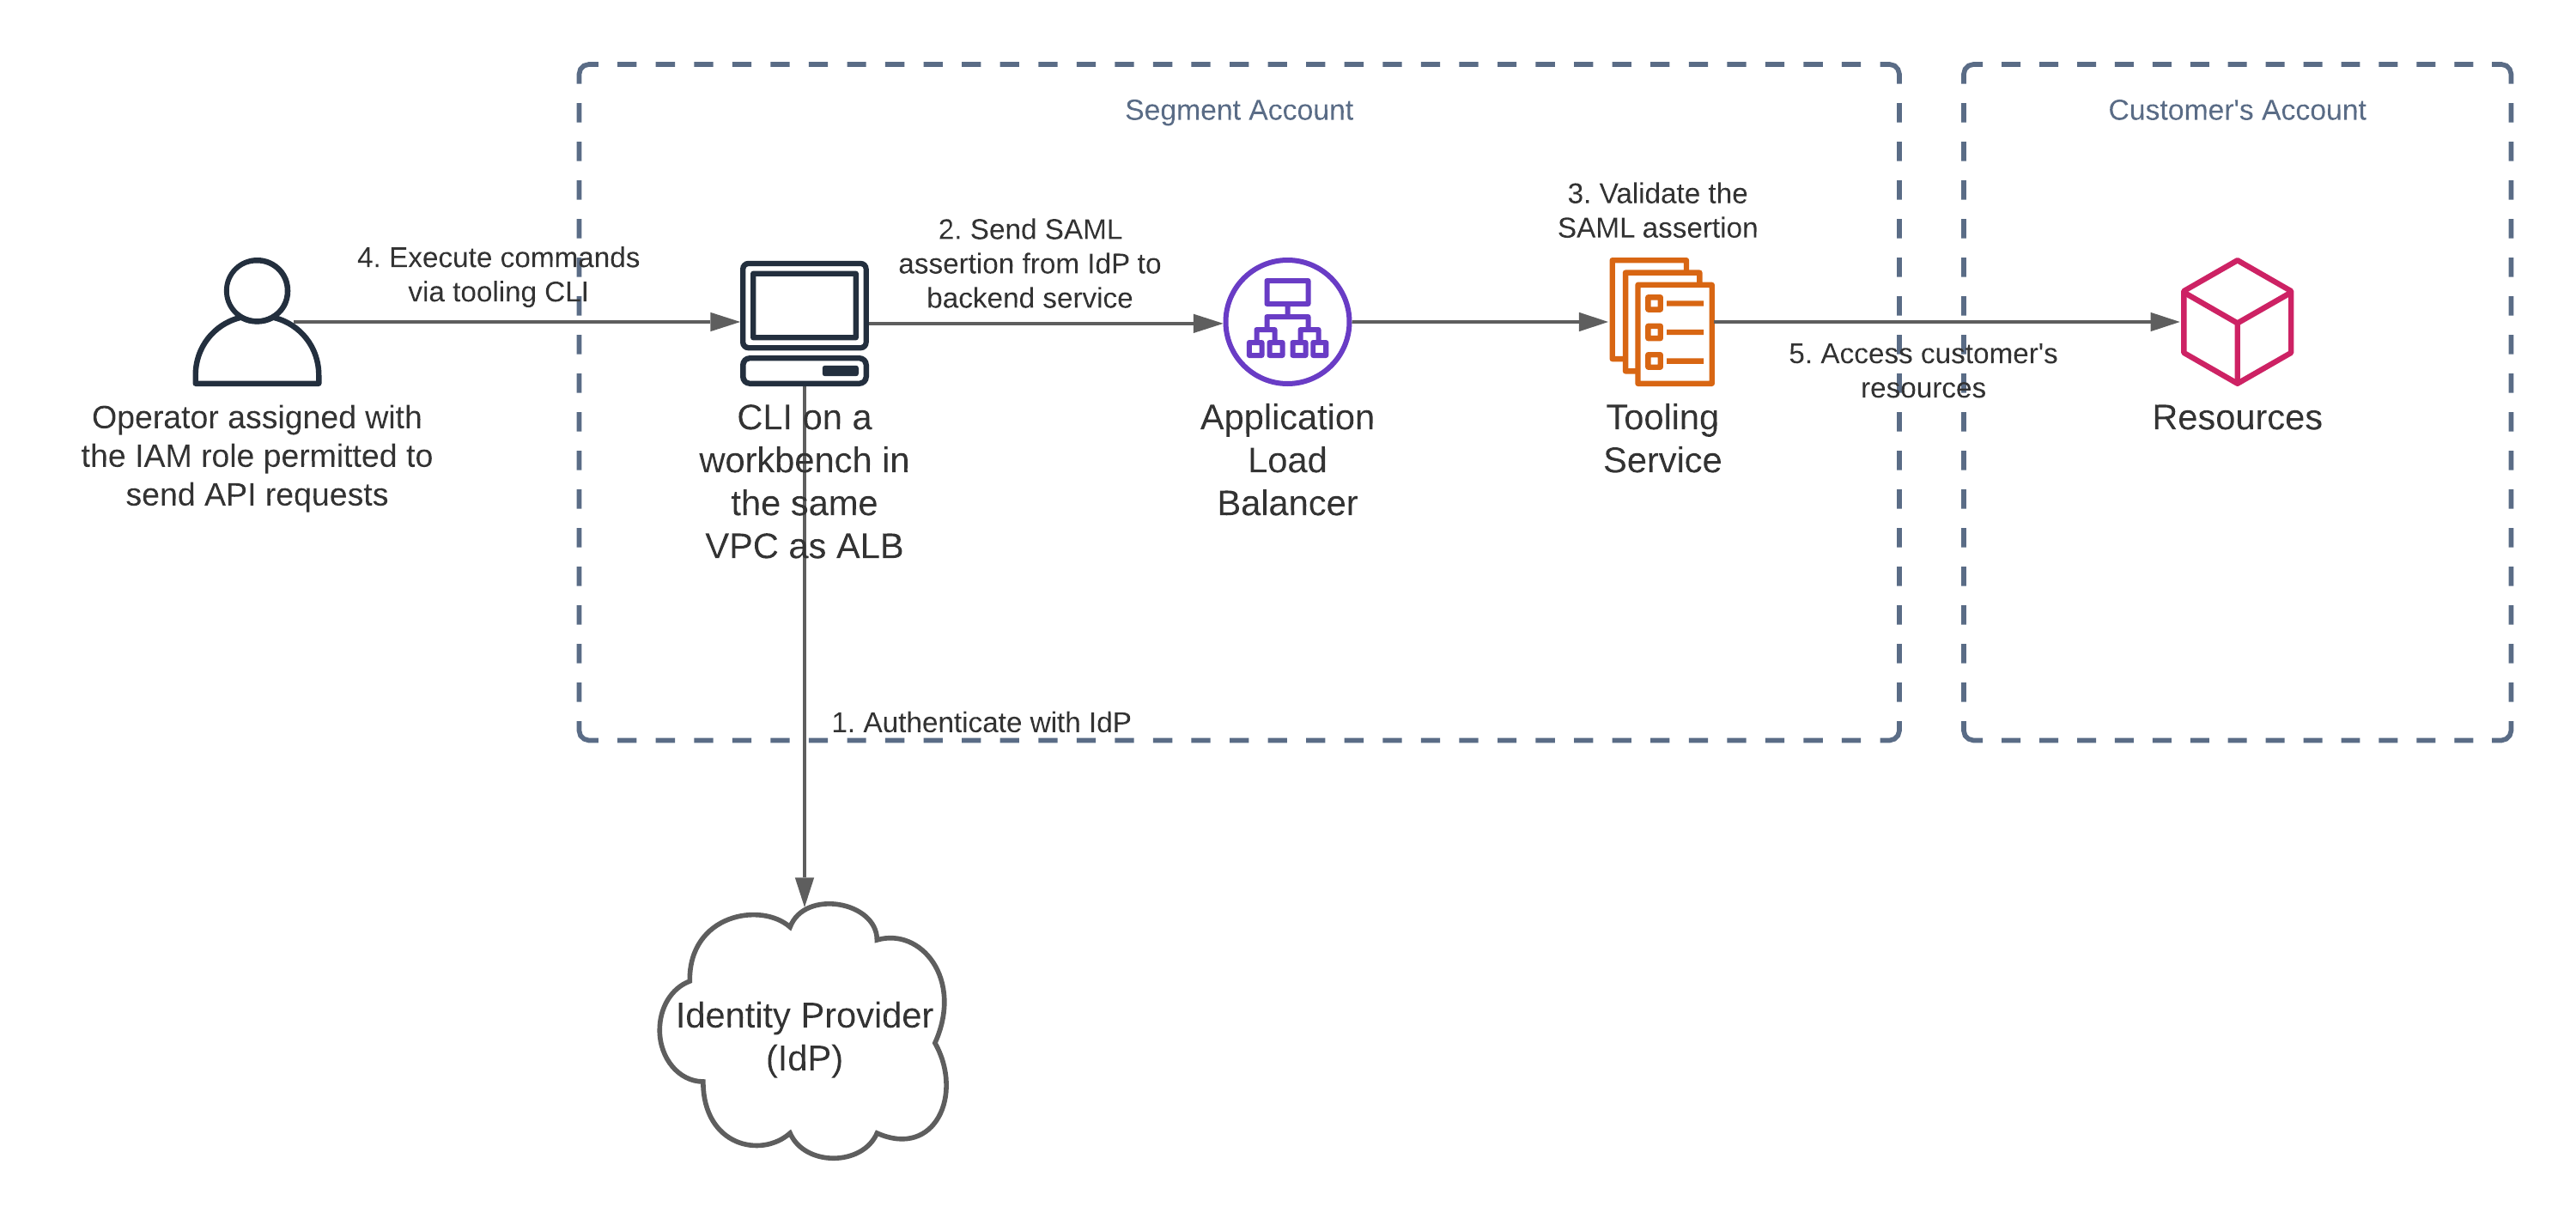
The SAML approach would allow us to verify that the operator of our tools is an authenticated and authorized Segment employee. However, this would add a lot of complexity because we’d need to create and maintain the code for both the CLI client and the associated SAML auth flow.
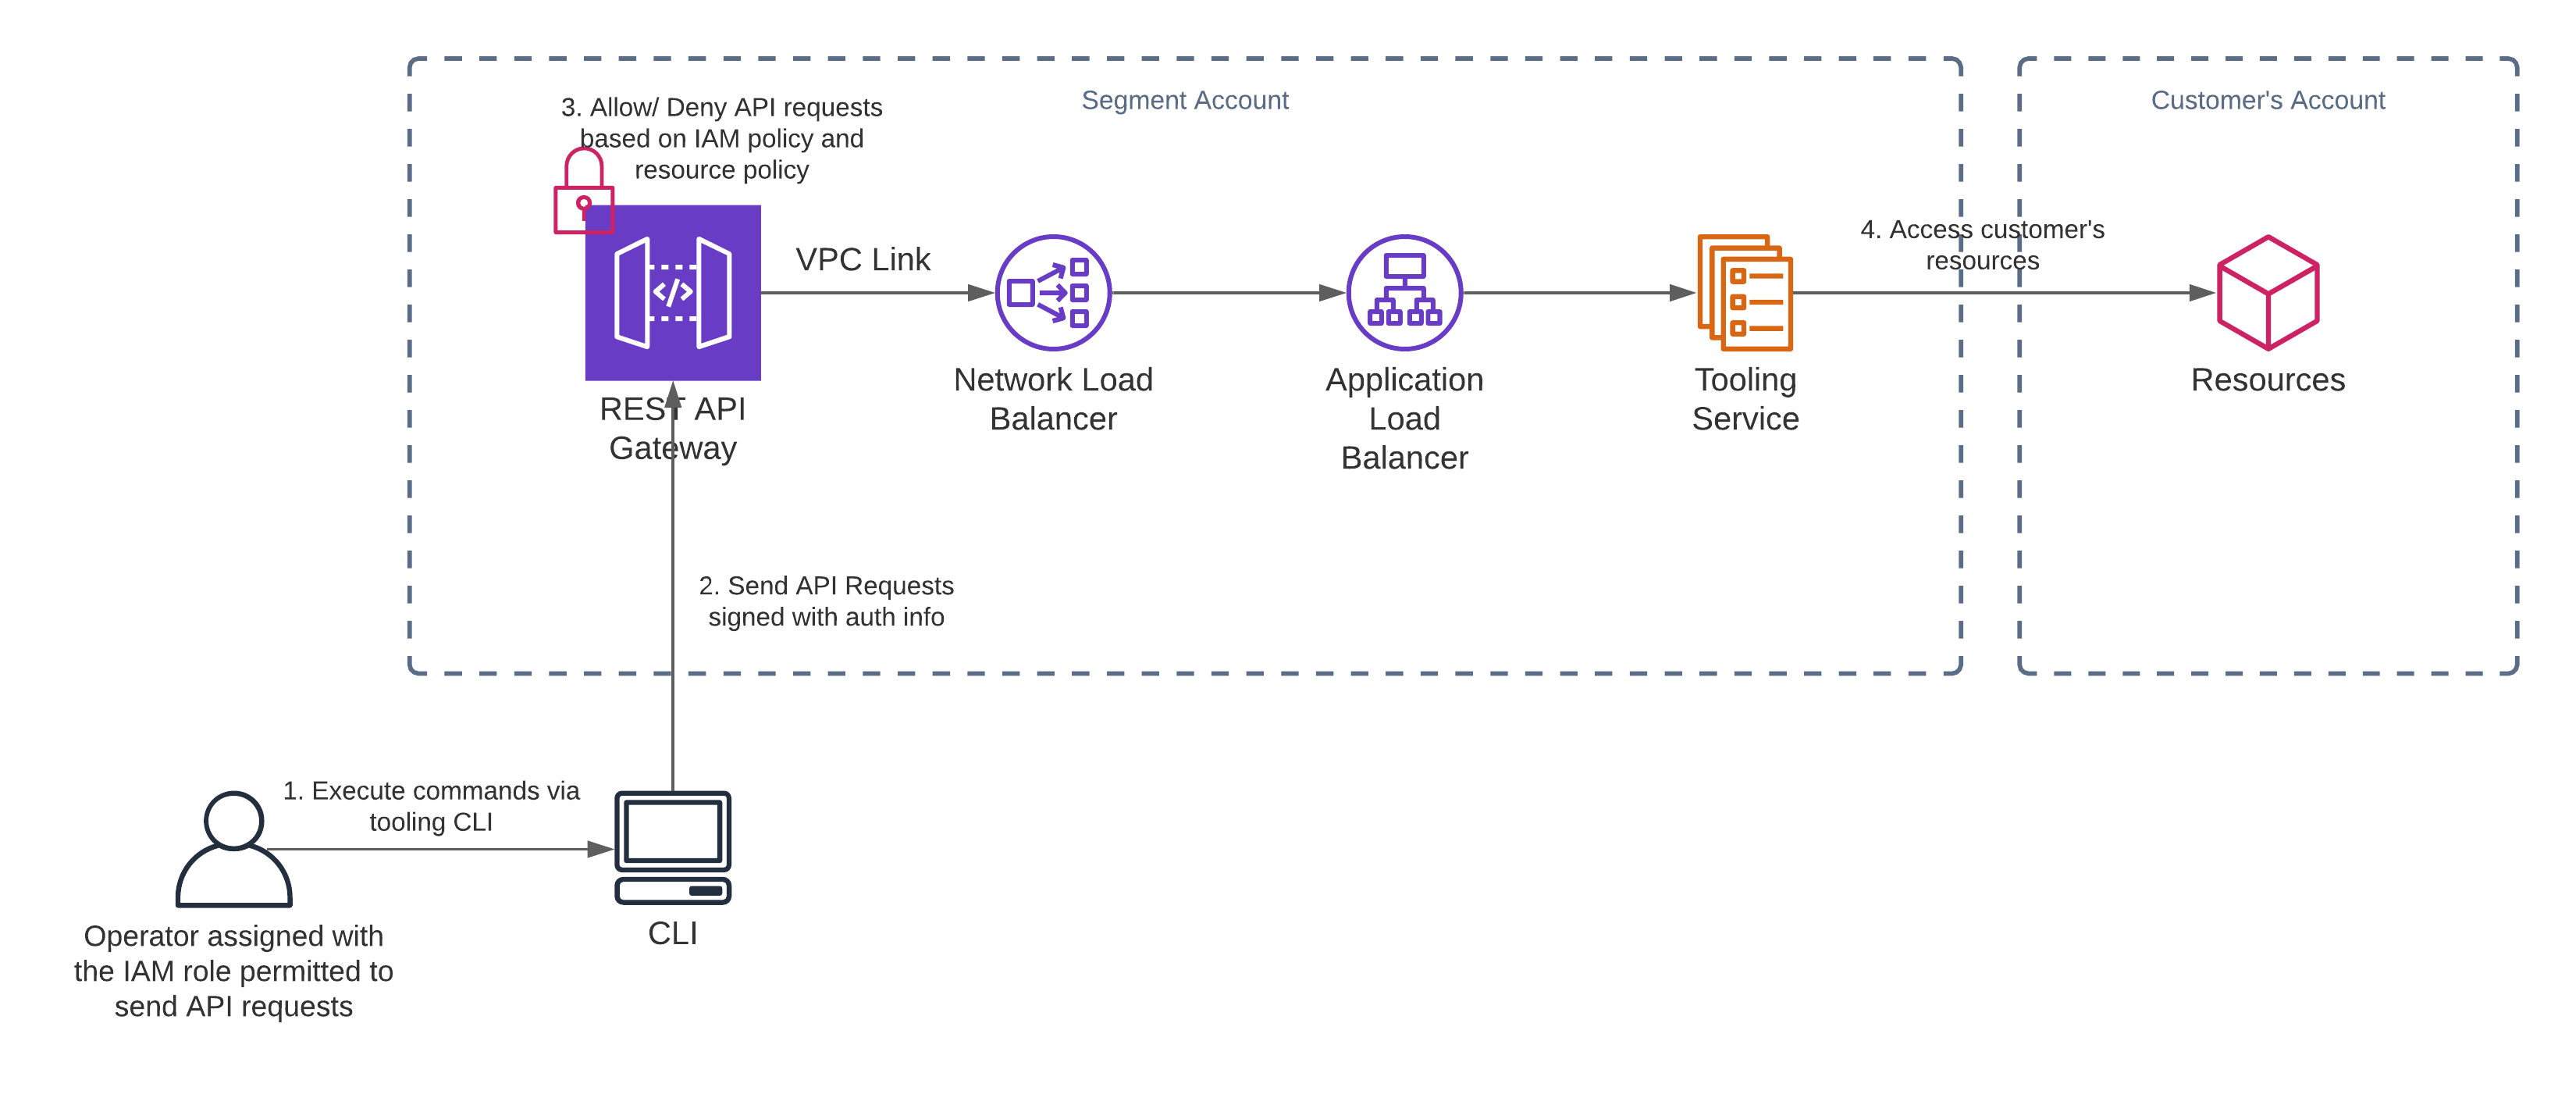
Just as we were about to implement the SAML solution, AWS released several new features for their AWS API Gateway product, including improved support for IAM-role-based API authentication. Since Segment was already using IAM roles to delegate access to Segment employees, it seemed fitting to also control access to the Data Lakes APIs using IAM-based policies.
With this solution, we could offload responsibility for authentication and authorization to an external service and spend more time focusing on just the Data Lakes aspects of our tooling.
After working on a POC to validate the setup would work, we officially decided to lean into the AWS API Gateway with IAM authorization instead of supporting a SAML flow in our code.
Before getting into the details of how we integrated AWS API Gateway into our design, let’s review how this product works and the various features it offers.
AWS API Gateway sits between API clients and the services that back these APIs. It supports integrations with various backend types including AWS Lambda and containerized services running in ECS or EKS. The product also provides a number of features to help maintain and deploy APIs, for instance managing and routing traffic, monitoring API calls, and controlling access from a security standpoint.
API Gateway supports two types of APIs – HTTP APIs and REST APIs. Many features are available for both, but some are exclusive to just one or the other. Before deciding on which type of API Gateway best fits your use case, it’s important to understand the differences between the two. Check out this guide in the AWS documentation library for a good summary.
Here are some API Gateway concepts that will be mentioned in this blog post and that you may come across when you set up your own AWS API Gateway.
Resource policies
IAM policies are attached to IAM users, groups or roles whereas API Gateway resource policies are attached to resources. You can use IAM policies and/or resource policies to define who can access the resource and what actions can be performed.
Proxy integration
A proxy integration allows requests to be proxied to a backing service without intermediate body transformations. If a proxy integration is used, only the headers, path parameters, and query string parameters on each request can be modified. If a proxy integration is not used, mapping templates can also be defined to transform request bodies.
Proxy resource
A proxy resource allows bundling access to multiple resources via a greedy path parameter, {proxy+}. With a proxy resource, you don’t need to define a separate resource for each path. This is especially useful if all the resources are backed by the same backing service. For more details, refer to this AWS doc.
Stage
A Stage in API Gateway is a named reference to a deployment. You can create and manage multiple stages for each API, e.g. alpha, beta and production. Each stage can be integrated with different backend services.
In our case, we really wanted to use resource policies to define access control, and this feature is only available in REST APIs. HTTP APIs are cheaper than REST APIs, but since we expected low request volumes from our tooling, total monthly cost wouldn’t be a concern. Therefore, we decided to go with a REST API.
If you need to integrate a REST API with an ALB, or if you want to use API Gateway to handle API access control, you may experience some challenges. In the following sections, we share how we addressed these issues.
Our backend tooling service resides in a private VPC and sits behind an ALB. HTTP APIs support integrating with an ALB directly, but REST APIs do not (see comparisons between HTTP APIs and REST APIs). To integrate a REST API with an ALB, you need to place an NLB between the two.
The setup here involves two steps:
NLB → ALB Integration
REST API Gateway → NLB Integration
NLB → ALB Integration
The first step is to create an NLB which can forward traffic to the ALB:
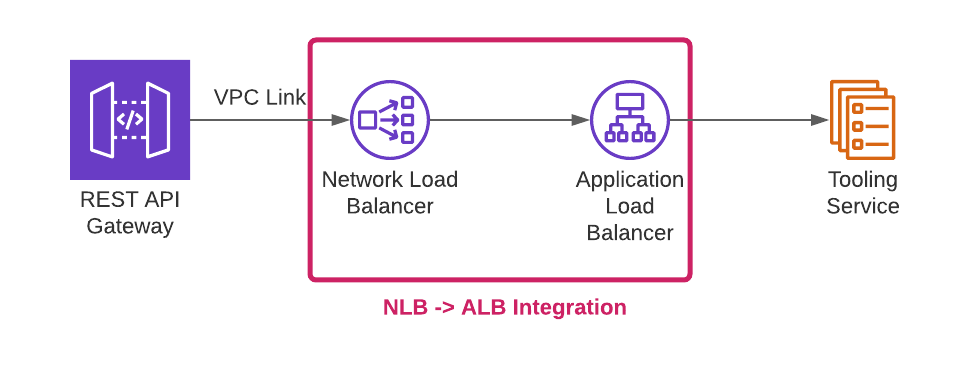
This AWS blog explains how to set up this integration using a Lambda function, and it includes the Lambda function code and a CloudFormation template that you can use for the setup.
REST API Gateway → NLB Integration
The next step is to link the REST API to the NLB as shown below:
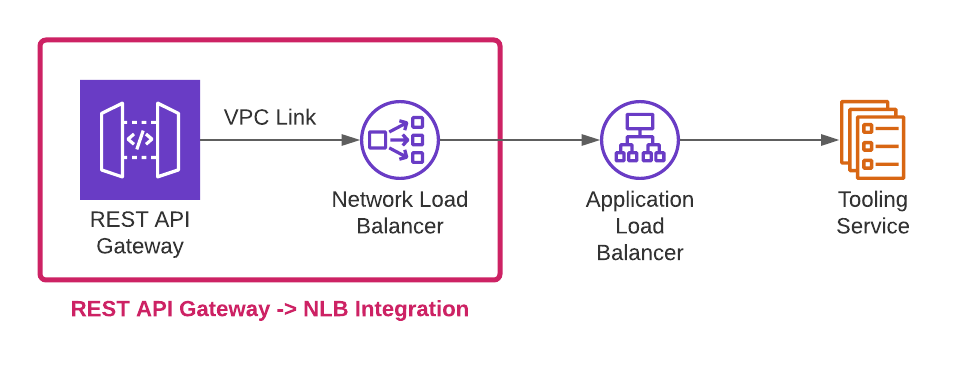
This can be achieved by first creating a VPC link to the NLB, and then using this VPC link in the Gateway API method integration. This guide from AWS provides the instructions for integrating an API with a VPC link to a NLB.
We set up our API using both a proxy integration and a proxy resource. If a new API is introduced or our API schema evolves, we don’t need to update the API Gateway.
Terraform example
We use Terraform to organize and manage our AWS infrastructure at Segment. The following is an example of integrating a REST API with an NLB, and creating a proxy integration with a proxy resource:
To ensure only authorized users can access our tooling service, we use a combination of IAM Authorization and API Gateway resource policies. In the following sections, we go into more details about what these are and how we configured them for our tool.
IAM Authorization
API Gateway supports enabling IAM authorization for the APIs. Once this is enabled, the API requests sent need to be signed with AWS security credentials (AWS doc). If a request is not signed (i.e. anonymous identity), then the request will fail. Otherwise, API Gateway will allow or deny the API requests based on the IAM policies and/or resource policies defined. This AWS guide explains how API Gateway decides whether to allow or deny based on the combination of an IAM policy and resource policy.
Resource Policy
An IAM policy and/or resource policy can be used to specify who can access a resource and what actions can be performed, but we use only the latter for our use case.
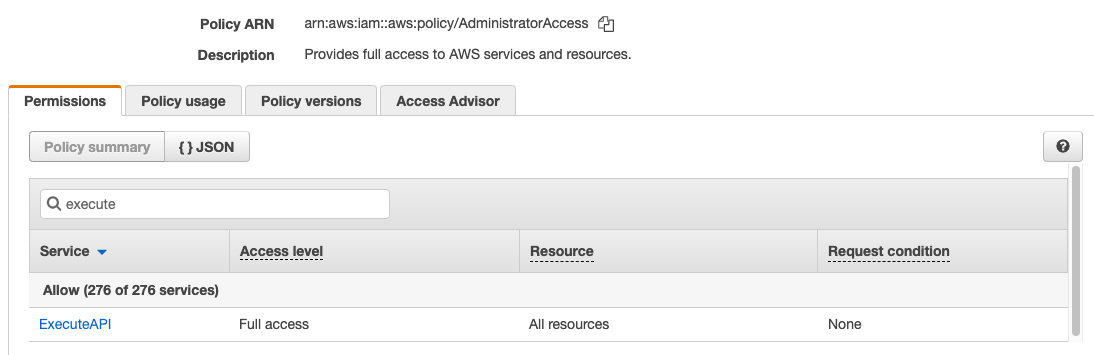
At Segment, we have multiple roles in the same AWS account, e.g. a read role with a ReadOnlyAccess policy, an admin role with an AdministratorAccess policy, etc. Some policies grant execute-api permission, which is required for invoking APIs in API Gateway, and some do not. For instance, the AWS managed policy AdministratorAccess allows execute-api for all resources.
If you want to restrict execute-api permission to a specific role api-invoke-role, you need to attach an IAM policy that denies execute-api to all of the other roles that have this permission, or explicitly deny those roles in the resource policy.
For the former approach, you would create a policy to deny invoking execute-api against your API Gateway and then attach this policy to the roles that should not be allowed to invoke the APIs. Here’s an example policy:
For the latter approach, you would list all the roles that should not be allowed to invoke the APIs in the resource policy. The following is an example:
If there are many roles in the account and new roles are created over time, it can be very tedious to create these policies and keep them all up-to-date. This is even worse if there are multiple APIs in the same account and each has a separate set of allowed IAM roles.
As an alternative to this, you can create a resource policy that explicitly allows access to a subset of roles while blocking access to everything else by default.
This is the approach that we decided to go with:
Terraform example
The following is an example of implementing the above approach in Terraform:
Another important security requirement is to keep an audit trail of the requests made to the API Gateway. Each record should contain the caller identity and the details of the request that was made.
API Gateway has a built-in integration with CloudWatch that makes it easy to generate these access logs in the latter. You can select a log format (CLF, JSON, XML or CSV) and specify what information should be logged.
In addition to using CloudWatch, we also created a Segment source for the audit logs. Our backend service issues a track call for every request, and all the track events are synced into our warehouse. With this, we didn’t need to implement a connector to export the data from CloudWatch and load it into our warehouse.
Terraform example
The following shows how to configure CloudWatch audit logs for an API gateway. Note that you need to create an IAM role that has the appropriate read and write permissions on the CloudWatch side:
With IAM authorization enabled, all API requests need to be signed with an AWS access key so AWS can identify the caller. There are multiple versions of the signing process, with v4 being the latest (and recommended) one. The various AWS SDKs provide helper functions that handle the low-level details of this process.
Here’s an example using the AWS SDK for go:
In our use case, the CLI client automatically wraps the input, signs the request using the user’s AWS credentials, and sends the request to our API Gateway, making it really easy for users to use.
For example, we expose the following command to check the status of an EMR cluster. The CLI client maps the command and flags to the request path and body in our API:
One thing to keep in mind when using an API Gateway REST API is that it does not support automatic deployments (HTTP APIs do). So, if you make changes to API resources or stages, you need to manually trigger a deployment.
Terraform example
This example demonstrates how to trigger a deployment with Terraform 0.11. The trigger hash could be a hash of the Terraform file(s) containing resources associated with the API Gateway. If there are any changes in these files, the hash will change and thus a deployment will be triggered.
Note that Terraform 0.12 supports an explicit triggers argument that allows you to provide the trigger hash inside of the latter as opposed to doing this via the deployment variables.
We have been using this API-Gateway-based setup for several months, and it has been working really well for the Data Lakes tooling use case. Before this setup became available, the tooling operations were executed solely by our engineering team to resolve customers’ issues. After the solution was deployed, we opened up the tooling service to our support team, reducing the dependency on the engineering team and the operational costs.
This was our first time using the API Gateway product, so we had to spend some time figuring out various solutions and workarounds (e.g. integrating with an ALB, triggering deployments with Terraform, etc.), but overall we had a pleasant experience once we worked through these issues.
There are many other features of API Gateway that we didn’t use for our tooling and thus didn’t discuss in this blog post, but may still be helpful for your use case. For example, API Gateway allows you to set throttling limits and set up a cache. These features will help to prevent your system from being overwhelmed by the high volume of requests. You can also use API Gateway to manage and run multiple versions of the API simultaneously by configuring the API with different backend integrations.

Our annual look at how attitudes, preferences, and experiences with personalization have evolved over the past year.