The Twilio Segment AWS Stack
By Calvin French-Owen
AWS is the default for running production infrastructure. It’s cheap, scalable, and flexible to whatever configuration you’d like to run on top of it. But that flexibility comes with a cost: it makes AWS endlessly configurable.
You can build whatever you want on top of AWS, but that means it’s difficult to know whether you’re taking the right approach. Pretty much every startup we talk with has the same question: “What’s the right way to setup our infrastructure?”
To help solve that problem, we’re excited to open source the Segment AWS Stack. It’s our first pass at building a collection of Terraform modules for creating production-ready architecture on AWS. It’s largely based on the service architecture we use internally to process billions of messages every month, but built solely on AWS.
The steps are incredibly simple. Add 5 lines of Terraform, run terraform apply, and you’ll have your base infrastructure up and running in just three minutes.
It’s like a mini-Heroku that you host yourself. No magic, just AWS.
Our major goals with Stack are:
to provide a good set of defaults for production infrastructure
make the AWS setup process incredibly simple
allow users to easily customize the core abstractions and run their own infrastructure
To achieve those goals, Stack is built with Hashicorp’s Terraform.
Terraform provides a means of configuring infrastructure as code. You write code that represents things like EC2 instances, S3 buckets, and more–and then use Terraform to create them.
Terraform manages the state of your infrastructure internally by building a dependency graph of which resources depend on one another:
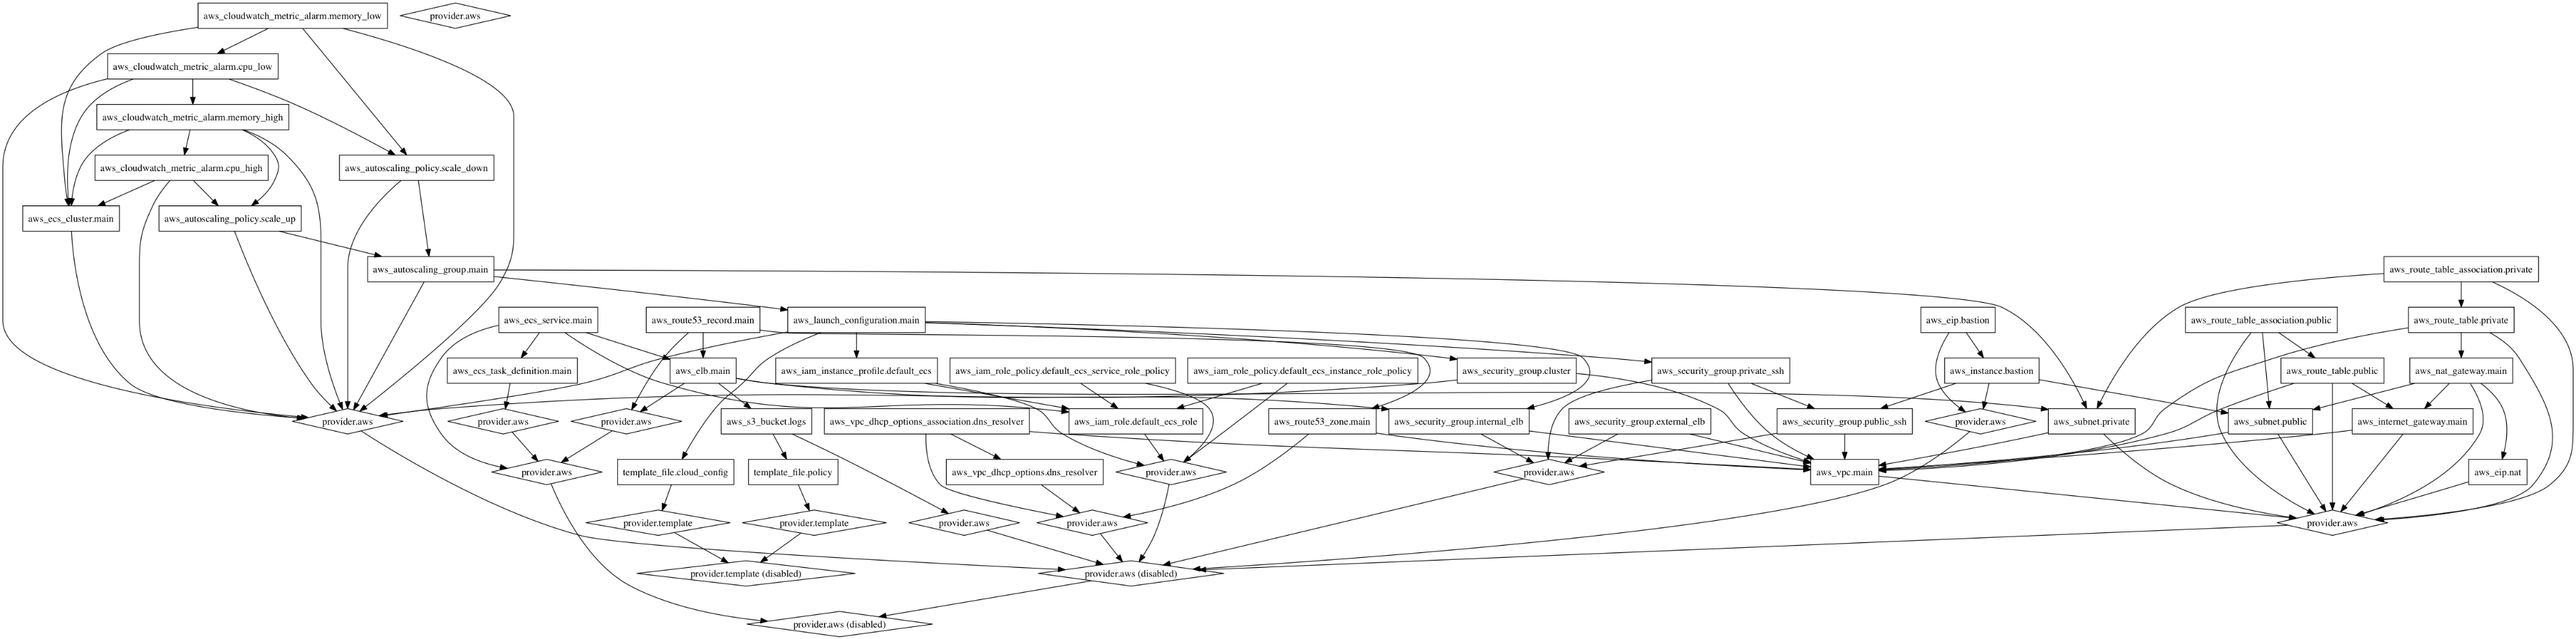
and then applies only the “diff” of changes to your production environment. Terraform makes changing your infrastructure incredibly seamless because it already knows which resources have to be re-created and which can remain untouched.
Terraform provides easy-to-use, high level abstractions for provisioning cloud infrastructure, but also exposes the low-level AWS resources for custom configuration. This low-level access provides a marvelous “escape hatch” for truly custom needs.
To give you a flavor of what the setup process looks like, run terraform applyagainst this basic configuration:
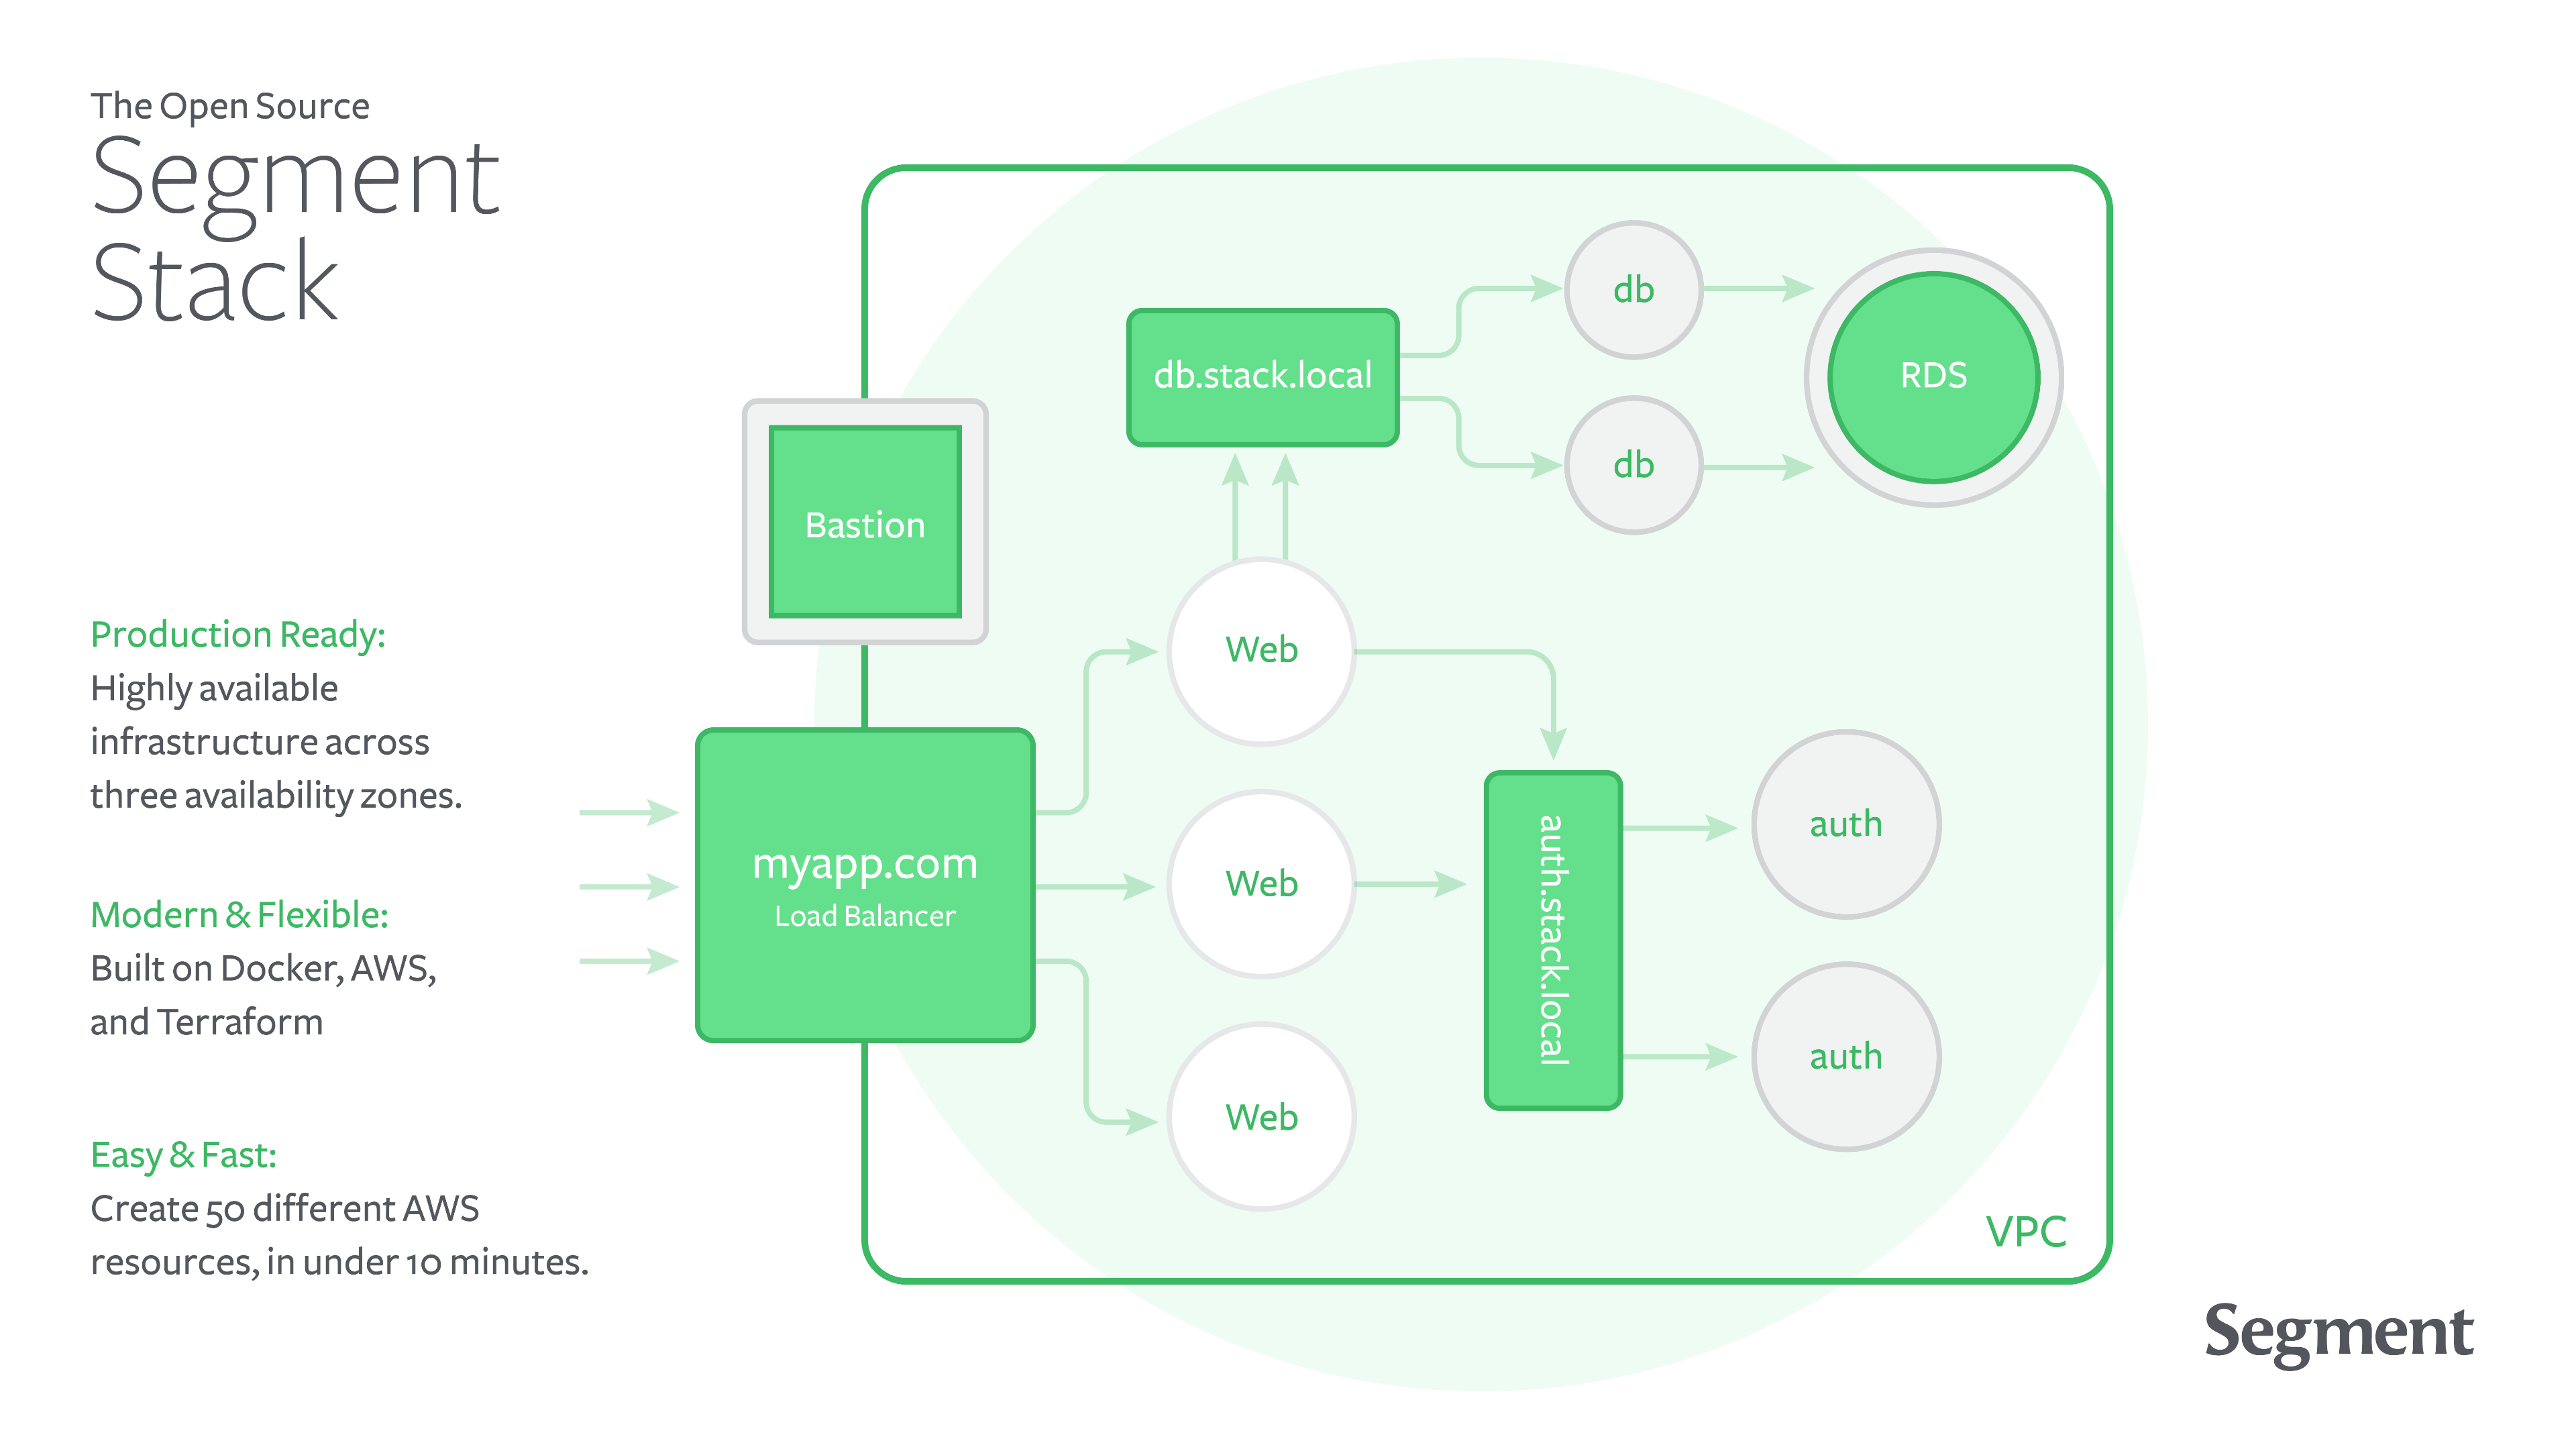
It will automatically create all of the following:
Networking: Stack includes a new VPC, with public and private subnets. All routing tables, Internet Gateways, NAT Gateways, and basic security groups are automatically provisioned.
Auto-scaling default cluster: Stack ships with an auto-scaling group and basic lifecycle rules to automatically add new instances to the default cluster as they are needed.
ECS configuration: in Stack, all services run atop ECS. Simply create a new service, and the auto-scaling default cluster will automatically pick it up. Each instance ships with Docker and the latest ecs-agent.
CloudWatch logging & metrics: Stack sends all container logs to CloudWatch. Because all requests between services go through ELBs, metrics around latency and status codes are automatically collected as well.
Bastion: Stack also includes a bastion host for manual SSH access to your cluster. Besides the public services, it’s the only instance exposed to the outside world and acts as the “jump point” for manual access.
This basic setup uses the stack module as a unit, but Terraform can also reference the components of Stack individually.
That means that you can reference any of the internal modules that the stack uses, while continuing to use your own custom networking and instance configuration.
Want to only create Stack services, but bring your own VPC? Just source the service module and pass in your existing VPC ID. Don’t need a bastion and want custom security groups? Source only the vpc and cluster modules to set up only the default networking.
You’re free to take the pieces you want and leave the rest.
If you’d like to dig into more about how this works in-depth, and each of the modules individually, check out the Architecture section of the Readme.
Now, let’s walkthrough how to provision a new app and add our internal services.
Note: this walkthrough assumes you have an AWS account and Terraform installed. If not, first get the pre-requisites from the requirements section.
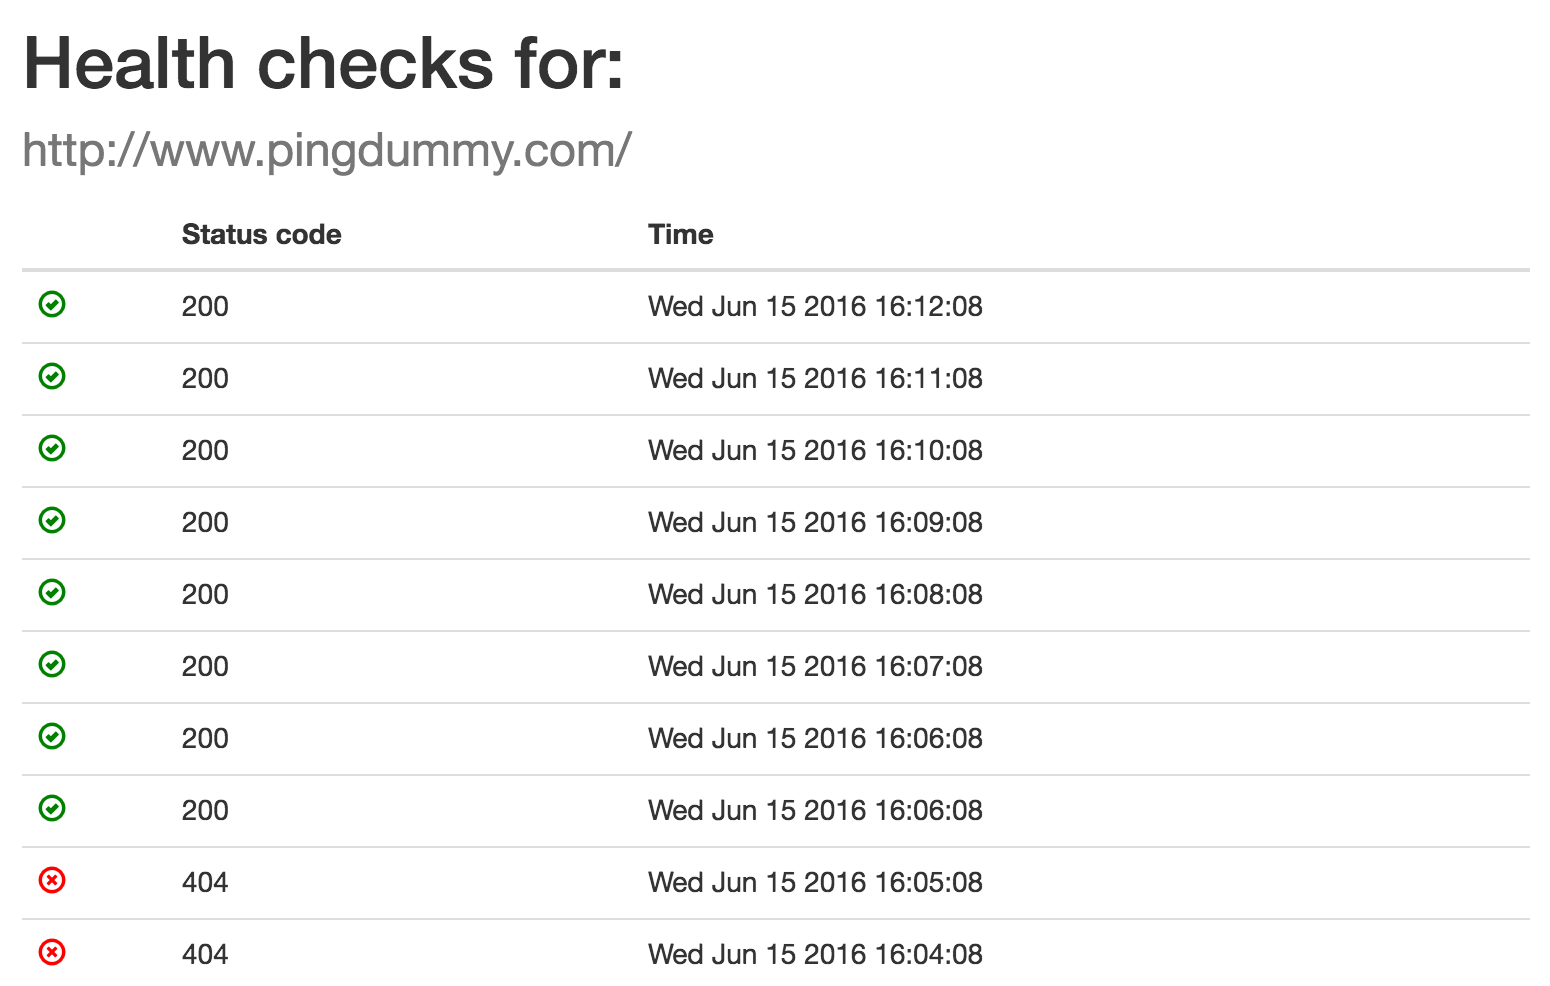
For this tutorial, we’ll reference the pieces of the demo app we’ve built: Pingdummy, a web-based uptime monitoring system.
All of the Docker images we use in this example are public, so you can try them yourself!
The Pingdummy infrastructure runs a few different services to demonstrate how services can be deployed and integrated using Stack.
the pingdummy-frontend is the main webpage users hit to register and create healthchecks. It uses the web-service module to run as a service that is publicly accessible to the internet.
the pingdummy-beacon is an internal service which makes requests to other third-party services, and responds with their status. It uses the servicemodule, and is not internet facing. (though here it’s used for example purposes, this service could eventually be run in many regions for HA requests)
the pingdummy-worker is a worker which periodically sends requests to the pingdummy-beacon service. It uses the worker module as it only needs a service definition, not a load balancer.
an RDS instance used for persistence
First, you’ll want to add a Terraform file to define all of the pieces of your infrastructure on AWS. Start by creating a terraform.tf file in your project directory.
Then, copy the basic stack setup to it:
And then use the Terraform CLI to actually apply the infrastructure:
This will create all the basic pieces of infrastructure we described in the first section.
Note: for managing Terraform’s remote state with more than a single user, we recommend configuring the remote state to use Terraform Enterprise or S3. You can use our pingdummy repo’s Makefile as an example.
Now we’ll add RDS as our persistence layer. We can pull the rds module from Stack, and then reference the outputs of the base networking and security groups we’ve already created. Terraform will automatically interpolate these and set up a dependency graph to re-create the resources if they change.
Again, we’ll need to run plan and apply again to create the new resources:
And presto! Our VPC now has an RDS cluster to use for persistence, managed by Terraform.
Now that we have our persistence and base layers setup, it’s time to add the services that run the Pingdummy app.
We can start with the internal beacon service for our health-checks. This service will listens on port 3001 and makes outbound HTTP requests to third-parties to check if a given URL is responding properly.
We’ll need to use the service module which creates an internal service that sits behind an ELB. That ELB will be automatically addressable at beacon.stack.local,and ECS will automatically add the service containers to the ELB once they pass the health check.
Next, we’ll add the pingdummy-worker service. It is responsible for making requests to our internal beacon service.
As you can see, we’ve used the worker module since this program doesn’t need a load balancer or DNS name. We can also pass custom configuration to it via environment variables or command line flags. In this case, it’s passed the address of the beacon service.
Finally, we can add our pingdummy-frontend web app which will be Internet-accessible. This will use the web-service module so that the ELB can serve requests from the public subnet.
In order to make the frontend work, we need a few extra pieces of configuration beyond just what the base web-service module provides.
We’ll first need to add an SSL certificate that’s been uploaded to AWS. Sadly, there’s no terraform configuration for doing this (it requires a manual step), but you can find instructions in the AWS docs.
From there, we can tell our module that we’d like it to be accessible on the public subnets and security groups and be externally facing. The stack module creates these all individually, so we can merely pass them in and we’ll be off to the races.
Finally, run the plan and apply commands one more time:
And we’re done! Just like that, we have a multi-AZ microservice architecture running on vanilla AWS.
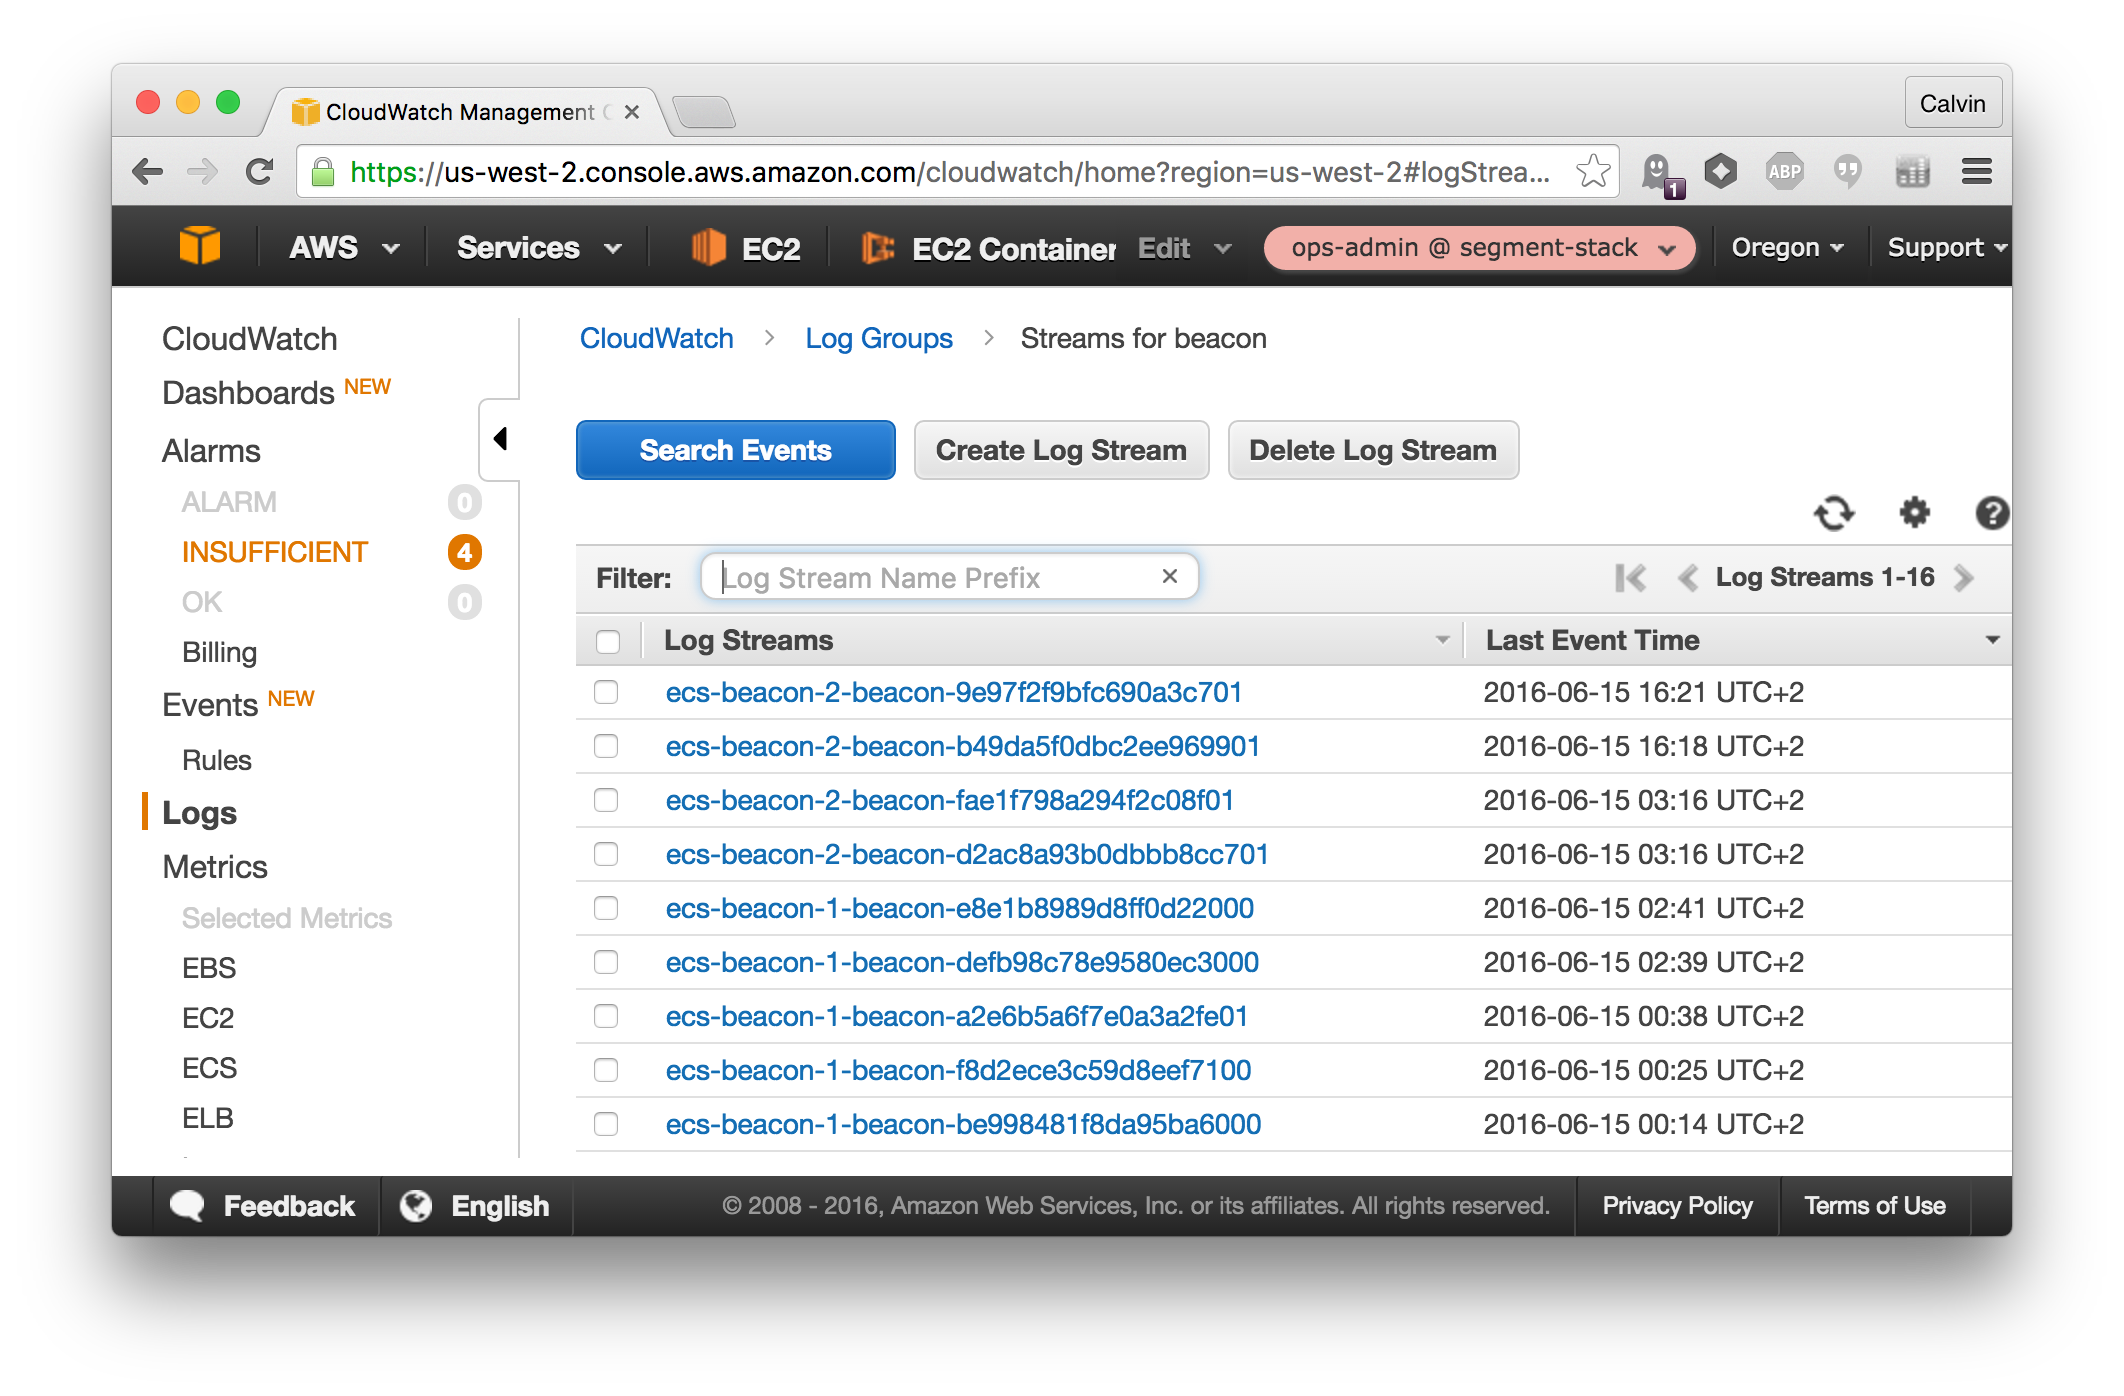
Looking in the AWS console, you should see logs streaming into CloudWatch from our brand new services. And whenever a request is made to the service, you should see HTTP metrics on each of the service ELBs.
To deploy new versions of these services, simply change the versions in the Terraform configuration, then re-apply. New task definitions will be created and the appropriate containers will be cycled with zero downtime.
There’s a few other pieces you’ll need to add, which you can see examples for in the main Pingdummy terraform file. Keep in mind that the example is a dummy app, and is not how we’d recommend doing things like security groups or configuration in production. We’ll have more on that in terraform to come :).
Additionally, we’re excited to open source a few other pieces that were involved in releasing the Stack:
Amir Abu Shareb created terraform-docs, a command-line tool to automatically generate documentation for Terraform modules. You can think of it as the godoc of the Terraform world, automatically extracting inputs, outputs, and module usage in an easily consumable format.
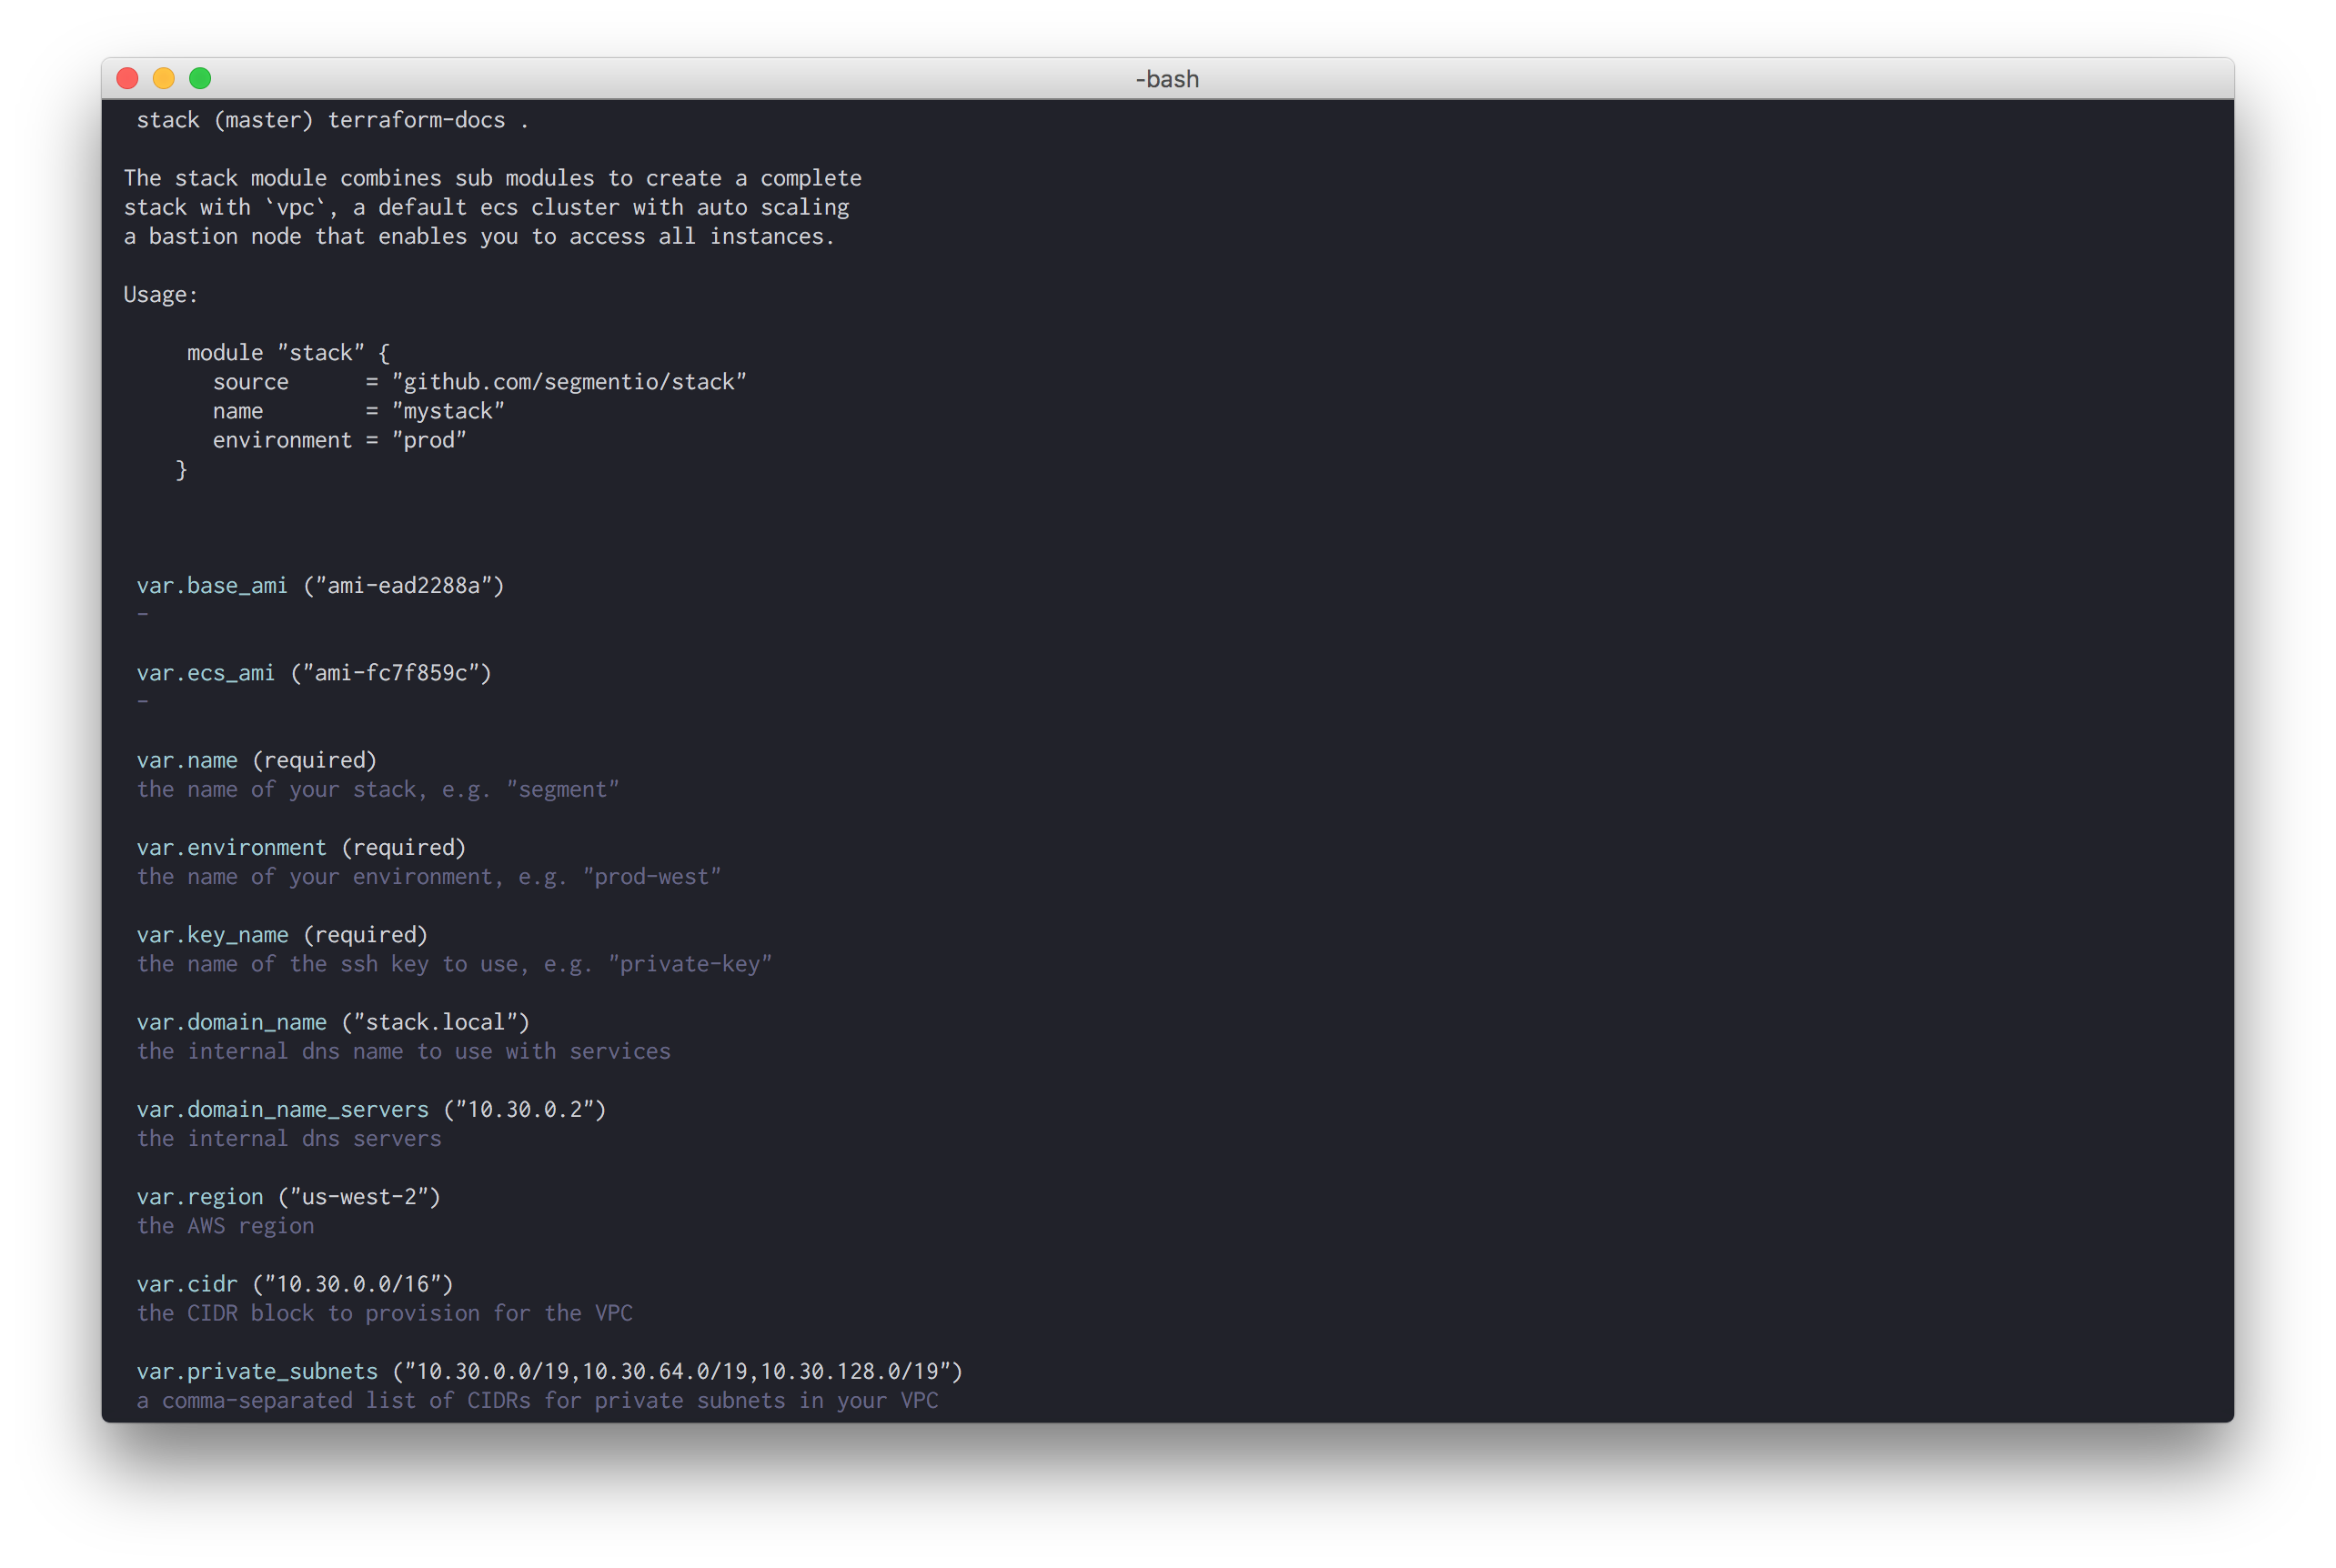
We use terraform-docs to build all of the module reference documentation for Stack.
Achille Roussel created ecs-logs, an agent for sending logs from journald to CloudWatch. It provides all the built-in logging for Stack, and makes sure to create a log group for each service and a single log stream per container.
It’s our hope that this post gave you a brief look at the raw power of what can be achieved with the AWS APIs these days. The ease of Terraform paired with the flexibility and scale of AWS is an extremely powerful combination.
Stack is a “first pass” of what combining these technologies can achieve. It’s by no means finished, and only provides the foundation for many of the ideas that we’ve put into production. Additionally, we’re trying some new experiments around log drivers and instances (reflected by the 0.1 tag) which we think will pay off in the future.
Nonetheless, we’ve open sourced Stack today as the first step to gather as much community wisdom around running infrastructure atop AWS.
In that vein, we’ll happily accept pull requests for new modules that fall within the spirit of the project. It’s our goal to provide the community with a good set of Terraform modules that provide sane defaults and simpler abstractions on top of the raw AWS infrastructure.
So go ahead and try out the Stack today, and please let us know what you think!
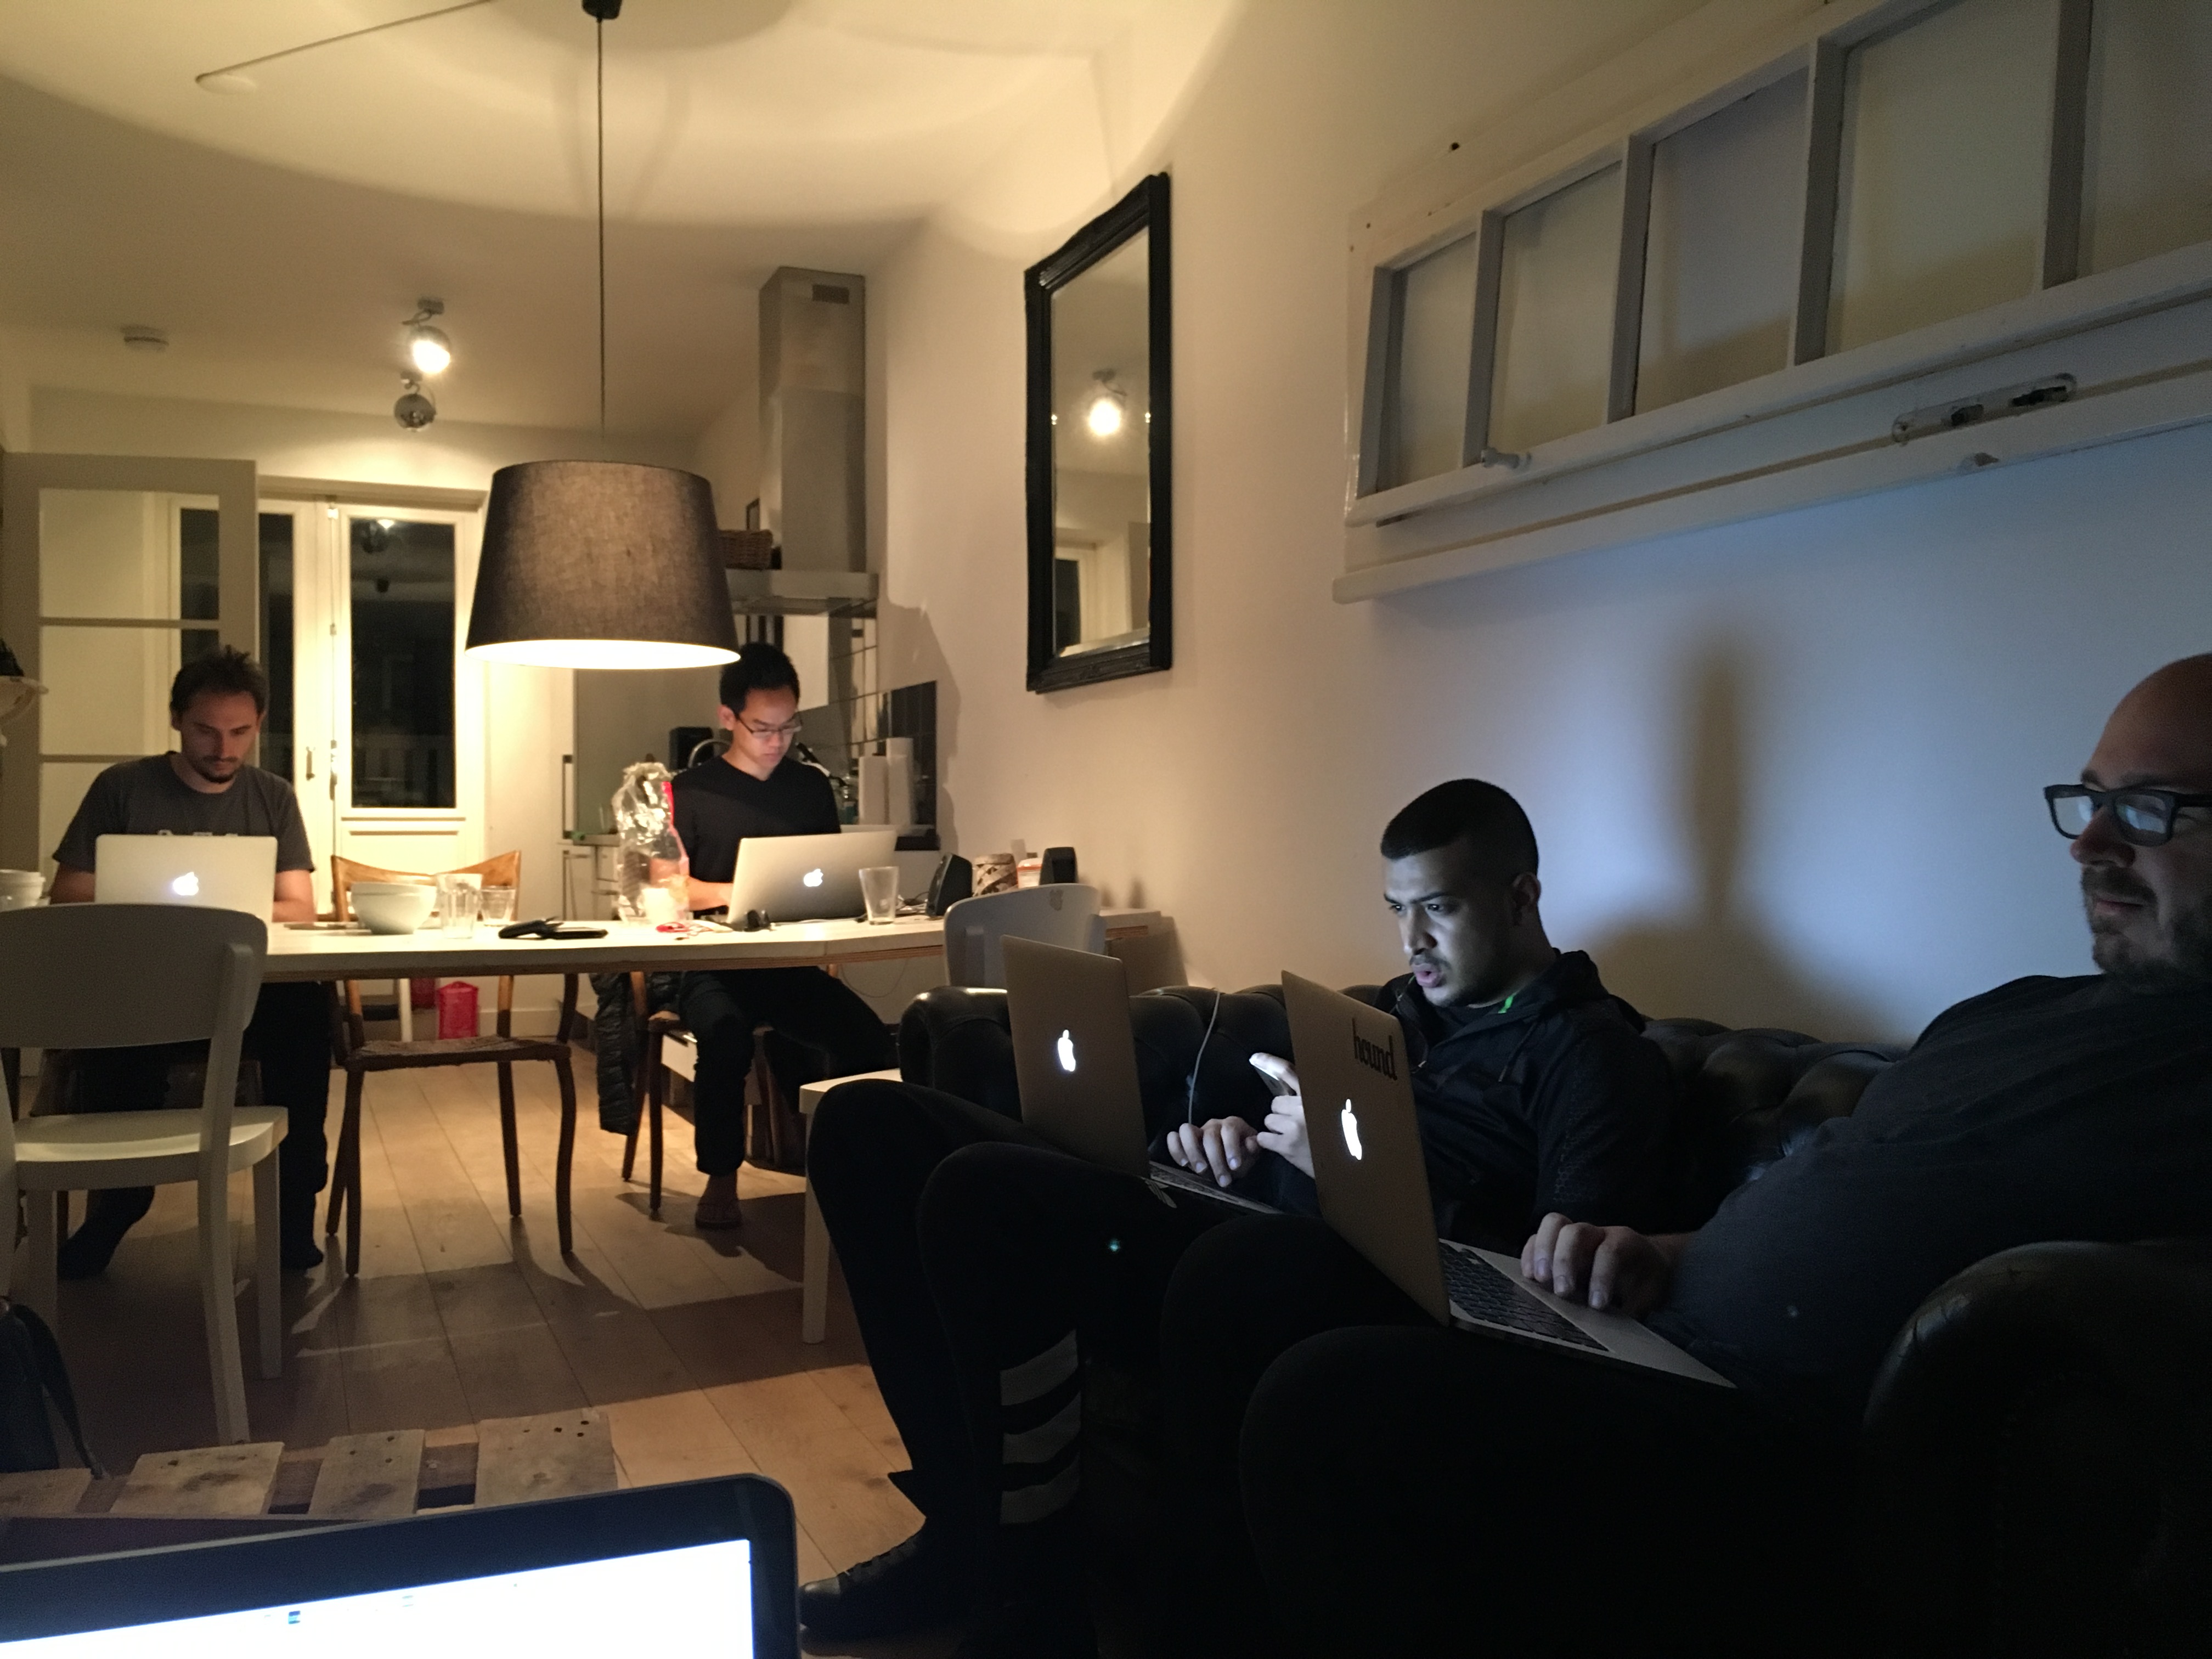
Part of the Segment infrastructure team hacking on The Segment Stack: Amir Abu Shareb, Rick Branson, Calvin French-Owen, Kevin Lo, and Achille Roussel. Open sourced at a team-offsite in Amsterdam.

Our annual look at how attitudes, preferences, and experiences with personalization have evolved over the past year.