Build an App in Under 10 Minutes With Anvil & Twilio Segment
By Meredydd Luff
This is a guest post from Meredydd Luff, Founder of Anvil, the Python-based drag-and-drop app builder. It was first published on the Anvil blog.
Segment makes it easy to collect customer interaction data from your apps and websites, and send it to all your analytics tools, data warehouses, CRMs, and literally anything else.
Anvil makes it easy to build web apps, by letting you do it all in Python (no HTML or JS required!). Today, I’m going to show you how to use them together: we’re going to wire up an Anvil app to collect user interactions with Segment.
We’re going to take a simple feedback-form app, and use Segment to track the user’s journey as they fill it out. Then we’re going to show you how to use Anvil’s built-in user authentication to identify users to Segment.
Ready? Let’s dive in.
We’re going to start with a simple feedback form, built from this tutorial. The tutorial will take you 10 minutes, but if you’re feeling impatient you can get a complete copy of the app by clicking this link.
But seriously, consider checking out the 10-minute tutorial – it’s pretty simple to get started:
Building web apps with Anvil is really easy. Try the tutorial!
We need to publish our app to give it a URL:
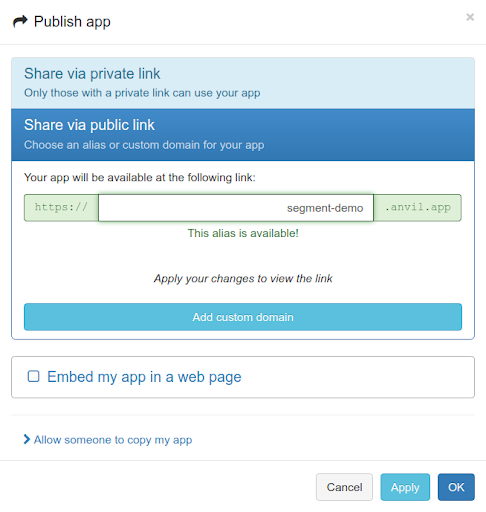
Choose a URL for your app and Anvil deploys it
OK, we have an app that can receive feedback! Now we want to track when a user starts typing, and when they hit the Submit button. For that, we need a Segment account:
We need Segment to recognize our app as a data source, using the analytics.js SDK. This is pretty easy - when you sign up for a free account at segment.com, you’ll get prompted to “create a source for your website”. Follow the instructions to get a code snippet:
Adding a source to our Segment workspace
We now have a code snippet we can embed in our page. That Javascript is pretty ugly, but don’t worry - we’ll be using it entirely from Python!
First, paste that snippet into your app’s Native Libraries. This will include the snippet in your app’s HTML:
Don’t worry, that’s the last Javascript we’ll need today.
Now we can import Segment’s analytics SDK and use it from Python! Open your form’s code and add at the top:

That imports the analytics Javascript object into our Python module. We can now call all the functions from the Segment docs, but we can do it from Python! (For more information about calling Javascript functions from Python, you can check the Anvil docs.)
Let’s record an event when the user clicks the Submit button. Open your form’s code and add this line at the top of the submit_btn_click function:

That’s it! Now, every time you click that button, your app sends a "Feedback submitted" event to Segment.
You can verify that it’s working in your Segment dashboard, by opening the Debug panel for the source. Then open your app in another tab, and watch the events flow in:
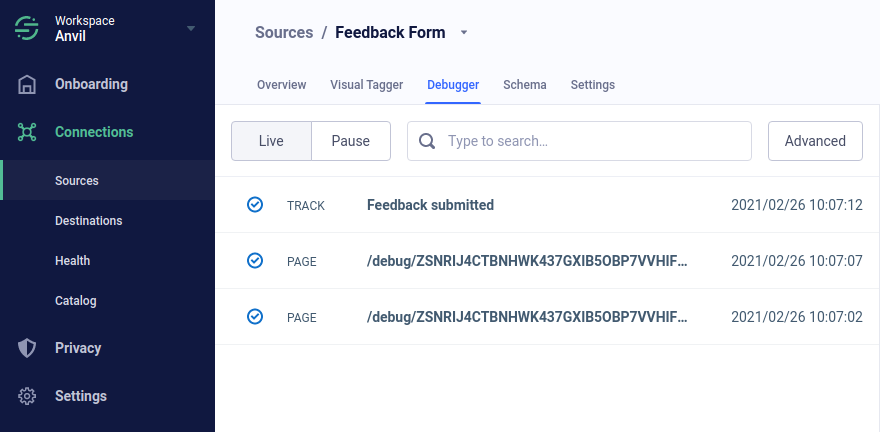
This display updates live. It’s pretty cool.
Let’s get a bit more detail about what our users are up to. Let’s say we want to track our funnel. Specifically, we want to know how many people type something into the feedback form but don’t submit it.
When you write an Anvil app, you write code in Python that runs in the browser as your user interacts with your app. This means your Python code can know, for example, about each keypress in a text box. We can use this to send a Segment event when the user first starts typing.
We’ll write a function called on_started_editing(), and trigger it on the change event of any of our text fields. The first time this function is called, we’ll call analytics.track() to send the event to Segment.
Here’s how our Form1 class looks when we’re done:
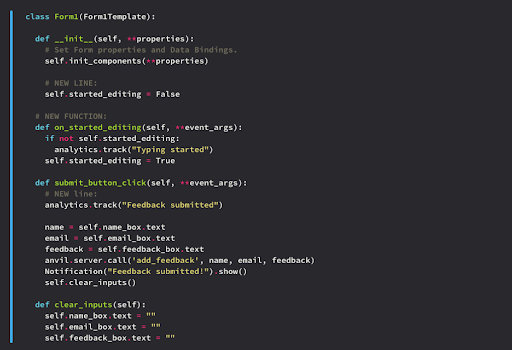
Finally, it’s time to wire up the event, so that Anvil calls on_started_editing() every time someone edits their name, email address, or feedback text. We do this by selecting each component, opening the Properties panel, scrolling down to Events, and entering on_started_editing in the change box:
Now run your app, and watch the Segment debugger as you start to type!
If a user logs into our app, we want to associate tracked events with individual users. Let’s add Anvil’s built-in user authentication to our app, then integrate it with Segment’s user identification.
First, we’ll add the Users Service to our app, and call anvil.users.login_with_form() in the form constructor. That function returns a row from the Users table. We can then pass the ID of the row, and the email column, to analytics.identify():

Here’s the whole process. This is all it takes to add user authentication to our app, and integrate it with Segment:
Again, once you’ve done this, you can run the app and watch the information arrive in Segment’s debugger! (You probably want to add a user account to your app first!)
That’s it!
We’ve just created a web app with nothing but Python; added Segment tracking to it, and even integrated Anvil’s user authentication with Segment’s user identities. Pretty cool, huh?
More about Anvil
Anvil is a platform for building full-stack web apps with nothing but Python. No need to wrestle with JS, HTML, CSS, Python, SQL, and all their frameworks – just build it all in Python.

Our annual look at how attitudes, preferences, and experiences with personalization have evolved over the past year.