How Twilio Segment helped us create the first predictive analytics platform
By Theodore Chao, Bilal Mahmood
This post is a guest submission by our partner, ClearBrain. It shares their experience building a Segment Destination. Thanks to ClearBrain for sharing their story!
—Segment
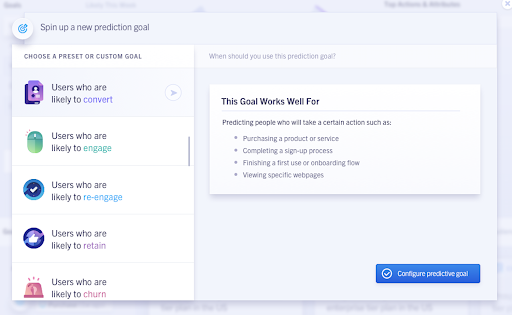
At ClearBrain, we’re building the first self-serve predictive analytics platform. Growth marketers have one consistent objective—forecasting and testing with their best users for incremental ROI, as fast as possible. At ClearBrain, our proprietary AI enables customers to personalize and test every user journey by their predicted intent, for any conversion event, in minutes.
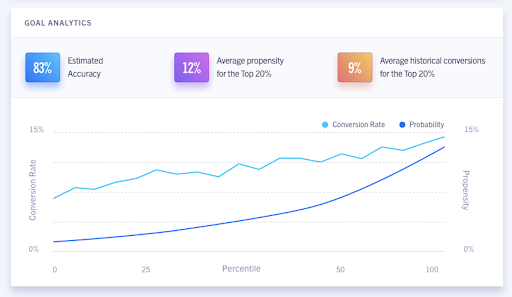
Delivering on this promise of predicting user intent requires two distinct components working together: a data layer and an intelligence layer. On the data side, you need a standardized collection of user attributes and events, aggregated across disparate digital channels—effectively requiring dozens of API integrations. The intelligence layer, in turn, normalizes that data to run machine learning models and predict any conversion event, automating the statistical analyses needed to recommend which audiences are most likely to perform an event.
The challenges and infrastructures required to build these two components of a predictive analytics platform couldn’t be more different. It’s hard enough to build one product, let alone two at the same time. Thankfully due to Segment opening up their platform to partners, this tradeoff was not an issue for ClearBrain.
Segment’s Customer Data Infrastructure enabled us to focus on the intelligence components that truly differentiate ClearBrain. Rather than spending years building API integrations into every customer data input, we instead invested that time into automating the statistical inference necessary to power a predictive analytics platform.
Segment was a natural partner to power the data layer for our platform. Breaking it down, there are 3 critical features of a data layer necessary for predictive analytics: omni-channel data, standardized data, and historical data.
Predictive analytics is built on the foundation of predicting user intent via lookalike modeling. You predict your user’s intent to sign up by analyzing the users who signed up in the past (vs those who didn’t). Thus to build an accurate model of user intent you need a complete digital picture of their user journey. The problem, of course, is data heterogeneity. Apps may be built on Go or Java, running on Android or iOS, or integrated with email clients like Braze or Iterable. Further, companies in different verticals organize their user journeys in completely different ways, from user-based checkout to account-based subscription funnels.
Segment resolves a lot of this data heterogeneity. By building an integration to Segment via their platform, ClearBrain was able to build for one API and automatically collect data from any client, server-side, platform, or email integration. Rather than spending years building an integration for every code library and email API, we got instant access to the dozens of data sources available in Segment’s sources catalog. And all of that data is cleanly organized. Regardless of whether it is a server-side attribute or an email event, all data is received via a universal spec of four main event collections: identifies, tracks, pages, and screens. Further, there are vertical-specific specs for eCommerce and B2B SaaS that map out the user journey via standardized sets of event names specific to each vertical. Regardless of data source, we can always be guaranteed that the data is received in a predictable format.
Clean data is just as vital as homogeneous data when powering a predictive analytics platform. There’s the classic statement, “garbage in, garbage out”. If the data you’re receiving is anomalous, stale, or redundant, the predictive models powering your insights will be too. Thankfully, a benefit of building on top of Segment is that they provide tools for data governance and quality. Their Protocols product guarantees that data received into ClearBrain will be standardized, live, and accurate. I can’t tell you the number of times we’ve seen data come in from other data sources where there are 4 different events for sign up (e.g. sign_up, signup, sign-up, and Sign Up).
Lastly, a critical component for any analytics product is time to value. Any data visualization requires multiple weeks of data to appreciate engagement or retention trends (remember, it takes a minimum of two points to make a line!). This problem is only compounded if your analytics relies on predictive modeling. Predictive modeling is based on analyzing past behavior to infer future behavior, so it follows that the more historical user data you have, the better you can project w/w changes, seasonality, and other critical trends. Segment’s historical Replay plays a critical role for ClearBrain here—rather than waiting weeks to collect enough historical data to power their predictive insights, they can replay years of user events in a matter of days.
These three facets–omni-channel, standardized, and historical data, made integrating with Segment a no-brainer. Rather than spending years on the pipes, we could focus on the statistical inference that makes ClearBrain truly unique. You effectively get all the benefits of being customer data infrastructure, with none of the work!
Building an integration on the Segment platform was really straightforward, thanks to their new Developer Center, clean documentation, and a developer-friendly support team. There are a few main steps to integrate with Segment as a Destination:
Step 1a: Set up a static HTTPS endpoint to receive customer data
The way that Segment is able to send customer data to your destination is by passing a batch of JSON messages as part of a POST request payload to an HTTPS endpoint that you provide. Their specs detail the requirements for your endpoint, but in a nutshell, your endpoint must satisfy the following requirements:
Accept POST requests
Accept data in JSON format
Use HTTPS
Our particular endpoint is set up using a CNAME in our DNS provider that points to the endpoint for an Application Load Balancer (ALB) in AWS. In the following section, we will talk about the use of reference architecture provided by AWS, that handles setting up an ALB.
Step 1b: Set up your API server (using AWS!)
The bulk of the work centers around building infrastructure that can support the amount of data your customers will be sending you at any point in time (keep in mind that historical Replay is an option that customers may be able to leverage, which can cause a one-time rate of requests higher than your average rate, but we’ll get to that later). Building a scalable API server is not the simplest of tasks, but there are solid templates made publicly available that you can reference. At ClearBrain, we decided to build our API server in AWS, which was made easier using a boilerplate provided by AWS.
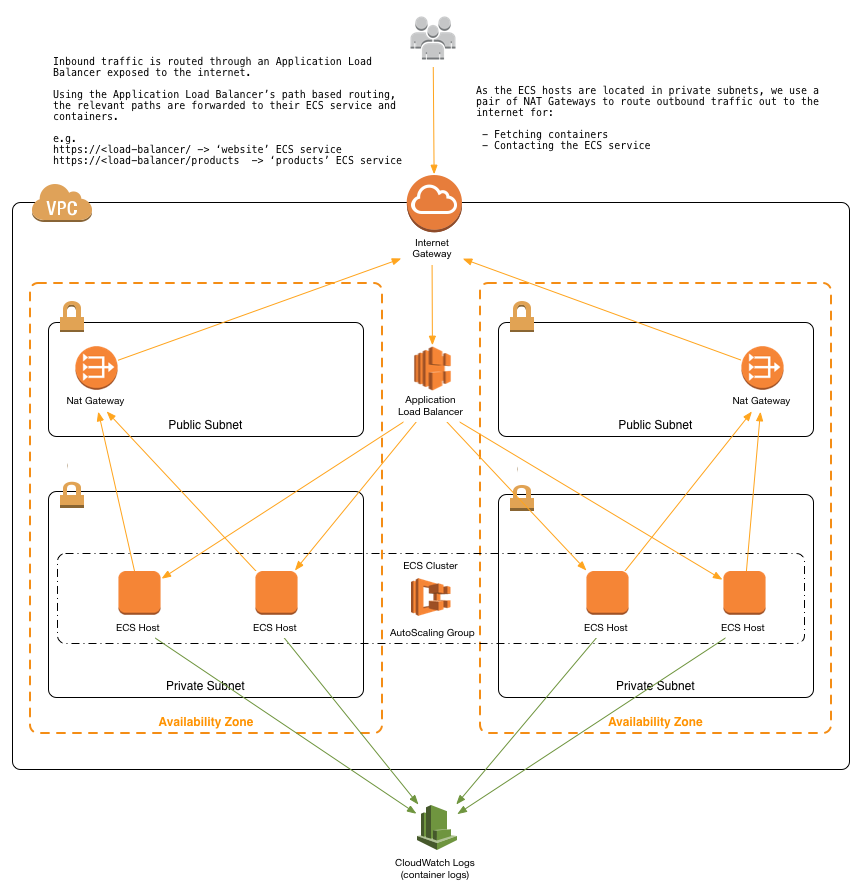
This particular reference architecture provided by AWS uses a set of Cloudformation templates to define a set of related resources in AWS (e.g. VPCs, ECS Clusters, Subnets, ECS Services) that will represent the entire API server. We won’t go into specifics of how we adapted the templates for developing the ClearBrain destination, but here are a few changes we made on top of the reference architecture to productionize our API server:
Replace product-service and website-service with our own API service, which was loosely based on the product-service .yaml file
Define auto scaling policy for for ECS cluster
The AWS template provides auto-scaling at the ecs service level, but does NOT provide auto-scaling at the cluster level, which means that the cluster would not auto-scale in response to the auto-scaling of the contained services
Define a Makefile
We wanted to be able to run commands that would handle various tasks, such as:
running the API server locally for development
sending batches of messages at various rates for stress testing
validating cloudformation templates prior to deploying
deploying cloudformation templates
To find a sweet spot for minimal cluster size, as well as verify that our cluster would be able to scale up to handle larger loads (especially during Replay), we performed a series of load tests. This involved sending synthetic loads to a test cluster at varying levels of traffic, both with autoscaling off and on, carefully observing resulting performance (latency, errors), and verifying autoscaling mechanics and speed.
For the load test, we used an open source benchmarking tool, wrk. This tool allows specification of parallelism level and even the exact query to send (which allows sending realistic queries). It then measures performance while sending requests as fast as possible–and as wrk is written in C++ it’s able to do so with very minimal CPU usage. However, the nodes sending load are still limited by their network throughput, so we made sure to use high network throughput instances. On AWS, we used c5n class instances to send the load, but even then, we had to run multiple instances in parallel to ensure that enough load was sent to the cluster so that it was pushed to its limit.
Finally, in evaluating the cluster size, consider that it will take some time for a high CPU condition to be measured, plus some additional time to provision instances, install the image, start the server, and add them to the load balancer. Leave a comfortable margin of time to be safe. In our case, we verified (with auto-scaling off) that the cluster could comfortably handle well over 90% CPU utilization without affecting correctness or latency. Then, when setting up auto-scaling we set a target tracking policy with CPU utilization target of 50%. We also set a minimum cluster size so that even in low-traffic times if we received a surge of traffic, the cluster could handle it comfortably without needing to wait to scale up.
Step 1c: Build your ingestion logic
Once your API server is set up to receive requests, the rest of the work is (mostly) business logic. Ultimately, you just need to ensure that incoming requests get handled appropriately. Possible tasks include:
validating requests are coming from expected customers’ Segment sources
stripping / augmenting requests
writing data to persistent storage + partitioning
It is strongly encouraged that you build validation into your API service, to ensure that you are processing data that is being expected. The simplest way to perform validation is to check the Authorization Header that is sent with each request from Segment. As mentioned in their documentation, each request will have an Authorization Header that contains a Base64 encoded string containing a secure token that you will be passing to Segment as part of the OAuth flow (see Step 2). By decoding the header, you can verify whether you have already issued this token to a customer, and additionally map the token to a customer, if you so choose.
The next recommendation is to write specific logic to handle any of the various types of calls that Segment supports (page, track, identify, group). You can do this by checking the type property on each JSON message and routing your logic accordingly.
The last recommendation is to respond to the request with an appropriate status code. See documentation for details on what each unique status code means to Segment.
Step 2: Build the OAuth flow to allow users to set up the destination
Once your API endpoint has been tested, submitted for review, and approved, the last step is to build an easy OAuth flow to make it easy for your customers to set up your integration as a destination in their Segment accounts.
Segment provides a button, which you can embed on your site/application, that handles redirecting your users to Segment and allowing them to select a source to set up for a Destination. Due to some technical complications with how ClearBrain’s app works, we ended up inspecting their source code and boiled it down to a simple redirecting of the browser to https://app.segment.com/enable, passed with the following properties as query parameters:
Query parameter
Description
integration
the unique name of your integration in Segment
settings
Base64 encoded string of {"apiKey":"<securityToken>"}
redirect_url
Base64 encoded string of the url for Segment to redirect back to
A sample url would look like:
https://app.segment.com/enable?integration=yourcompany&settings=abcdef12345&redirect_url=foobar
Notice the securityToken that is passed in as part of the base64 encoded settings query parameter. This will be a unique and secure token that you will generate (and save!) on your end and pass to Segment. Segment will then send this security token back with every request to your API endpoint, which you can use to validate the request (as mentioned in Step 1c).
Building our integration into Segment–from OAuth to API server to data ingestion, took only a couple days to implement. Thats days of work compared to the months, if not years, it would take otherwise to build and maintain a whole data infrastructure layer.
In turn, we’ve been able to focus on the statistics and machine learning components necessary for a best-in-class predictive analytics platform–one that from day one can deliver on the promise of predicting user intent on top of omni-channel, standardized, and historical data powered by Segment.
Learn more about how Clearbrain and Segment work together here.

Our annual look at how attitudes, preferences, and experiences with personalization have evolved over the past year.